Fabrice's 429CJ 71 project

7173Mustangs.com

Help Support 7173Mustangs.com:

This site may earn a commission from merchant affiliate links, including eBay, Amazon, and others.
Looks real nice, what are the ingredients for your secret sauce? I have a trunk lid and hood to do too, you've got to tell us  :whistling:
thx, that would be the cheapest fluid I ever bought for my cars: cleaning vinegar. 60 cents a quart, @Vinnie found it even cheaper 40 cents at his local supermarket :)

That's for the bite part. Then I use Rustico, which is a rust dissolver that evaporates when done. The funny part is that this expensive fluid, doesn't work as good as the cheap vinegar to remove a bit thicker than light rust. But its a perfect combo so far tested after the vinegar, as it treats the pores and leaves a thin protective layer than can be oversprayed.  If you read 2 or 3 posts back, you'll see how I did it. Basically using Duck Duct tape (<--- I did not forget!)    

That looks great!
Dank je! Ben maar op de helft maar begin wat op te lijken !

 
Last edited by a moderator:
Sunny, dry: lets get to it


Started right away by applying the nasty stuff, and not long after that I finally got to see the metal under the last of the 4 layers of paint.

As there was no more primer to isolate, this time the old paint went out without much efforts.


Cleaned with water, the outside now naked looks pretty good. Was afraid the thick bondo found would hide some ugliness, but no, there was this fat layer of bondo just to cover a weld that wasn't grinded enough, go figure...

So I did the welding of the 2 holes found yesterday right away and could mark the metal work as done! Yeah! :)


Aside this small dent, where I've welded on the lower part and where the holes of the antennas were, there should be not much bondo required next week.


Time to sand the sides smooth and remove the dust.


Even if metal looks good, its amazing how much dirt/residues are trapped into the small scratches. So used thinner a couple of time till the rag was no longer dirty. Blew all with air one last time and prepped the juice.


The once rusty dirty deck lid was looking good again!


The joy was short term... somehow this epoxy primer has a funny smel, and before i knew it got at least 6 kamikases on the surface. The joys of outside spraying :)

Its no biggy tho, I need to light sand it next week to receive the next filler primer layer, sand the bondo etc... But after so much dirty work, I would have loved to see a clean result for at least a few minutes, dam bugs! :)


The sun was going down, the deck lid in garage so I couldn't start much. Saw this poor little guy looking at me and gave it some love for the last 1/2 hour before I've called it a day.

Looking back at this deck lid job, I've learned a few things, like the bubbles present on the black paint that I thought to be rust underneath popping up were simply the old top coat reacting slowly to the layers bellow. As the car has plenty of these, it's very good news regarding the overall body condition (tho there will be surprises i'm sure). If there are 4 layers everywhere, metal should be pretty ok. I also know I will reuse this chemical, I wasn't expecting it to affect/melt the old paint that well, especially on the inside where you practically can't use mechanical tools because of the complex shape. For the next candidates, I know that I will apply a large amount of it, pack into plastic so it doesn't dry and let it rest at least a nite before do anything.

Glad I did this deck lid before the hood, should save me lots of work.... we'll see that soon.

To be continued

 
Last edited by a moderator:
As usual great work you are doing and will look forward to how you tackle your hood.

Oh and I completely understand the bugs in the paint. Even when mixing paint I have all sorts of bugs come from nowhere

I will definitely be hiring a spray booth for the final paint!

 
Oh man. Looking great. Sorry about the visitor. Everyone wants a ride in a mustang ya?

 
@Wide-body71

Yes that must be it! Tho I think the funny smell of this epoxy might also play a role.

Weekend!

Probably one of the last nice day of the year.

So first gave some attention to the 73, let it run, prolly annoyed at bit my neighbourgs with a few nice high revs with my loud freeflow exhaust and it was time to go play with water outside.


As last week epoxy layer was really dry and hard, next was to go fix the surface problems here and there..

And so the good looking decklid started look ugly again. :)


Finally done what I should have done before: injected a good quantity of epoxy inside. Because there was no tape this time, lets just say, I know I will do this right after the de-rust when I'll do the hood.

Because I do not like thick layers of bondo, I've sanded and brought back to a minimum the layers. Had to repeat on some places twice to get it where I wanted it to be. I don't know for sure, but I think I've used not even 10% of what the previous guy placed on.


While wet sanding the inside, also brought a layer of sealer. I know this can be as messy as bringing kit around a bath tub, so taped first, applied and thinned it with my fingers. Tape out, wet sanded further more while waiting it would be paint ready and clean/dried everything. The sides full of epoxy in between and from the inside were looking too good and decided not to add sealer there.

Ready for the next step.


Sprayed the filler primer, and aside a few details on the front lower left side, I don't think I'll need do much aside wet sand it.


As I want the most visible part being flawless, spend time prep the surface, and ensured the bondo layer would be super thin. At least that was the plan.


(top left) The top, with its 2 ancients holes badly grinded right after spraying it last week.

Its all gone, even in garage with white light, I could not see anything wrong, the fine water sanding did its magic.

Was very happy how it turned out and even more knowing I will not need do much aside water sanding on it tomorrow.

As I will not paint the car here, That's when I really miss to have space.... where will I store this baby meanwhile??

 
@73pony, I don't know if its art, but I know for sure its freakin lots of work if you want something nice out of a 50 year old sheetmetal!

Not in the mood to do some body work,


Started the day by trying another candy I bought for the intake. As I will never use a carburator again, I know from my cleveland with a similar hoffy intake that a little open spacer does very good with an EFI.


Blinded by so much bling bling I was in the mood again :) So went back to the deck lid and injected the color inside on the now dry epoxy. Once the paint was dry, injected the wax. This german wax comes with a very handy long thin tube with a nozzle with 4 holes, it literaly goes everywhere. All places treated on my 73 never ever showed rust again after this treatment.

Meanwhile redid the corner as I wasn't pleased with a curve after tested with the extension.


And then it was once more the water game. It was sunny and light was ideal to spot every detail on the surface.

The surface was now as smooth and silky as a lady's bottom!


May be hard to see on the top picts, but there were 2 little cavities I could see while moving bits. So continued water sanding grid 600 in the regions. Water and sun do not lie. A few moments later, white round spots left overs confirmed the flaws.


On the 4 or 5 details I've fixed like this, one was just too deep, tho, we speak may 0.05 mm here. But I would not like see anything on the final paint, so primed again. The inside is paint ready. Next week, i'll water sand it again, its 1/2 hour work.


The deck lid now practically ready for paint, the next logical candidates were the extensions that i've used while busy checking the alignments on the deck lid. They were out of the car waiting in their box and they went first in a detergent bath. Got a first clue on the car history. Once cleaned up in the inside, one was green inside while the other greyish had some green, but more of an overspray.

Brought on both a layer of that nasty paint remover and let it work for 15 minutes...


I was able to remove a bunch of the paint on the first pass, so continued focus on that one while the other received a second layer.


At some point got one totally paint free, and I wish there was only one extension! One down, one to go!


Sun went meanwhile dark red but continued till I would get that thing totally cleared.

Unlike the other, this one was having some bondo and once under a good light, it's clear there is a story behind. As I've seen some bondo on the rusty tailpanel near the light, its clear the car got a kiss at some point. I'll probably know more once I'll replace the floor and tailpanel...

Another productive weekend passed. Glad that deck lid is done.

To be continued...

 
Last edited by a moderator:
You been busy again! Did you inject the color inside using the tube with nozzle as well? Or did you just spray as far as you could?
I need be busy again and again if I ever want to see this car put back together...

The wax that is important was sprayed with the nozzle.

For the color base coat I've borrowed a spray I have from my 73. The 71 will get a slightly different dark green. As the epoxy primer I've poured inside is yellowish/orange, I wanted to spray as far as I could inside. The overspray with the right color will later on correct the color and blend with this layer. The paint on itself as no protection value, its purely for my eyes. As once back on the car, unless you'd twist your neck to look up, nobody would ever see it. Totally overkill :)

 
Weekend again!

Today, weather was a record. Never ever was the temperature that high for this time of the year over here: 26c.


As its expected that all returns to normal (cold) within 3 or 4 days, I've decided go "cook" the hood today, as it's not the kind of work you want to do when it's cold.

Thought about all kinds of constructions to rock it, so the liquid goes everywhere and remembered our old picknic table, in a not brilliant state, it could not get worse and turned out to be the perfect help.

So started by removing the hood and label/pack every parts/bolts for later..

Bit of bad luck, one bolt of the latch "bar/retainer" broke. No time to loose on that one for now. Todo++.


First had to degrease a lot. Tape doesn't stick on grease. Partly because I've oiled in the past so it would not rust further and also because beneath the ram-air plenum was a bunch of greasy dirt had accumulated over the years.. As it's a ram air hood, the scoops leave massive holes that need be closed, so mixed duct tape and plastic to ensure all would be water tight. First on the top, then same story repeated on the inside. So many big holes to close, it turned out it was actually much more efficient and less leak prone to keep it on that side.

So filled it with 4 liters of cleaning vinegar, a big glass of concentrated rust dissover, few liter of water and the shaking/rocking started. The table turned out be super handy, not to high or too low. Up down, left , right, front back... repeat. repeat.

After a while, every muscles in me started complain...


In between sessions, handled the scoops with paint remover, and let the chemicals do the job for me. Somehow the top coats reacted on only one. So removed the now soft top coat with a scrapper, and reaplied a second time. 2 hours or so later, the old paint was finally reacting everywhere. I know now thx to this test, that I will sand a bit the top coat on the top side of the hood first before applying the chemicals. The inside, just like the deck lid, was painted like a pig. They simply open the hood and sprayed black. No sanding, no primer, no masking. On multiple places the original Ivy green paint is visible where parts were removed. Its big strange, as for such an expensive "art work" at the time, you'd expect the paint job was done with great care. But no, the scoops were on when they sprayed and underneath they are bare zamac. Probably NOS replaced when this paint job was done.

The good news is that I should not have lots of work to remove the paint on the inside later on.


Because there wasn't enough mess already, i've also cleaned up the plenum that was really dirty, full of greasy dirt. It doesn't look much, but it took lots of efforts to get it clean.


On top, when I started, down left, after 1 hour, the rust started get loose and there was already lots of deposits accumulating. The solution was still clear.

Down right, a pict taken just 1/2 hour ago, the fluid has been busy more than 8 hours, and the solution is now saturated.

I've just shaken/rocked it a few times again and leaved it to cook for the night.

Pretty sure I will not have any problems to fall asleep tonite. :)

 
Last edited by a moderator:
Fabrice, great to see a Master Chef at work once again! Vinnie, are you paying attention?

Wish shipping expenses weren’t so insane. The hood on my red 71 Mach1 is in such bad shape it needs to be cooked by a professional such as yourself for at least a couple of weeks. It needs a lot of special sauces!! [emoji3]

Unseasonably warm weather seems to be going on everywhere. As I told you earlier I was headed to New Orleans to take some antiques to my daughter that she had found in SC. Ended up going to a vintage plane and air show put on by the WW II Museum and it was so hot we finally had to leave. (Is it really October)?

Getting to be an old monkey Fabrice, can’t take the heat like I used to!

Sent from my iPhone using Tapatalk

 
I could smell your cooking all the way overhere in amsterdam!

And most certainly am I paying attention but I’m not ready yet as I couldn’t find my picnic table in my garage ;-) also I have not settled on the method I wanna use. I’m still leaning towards a full dip but that could require between 150-250 litres of vinegar (or watered down rustyco). But also the inside had been sprayed and I may have to sand that first, somehow...

Anyway, with only 4 litres, are you sure every bit of inside surface is now cleaned of rust?

 
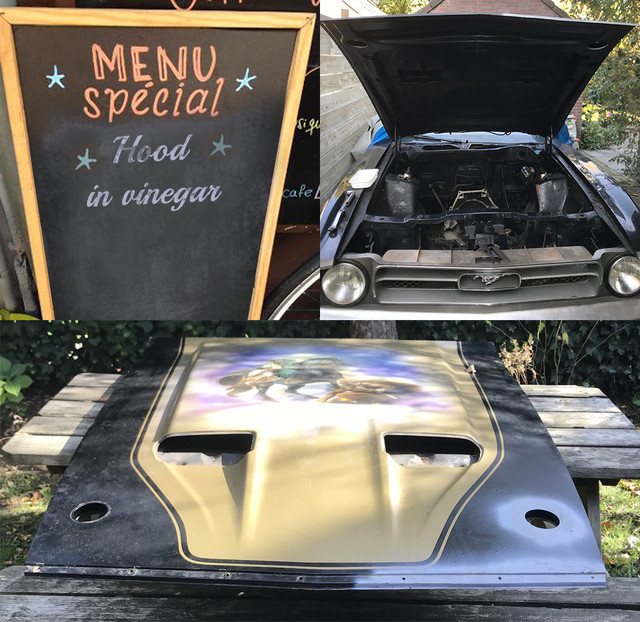
Totally rusty (me and my muscles) from yesterday

As the fluid stayed the whole night and morning more on the front,

started today with a liquid refresh, a final moving session and let it work +-2 hours on the back while I took a breakfast and prep for another messy dirty day...


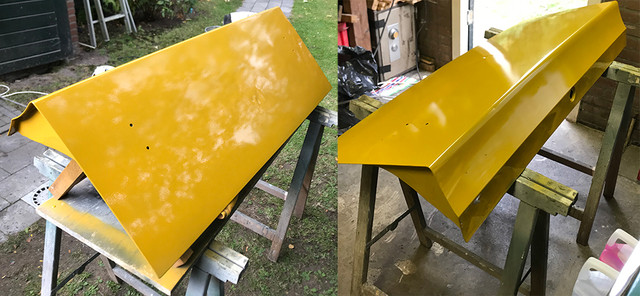
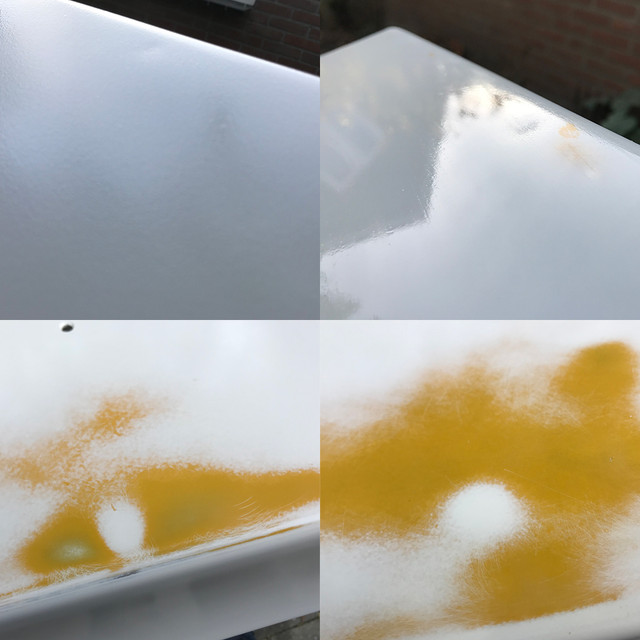
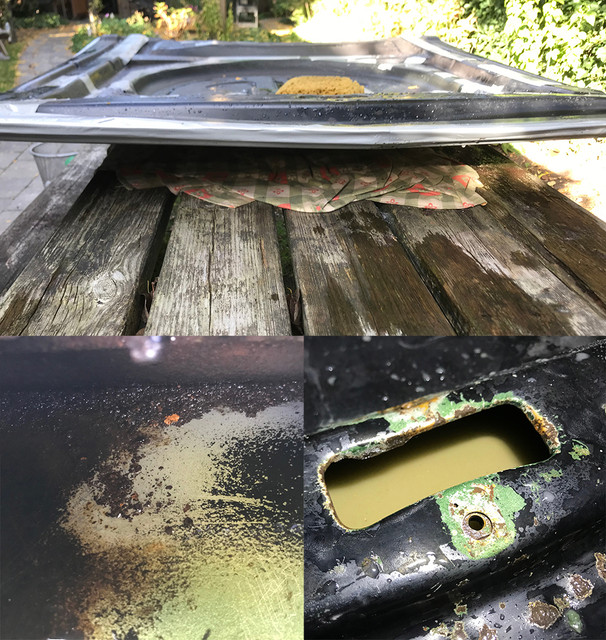
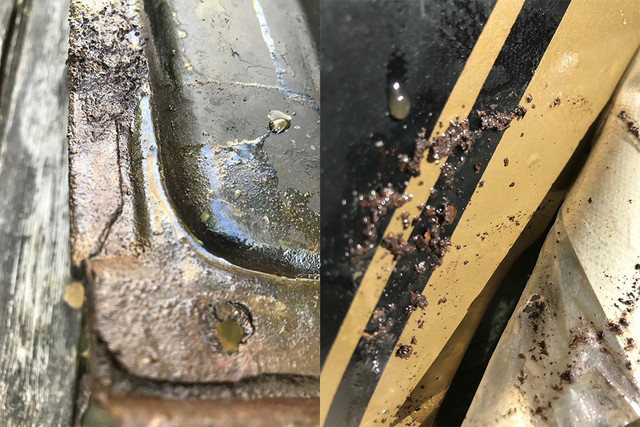
The bright orange rust was gone! Yeah!

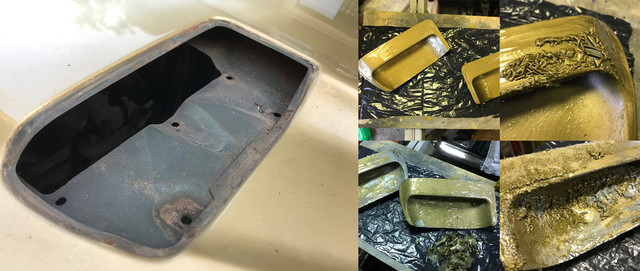
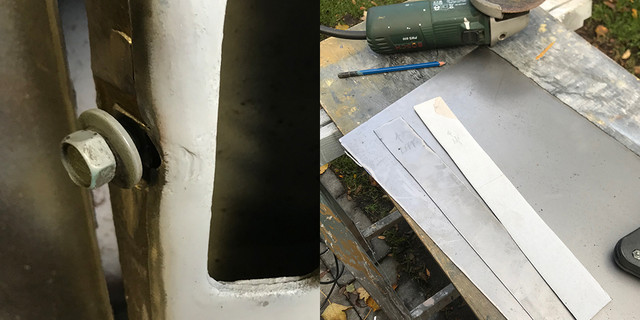
On the left, its the liquid over staturated that drips deep orange colored saturated juice, on the left, from one of the holes of the bracket, rust is gone too, the black are deposits.


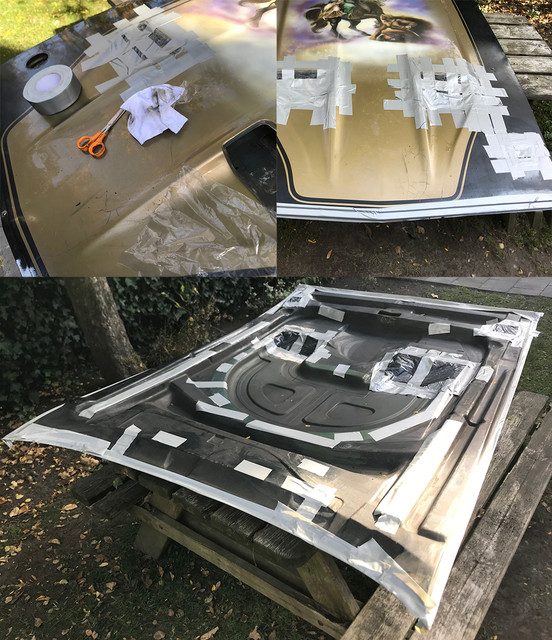
After breakfast, time for "purée de rust". Everywhere underneath the tape there was a thick layer of dissolved muddy rust and tons of rust debris.


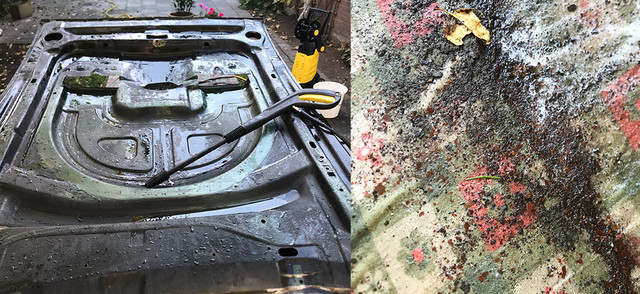
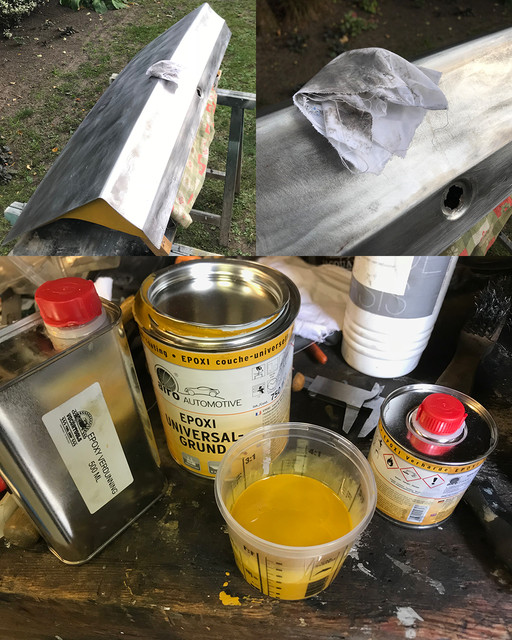
Time to make even more mess and use high presssure water inside with kicken soap to balance the ph. Man, the sh...t that came out of it. On the right, the rag I used on the table to prevent dents on the front side and ease the manip. Cleaned it up each pressure session, and when it was full, lifted the hood to empty it. Each time a massive amount of debris came out.


Eventually, the yellow brownish water that kept coming out turned clear and when there was no more debris to be found on the rag. Next step was the drying session to prevent flash rust.

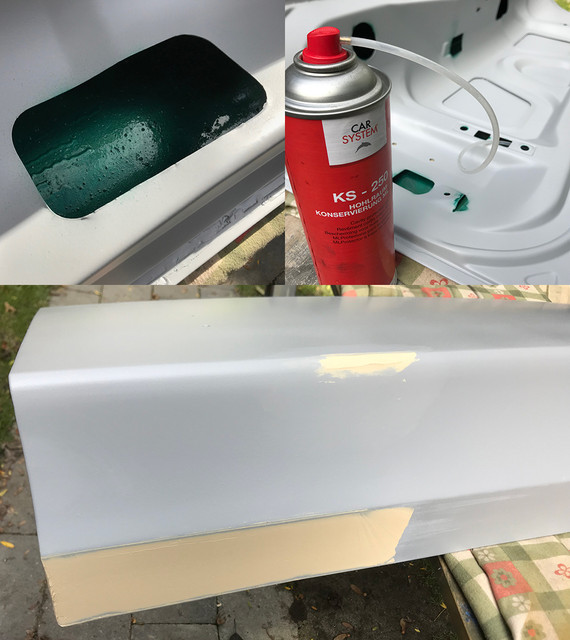
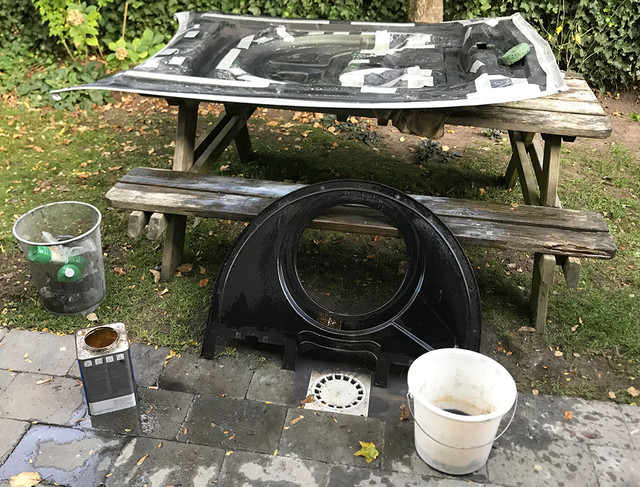
First with air, then with heat gun. Once dry, injected/sprayed pure rustico from the top. Let it rest 15, and heat gunned dry.


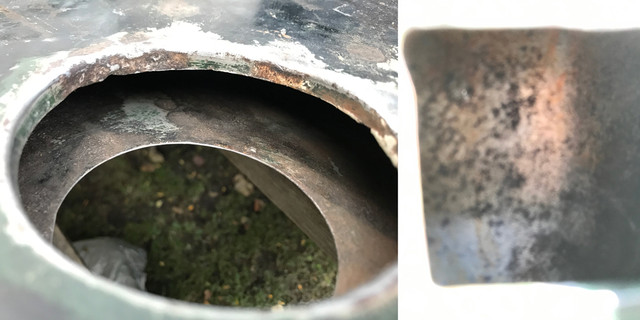
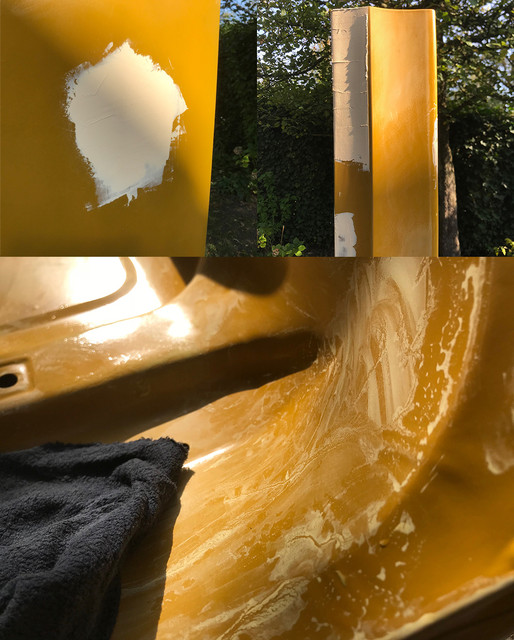
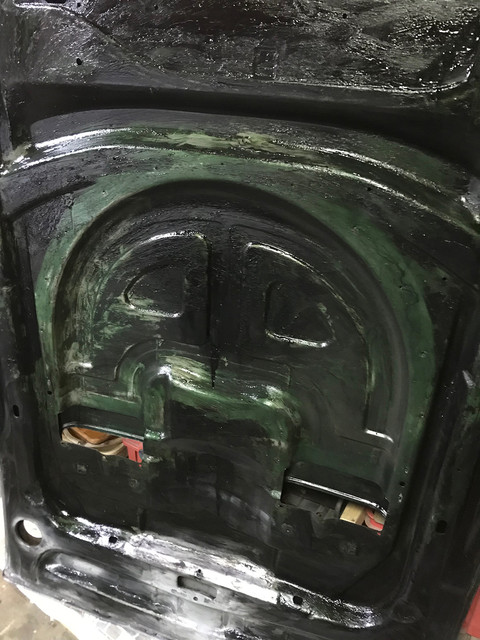
Somehow the pict are rose/orange colored, as I've tried make them in full sun, but the rust inside is gone. On the left, the rust left over is on top, it was under the tape, and did not get or very little exposure to the liquid, on the right, somehow burned image, due to high contrast, thats the inside at the bracket hole. the pink is an optic issue, it's grey metal color.


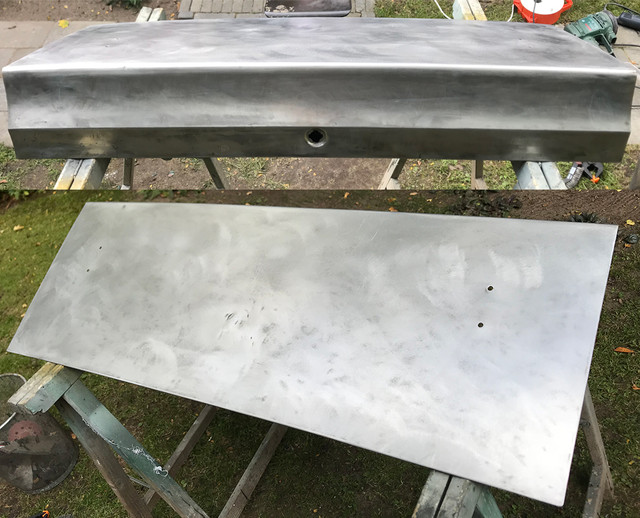
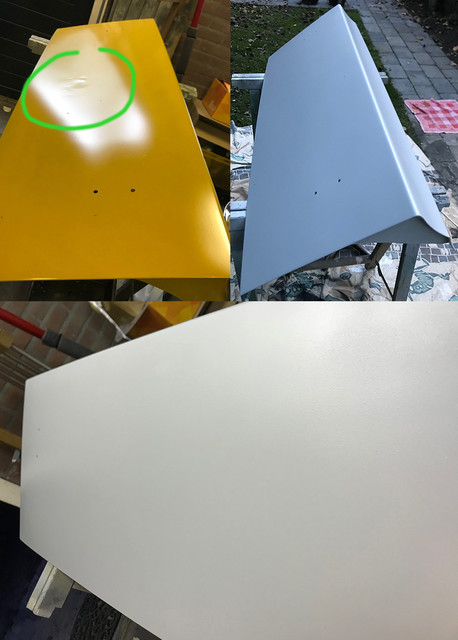
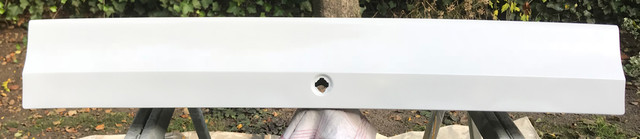
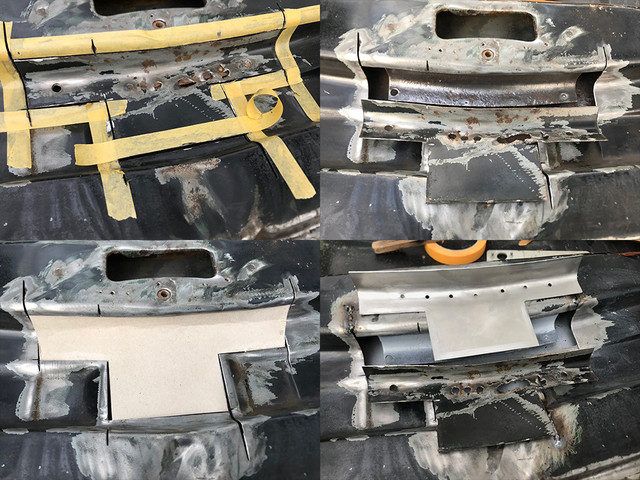
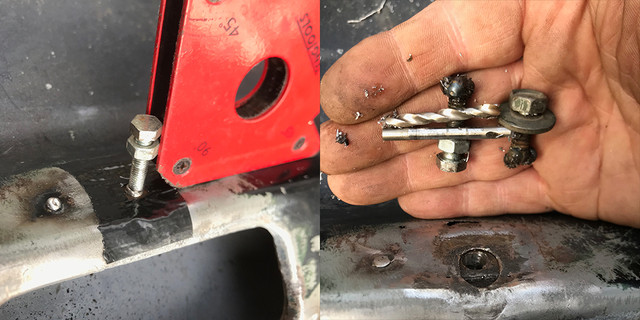
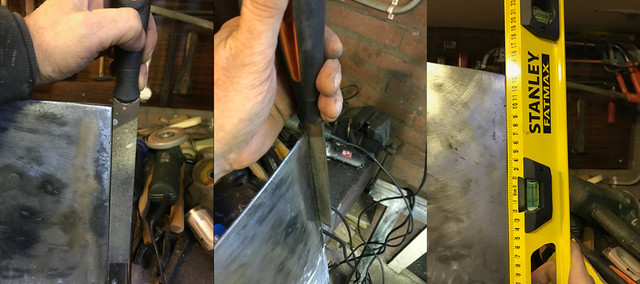
Once all was dry, started work on the outside, exposing the rust holes that I will be handling next week.

On this pict, you can see the inside at the latch with more real colours, there too, no more rust.


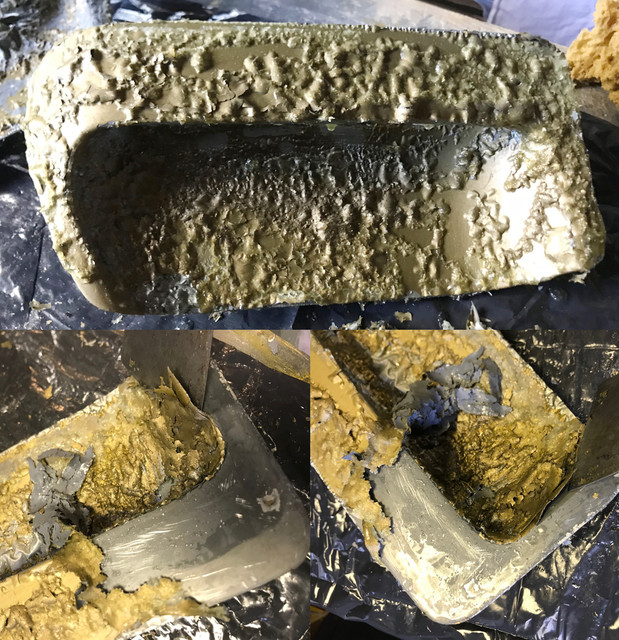
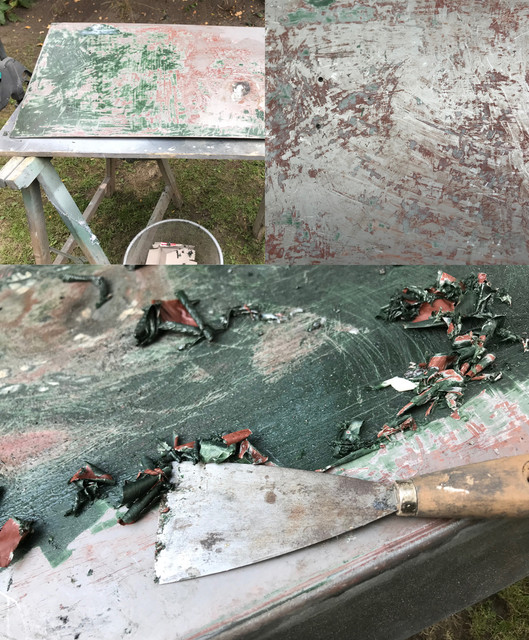
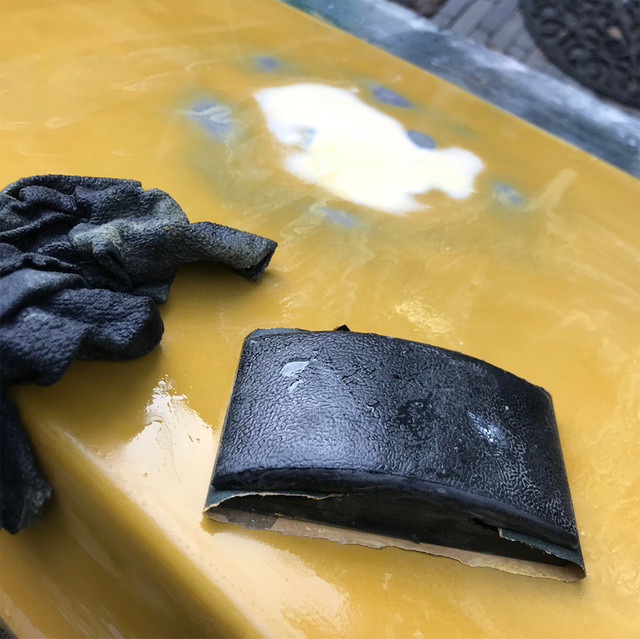
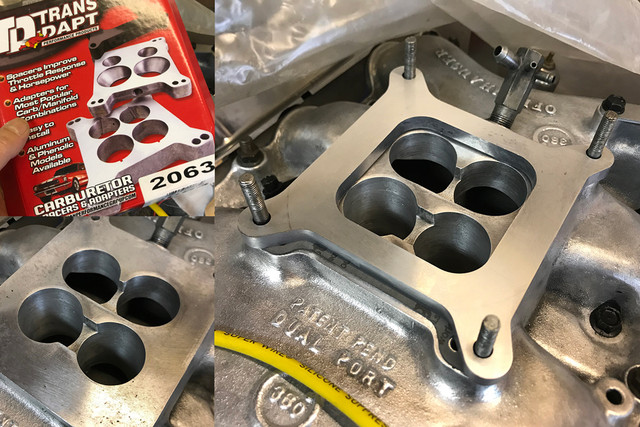
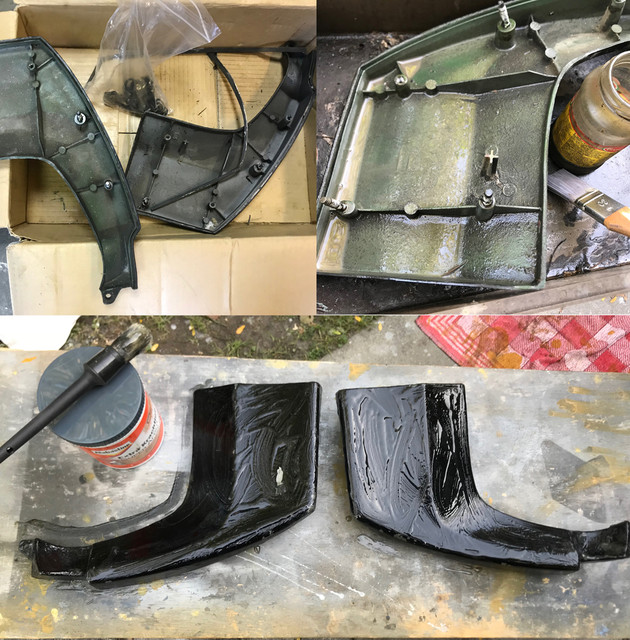
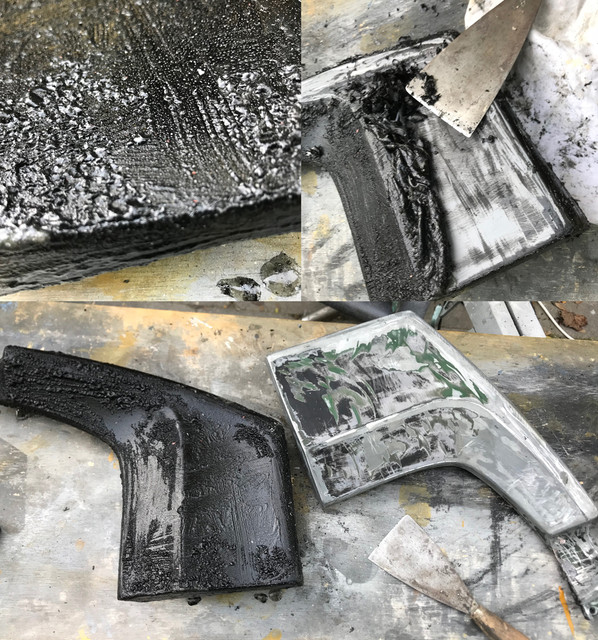
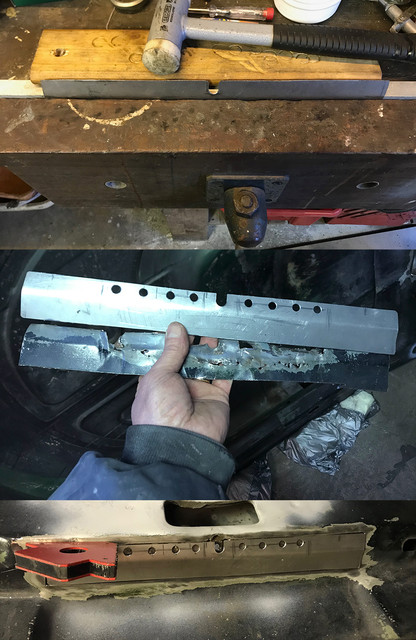
In between, it was time for a "scoop pudding", on top, the paint remover that stayed 24 hours applied. With zero force, the paint was peeling off the scoops.


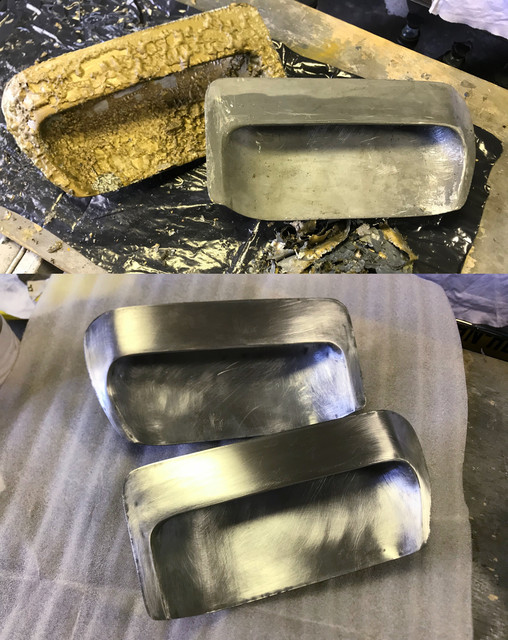
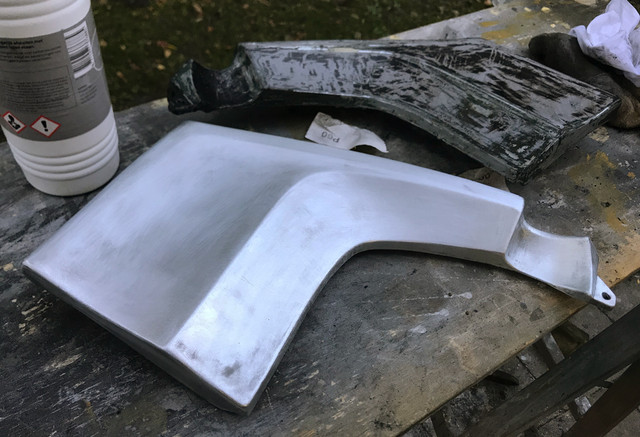
I think it took 20 minutes to get them both bare shiny. I've sanded not to be bling bling, but to provide a good base for the soon to be sprayed epoxy primer.

@Vinnie

4 liter + more than 1/2 the rustico concentrate bottle is more than agressive enough and done it twice. It could be done more but I wasn't planning to get up at nite to change fluid in the dark :)

Keep in mind, filling the hood is one, but then lifting/rocking it to get a wave inside that cleans up is heavy (at least for a small guy like me). I was having like 10 liters of fluid inside, it was alreally hard on my muscles, the hood is after all not the lightest.

A full dip would surely be better, but you still need to rince it, and trust me, that's really messy.

Found out (too late grrr) what I should have done, may I derust another one one day...

I should have placed the hood in huge plastic bags. Like they use for beds. tape them tight, heat gunned the plastic to fit the hood tight and only leave one hole at the latch. Say a mix of what I did and your full dip plan. I regretted not have this idea before... I would then have been able to fill it up to the neck...

Ah well, from what I saw, the most important, the side under the top of the hood is rust free, and only the most top part of the inside where I was filling could have used bit more. I need to weld there, so depending on what I will cut (and see inside), I may rebath it on that part after welding (using heat gunned plastic), but as of now, from what i saw, I don't think I will need to do it. Once protected (injection of epoxy and wax), rust will take many years before come back.

[and I may have to sand that first, somehow...]

You can forget it. No way to access anything. The spray they did, will wash off with the solution as it was likely sprayed on rust and is only near of big holes where the gun nozzle could go.

All with all, it was a very messy weekend and spend last 2 hours cleaning up everything, but glad its done now.

I will probably have to build some kind of platform for it, to move it in and out of the garage safely and without too much efforts, as placing it back in the garage alone was not that easy...

My "to be primed & painted box" has grown a lot in past weeks. So unless its raining or too cold, I might let the paint gun speak next weekend unless I return to the 73 for a change...

To be continued

@secluff

[Wish shipping expenses weren’t so insane.]

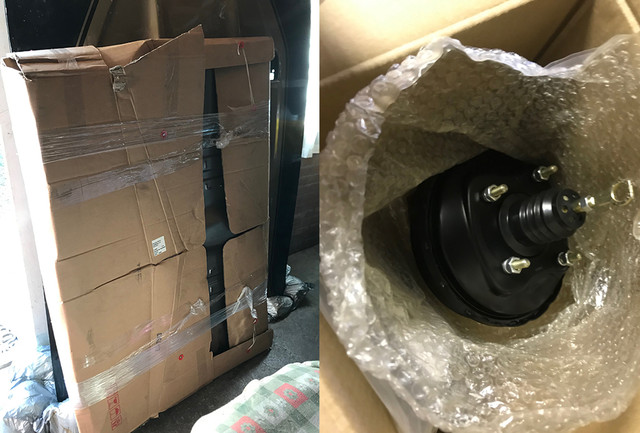
Yeah, well I have found a floor pan in Belgium, at least 800 euros cheaper than via regular USA shops, but even so 60 or 100 euros were added to let it come here. Mine is totally gone, nothing to be saved. They also import hoods, but all with all, it still would be here for 700/750 dollars. Its still lots of money vs a messy weekend. Once rust is gone, you still need to prime and paint, new or old. Plus the original hood, is made of 1mm thick metal, not the repops I saw.

[The hood on my red 71 Mach1 is in such bad shape it needs to be cooked]

Well, I bet at least 50% of the 7173 hoods have same prob. As its either considered too expensive for a repro or too messy to "cook". Most will simply close it and forget about it :)

 
Last edited by a moderator:
Found out (too late grrr) what I should have done, may I derust another one one day...

I should have placed the hood in huge plastic bags. Like they use for beds. tape them tight, heat gunned the plastic to fit the hood tight and only leave one hole at the latch. Say a mix of what I did and your full dip plan. I regretted not have this idea before... I would then have been able to fill it up to the neck...

Ah well, from what I saw, the most important, the side under the top of the hood is rust free, and only the most top part of the inside where I was filling could have used bit more. I need to weld there, so depending on what I will cut (and see inside), I may rebath it on that part after welding (using heat gunned plastic), but as of now, from what i saw, I don't think I will need to do it. Once protected (injection of epoxy and wax), rust will take many years before come back.
You did well! Looks like hard work for sure. The idea of a huge plastic bag is interesting but a quick search for them only got me wraps for pallet cargo which is a bit too small and too big at the same time... What about kling wrap? (dutch: huishoud folie)

The back of the top sheet metal is most important and definitely doable like you did. I'm still trying to think of ways to also treat the back/inside of the inner sheet of my hood. However, cleaning it in a dip of cheap stuff could be done but I'm starting to doubt if there is any way of getting primer everywhere. Maybe I shouldn't worry about the inner sheet to much and get it over with...

Need to buy a pump first now coz I can't let water run everywhere :-/ Saving for the  engine rebuild is taking long this way grrrrrr

 
Last edited by a moderator:
Weekend!

Temperature went down a lot past week, garden full of brown leaves.

but today was dry and in the sun not that cold. A typical autumn shiny day.


Received my floor pan and a replacement for my brake booster. As both are beyond repair, I needed them new.

Very happy to have the floor pan at an almost US price, thanks to a guy in Belgium importing sheet metal and parts in large quantities per container.

So after a short inspection of these goodies, I got to work and started with the hood welding...


The rust did her eating work near the latch lock area, lots of small holes where at spot welds.

Underneath the regular metal, there is a second much stronger piece of metal.

So started by drilling the spotwelds out, better said, what was left of them and defined a larger region that I could cut and redo without creating a too chalenging repair regarding metal forming...

Took another pizza box (I save these now:) ) and replicated the shape onto a new piece of metal. To mimic the spotwelds, I've drilled holes before start give the wanted shape. It doesn't look complex, but there are angles at play and I was happy to have the old piece to guide me to be as near as possible.

I didn't do too bad I think, as all went in place without much hamerring.


Bits unlucky, while busy my torch nozzle started to slow down the wire feed, and had to stop many times to fix the same issue.

I was mad at me for not having replacements in house. And of course all the pro shops where i can buy these are closed tomorrow grrr...

The welding on itself, was going slow because of that and the difference in metal thickness that did not help much. It was on some places, just like on the deck lid very hard to not go thru, which I did in several cases. For one inch all goes ok and the next bath, poof you go thru.

The sun went down early and there was not enough light to see, I'll have to finish this patch tomorrow.

I've located 3 places where a patch is required and will need to spot weld at the very end. The patches should be more easy comparied to this one, as they have no structural function unlike this one that really needs to be strong.

I hope I'll be able to do this tomorrow as I really want to inject protection in there and start prime before temp is too low...


Back on the hood, lost 2 hours on that broken lock latch bolt.. Got some equivalent of w40 penetrating oil whole week on it, heat, hammering, pliers from the inside, welded bolts, nuts and as last resort went to drilling and finally got the hole free again. Gotcha you [insert bad word] thing!

Seriously, do not use non-Ford bolts unless they are of good/similar quality and use grease no matter what on these bolts, there is serious water condensing issue in that area and when its stuck, man its really stuck..

Will need to redo the threads this week..


Rest of the afternoon was about making patches, grinding, welding, grinding, extra weld points here and there....

Done? Nope, that would be nice, but discovered same prob on the other side of the latch after a good brush wheel pass. And I still have to patch on the other side where the hood molding rests on the right side... Then a final grinding with a new disc which I also forgot to buy last week too.

In short: do protect your hoods in the inside! Don't let them get to that point! Its a real pita to fix as that thing isn't a small item that you can move around just like that.

All with all, done not half what I was planning to do... grrr

To be continued

 
Last edited by a moderator:
Usually happy when its mustang time, but was so busy at work this week, ordered what I needed way too late and the slim chance of receiving my shopping list this morning disappeared. (no weld torche nozzle, grinding discs, weld zinc etc... checkmate!)

Not to mention it was cold and rainy..


But hey its weekend, no way I'm gonna let some precious mustang time go away doing zip, I need do at least something! So as I got this nice surprise to discover more rust holes on the other side of the latch. I've let my cutting tool speak, even Mr Chisel helped as well.

There was this thread this week about rotary tools and Dremel being a toy. Well, for the 2 small cuts I've used the toy kuz the big bad boy I use normally would have added 1 inch of extra welding fun on by being too big. Toy or not, it did the job, tho took two tiny discs to get it done. Looking at strong and small alternatives atm... air or electric. Tips welcome.


Lost 2 hours last weekend to remove the broken bolt, so redid the thread as M8 metric and used a hood lock bolt from my long gone T-bird 91 that were metrics too. Stays Ford and I know its made for the job. Meanwhile the pizzabox was back to take a print of the hole and helped cut my patch out of a 1mm plate.


The patch at this location turned out to be more tricky to make than it looked. Some twist in the shape, tiny fold of few degrees, a good looking cut for the bolt location, prep the holes to mimic spot welds, took longer than expected to get the patch "flush". (not overlapping or going under, with just a tiny space in between)

Then it was really cold, so called it a day. Glad I did that one today after all.

 
Last edited by a moderator:
Blocked by the lack of welding supplies, went looking at the other known misery place on the front driver side of the hood.


Looking bits better once blank, I knew some massage needed be done. The lip at the end displaying 2 long holes.

Just like the deck lid, this ancient paint job done by I bet the same pig had massive lack of preparation, painted over original paint with zero sanding somewhere and primed a few inches further. On this corner of the hood, this brave man, fixed a dent and applied Bondo on bare metal and used that as primer. Knowing now the care used for the entire car paint, its clear why there are bubbles under the black paint. Unfortunately at this location, the water found its way thru the porous Bondo and did its damage.


Mad to not be able to weld, looking at these holes made my blood boil! :)

So I've drilled my torch head with the smallest bit I had and managed to free the guide enough to fix the prob causing my wire to get either too slow or stuck. Big smile on my face, I was back in business and welded the corner. I did not have any abrasive discs in house, but got a brand new metal file!

In fact, In the end, as the challenge here is to get the lip with new metal aligned to the rest, working with it was actually much better! More a sculpture thingy than the usual grinding.


Took some elbow oil to file everything. But eventually using only hand tools, managed to get that corner done!

I should have my abrasive disks by tomorrow, so one light pass should be enough to prep the metal.

With a layer of epoxy + filler primer, it should be just fine.

I'll finish the welding of my patch on the other side next week and I should finally be able to begin to make that hood look better vs make it more ugly every time I touch it! :)

Amazing the time that goes into these things!

To be continued...

 
Using a file to create a 100% cube... First task in precision engineering tech. school. I remember it well :)

Your hood is starting to come along nicely, glad you managed to fix your welder!

 
A one pict post for once...


Welded the patch inside, injected some epoxy/rust converter and applied a thick layer of paint remover that will work while I'm sleeping.

With both the drying rust eater/epoxy inside and the paint remover on the outside being busy doing their things, the air in the garage became of the kind I started feel very funky.

This stuff is so friendly I could see some smoky vapours on the surface. So decided it might be wise to go do something somewhere else :)

@Vinnie

Indeed, the file did just fine. Everything can be done by hand, glad it was just the hood corner and not a cube tho :)

 
Back
Top