Rear seat floor plans

7173Mustangs.com

Help Support 7173Mustangs.com:

This site may earn a commission from merchant affiliate links, including eBay, Amazon, and others.
Joined
Jul 19, 2011
Messages
4,829
Reaction score
19
Location
Pittsburgh, PA
My Car
1973 Mach 1 Q code 4 speed
1973 Chevelle 454 SS
2005 Magnum RT
2008 Colorado
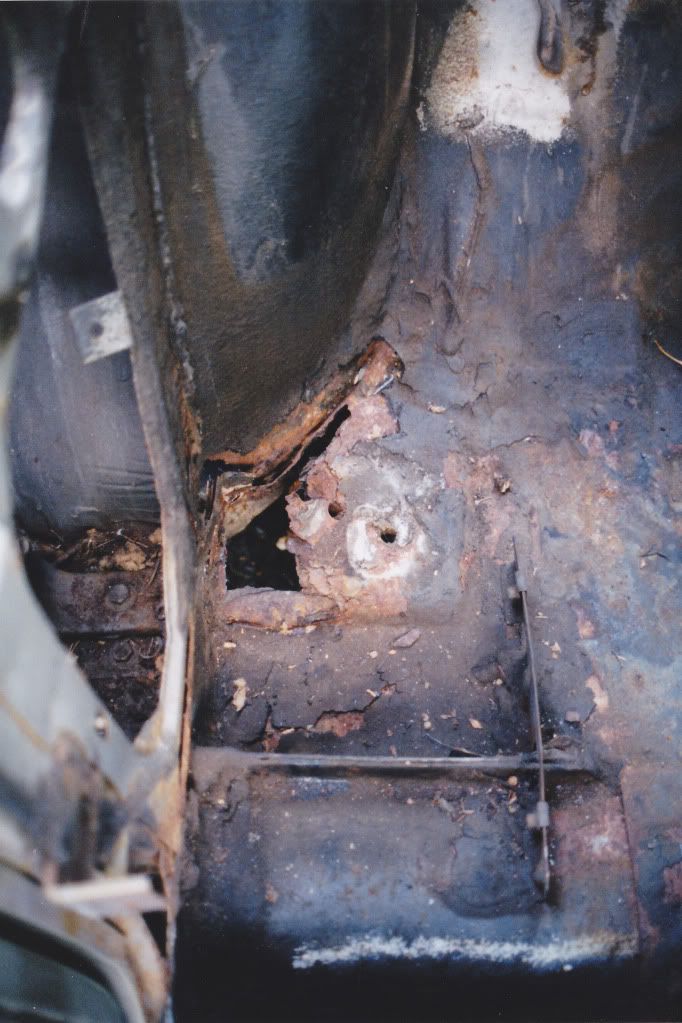
When I bought this car a large portion of the floor had already been removed but it came with the replacement panels thrown into the deal.

Qcode351mach told me I needed to get the floor done first before the trunk, so I went out this morning and fished removing the old floor section up to the wall on the passenger side and realized there is a 1.75in dropoff thats 5in x 4in that is not in the new panel. It's strait across. Know I know I don't need a 4 x 5 void under the seat and in the vicinity of the front bolt for the rear spring. So do I have the right panel and need to form it? Or is this for some other year car? I took a picture of the drivers side for comparison. :huh:

DSCN1319.JPGDSCN1320.JPGDSCN1321.JPGDSCN1322.JPGDSCN1323.JPG

 
Hey, you going incognito on us? Changed the user name :D

Probably best for Q to weigh in here. I'm thinking that that area is not repro'd yet for our years at least, and is probably a heavier gauge metal (torque boxes?).

At any rate, seeing this kind of repair is great motivation to those of us newbie body types that have sheet metal repair to do:exclamation: Thanks. ;)

 
Mark did you get the pictures I sent you on Fri ?

If so look at the ribbing

Red floor shows what it should look like

The floor under the rear seat should go from rocker to rocker.

That part you have almost looks like it was cut out of a car at one time or it is for another car, not mustang

There are 65 - 68 rear pans

There are no 71 - 3 pans
Looks like there is going to be some fabricating in my future. Since there are no bolt holes that are in that area, I may make a seperate plate in the drop off and cut and weld the panel I have (except for not having the drop off bent into it, it's a pretty good fit). I'll get the rear seat out of my other car to see if it drops into that spot, but I'm guessing it does.

 
Hey, you going incognito on us? Changed the user name :D
We can do that? Whoa, I picked my name before I had bought a Mach 1 so I went with the 65 identity. Hmm, maybe I should change mine to something more fitting like Don9Stang. :p

 
Hey, you going incognito on us? Changed the user name :D
We can do that? Whoa, I picked my name before I had bought a Mach 1 so I went with the 65 identity. Hmm, maybe I should change mine to something more fitting like Don9Stang. :p
Only if you treat the big guy very well! :p

 
Mark did you get the pictures I sent you on Fri ?

If so look at the ribbing

Red floor shows what it should look like

The floor under the rear seat should go from rocker to rocker.

That part you have almost looks like it was cut out of a car at one time or it is for another car, not mustang

There are 65 - 68 rear pans

There are no 71 - 3 pans
Looks like there is going to be some fabricating in my future. Since there are no bolt holes that are in that area, I may make a seperate plate in the drop off and cut and weld the panel I have (except for not having the drop off bent into it, it's a pretty good fit). I'll get the rear seat out of my other car to see if it drops into that spot, but I'm guessing it does.
M..you are going to have to make the patch where the rear seat belt bolts to. ....It has to be made with the same thickness or thicker metal as the original piece NOTHING thinner ! Not sure about the floor pan piece you have but as don said..doesn't look correct .The 3 options are to use what you have..fabricate a piece..or modify the 65-68. Any way you do it.. it's easier & a better repair to do the section where the belts attach first.

Ok look at the 1st picture ..you can see I made the patch out of 3 seperate pieces of metal ..The piece where the seat belt bolts to is 1..the piece in front is 2 & piece to the side is 3..The second picture shows after the welds are ground down & smoothed out..Hope this helps.

100_3065.JPG

100_3064.JPG

 
Last edited by a moderator:
Mark did you get the pictures I sent you on Fri ?

If so look at the ribbing

Red floor shows what it should look like

The floor under the rear seat should go from rocker to rocker.

That part you have almost looks like it was cut out of a car at one time or it is for another car, not mustang

There are 65 - 68 rear pans

There are no 71 - 3 pans
Looks like there is going to be some fabricating in my future. Since there are no bolt holes that are in that area, I may make a seperate plate in the drop off and cut and weld the panel I have (except for not having the drop off bent into it, it's a pretty good fit). I'll get the rear seat out of my other car to see if it drops into that spot, but I'm guessing it does.
M..you are going to have to make the patch where the rear seat belt bolts to. I will take some pictures later to show how I did mine....It has to be made with the same thickness or thicker metal as the original piece NOTHING thinner ! Not sure about the floor pan piece you have but as don said..doesn't look correct .The 3 options are to use what you have..fabricate a piece..or modify the 65-68. Any way you do it it's easier & a better repair to do the section where the belts attach first.
Naturally the metal I removed was pretty thin. The replacement panel is I'm thinking about 18ga. Let me know how thick I should use for the patch your talking about and I'll go get some metal. We have tin smiths at work that have been known to do a government job from time to time. :p Thanks
I don't remember what gauge it was, best bet ,take a micrometer & measure the thickness of the frame rail lip..Match it to that & you will be good to go .

 
OK metal is same thickness. Do I need to drill and spot weld also? Or just lap weld the ouside edges?. Looks like I shouldn't but 1 extra piece of metal after I use the panel I have and cut it for the seatbelt area. Thanks Don

 
Mark, also under the patch panel you must have these.

Either save the old ones or I have new ones

Don

Item #STD173

65-73 SEAT BELT ANCHOR PLATE

Replacement seat belt anchor plate.

 
OK metal is same thickness. Do I need to drill and spot weld also? Or just lap weld the ouside edges?. Looks like I shouldn't but 1 extra piece of metal after I use the panel I have and cut it for the seatbelt area. Thanks Don
Yes you need a few spot welds, look at the first picture carefully & you can see where I have a few plug welds..The outside edges can be lap welded although I choose to butt weld
Cool, we can do this!!:)

 
Mark, also under the patch panel you must have these.

Either save the old ones or I have new ones

Don

Item #STD173

65-73 SEAT BELT ANCHOR PLATE

Replacement seat belt anchor plate.
My anchor plates are still there welded to the heavier metal from the bottom. All I removed was the thin floorpan metal that was over top of it. I'm not replacing the thicker metal that goes from the frame to the rockerpanel and holds the plate. Here's a picture of what I'm covering. Thanks

DSCN1325.JPG

 
Mark, also under the patch panel you must have these.

Either save the old ones or I have new ones

Don

Item #STD173

65-73 SEAT BELT ANCHOR PLATE

Replacement seat belt anchor plate.
My anchor plates are still there welded to the heavier metal from the bottom. All I removed was the thin floorpan metal that was over top of it. I'm not replacing the thicker metal that goes from the frame to the rockerpanel and holds the plate. Here's a picture of what I'm covering. Thanks
M..If your not replacing the heavy anchor plates you can use the same thickness as the floor pan metal..I thought you had to replace the heavier metal
It just happens to be that the replacement panels I have are heavy gauge metal. Near as I can tell 1/16 thick. Should be good for another 40 years. Question. Does this change the repairs you recommend I'm looking just at panel wise?
Kinda since mine was shot under the floor pan..so I had to reconstruct that..Since your not you could try & form what ever metal your using to the shape of the seat belt heavy metal mount using some heat to form the metal..Don't go crazy with the heat a little at a time & never get it red hot ! Or if it's easier to do it in pieces than do it that way..It's not going to be a big deal since your heavy metal reinforcements are still intact & in essence your just laying a piece of metal on top to fill in close off the openings

Here's a pic of what mine looked like.

MUSTANGBEFORE_0007_NEW.jpg


Last edited by a moderator:
Back
Top