What did you do to your car today?

7173Mustangs.com

Help Support 7173Mustangs.com:

This site may earn a commission from merchant affiliate links, including eBay, Amazon, and others.
Thank you, Sir! Your generosity with the "confidence" pics of yours gave me the shove I needed to get those big meats (I'd considered only going with 275s, since Totalled's car looks so good with 'em).

I noticed the distortion and will check on that, for sure! I haven't actually had 'em locked down before. Let me ask: are properly adjusted hook locks designed to help keep the hood down, or just keep it from popping open (with very little tension at all)? Mine never worked when I bought it (thanks to Hillbilly Engineering), so I haven't had anything to compare.
Eric twist locks are for looks
Thanks, Don! I'll be letting them out a bit, then. ::thumb::

FWIW though - the hood locks have actually only been engaged briefly for initial installation and these pictures. Since it's not on the road yet, I haven't actually been latching the hood and/or locks when I slip it back into the garage at night.
Eric,

About your locks. If you haven't read this thread so far, do so as it tells a good story on the locks.

http://www.7173mustangs.com/thread-crack-on-hood-paint-near-hood-locks

The locks are mainly there to prevent the hood from blowing open if the main center hood latch fails for any reason, and the hood unexpectantly flys open.The sheet metal around the lock that is pulling down can mean that the lock shaft needs adjusting,or the lower baseplate needs adjusting up higher, or when you installed the circular locks on your hood, you over tightened the baseplates underneath them, and is crimping the lock too much into the sheet metal.

Regards your wheels again, if you ever decide you don't like the 295's on the back, and you want to move down to 275's, bare in mind that you can't put 275 tires on a 10 inch rim. The specs say 7.5 to 9.5 inches.

275 tires are very suitable to 8 inch rims. Keep that in mind.

Thanks E,

Greg.:)

 
Appreciate it, Greg! You guys always lookin' out for me. ::beer::

I just hope there's enough adjustability left in the hood lock shafts.

I don't think I'll be dropping down to 275s - only as an absolute last resort if the tires hit too much... mostly, because I love the deep-dish look of the 15x10s. I don't know that 275s would look all that much skinnier than the 295s... but on 15x8s, the deep-dish look would definitely suffer a little.

 
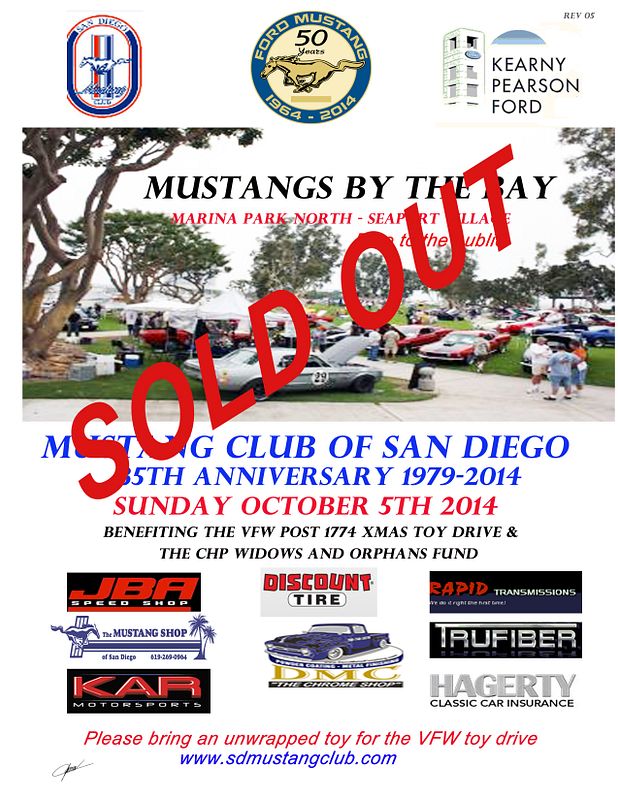
Put a new license plate frame on my 91, and found that my club's annual show here in SD is OFFICIALLY COMPLETELY SOLD OUT!

(Which means we met our 350 car limit, so there will be ZERO day of show entries allowed this year)

2014MBTBSoldOutFlyer.jpg


I will have to get the numbers on how many 71-73's registered from our car show chairman tomorrow night at my club's monthly meeting

(since it will obviously be all about the show next week)

 
Last edited by a moderator:
Not a lot of pics lately, because I've been doing mostly stuff that's not really "picture worthy." For instance, yesterday I swapped the front calipers because despite everything being new, I was not getting a pedal whatsoever. Turns out, I'd installed them on the wrong sides - the bleeder valve openings were not at the top of the pistons, so I never could get them bled properly. It's all good now, and the pedal is quite firm. Still gotta swap out the booster, but at least it stops confidently now. ::thumb::

Today, was different. We started out realizing I'd never taken a picture with the Sport Covers Kurt hooked me up with, so that was the first order of business. They still need a proper restoration, so I put the best ones on the 'picture side' for today.

After that, I jacked up the rear end and pulled the wheels, fabricated a rock shield for the Holley fuel pump mounted near the tank out of a newer model splash shield found at the Auto Hobby Shop. I'll put up a pic of that later. Then, jacked up the front end, pulled the wheels and bored holes into the fronts of the doors for the electrics (power windows, locks, and speaker). While I was in there, installed the front fender splash shields and made sure everything was kosher before slapping on the new rims and skins.

Oh. My. Gawd. I can't believe how cool this looks. Everything clears just fine (thanks again for the "confidence pics," Austin Vert), and I hope the 5-spring pack is up to keeping the tires out of the sheet metal... I certainly hope I don't have to go down to 275s on 15x8s after this.

Today also marks one of the first times I've actually gotten everything done I've set out to do during the day, as declared to some friends on Facebook. This was a great Mustang weekend! ::thumb::

So... what'cha think?
All I can say Eric is WOW!! Your car looks fantastic! The wheels and tires just take it to a another level.:cool:
 
Thanks, Brutha! Been a long time coming, that's for sure. ;) :D

This past weekend, we finished running the rest of the wiring for all of the modern things I'm installing:

  • Autoloc Power Windows
  • Autoloc Power Locks/Keyless Entry
  • Autoloc Alarm System
  • Retrosound Model 2 stereo with 4x8s in the doors/ 6x9's in the package tray
  • MTX Terminator amp and 2 Terminator subs
  • Pyle Audio back-up camera and monitor
  • Classic Auto Air HVAC (finally got around to wiring it up)


Here's the wiring nightmare after getting everything ran:

wiring_nightmare.jpg

That was Sunday morning after running wires all day Saturday and getting grommets into the doors/A-pillars. I got pretty much everything connected, soldered, and shrink-wrapped, bundled the stereo wiring, bundled the power window circuits, and ran all power leads to the Redneck Bait-Box Fuse Block.

Still gotta make some 'jumper wires' from the 'too-short' power lock harness in the fronts of the doors to the actuators in the rear of the doors (that wad of wires hanging from the mirror), finish bundling the rest of the wiring, mount the control modules (CAA, camera/monitor interface, locks, & alarm), Ground everything, install the speakers, mount the window switches in the center console, mount the motors on the quarter-window regulators, plug-in everything and test it all.

Hopefully I can get all, or at least most of that done Saturday.

 
Last week scored on a rear tail panel and moldings from fleabay.

Yea the fun part polishing stainless trim. Spent 4hrs on my day

off I got half of one of the two stainless moldings done. This job is

not that exciting and tedious but the results are good. My back

hurts now time to clean up.

Lil at a time

Anyone who has done this will feel me!

Cheers

Paul

 
Electric fan delivered. Power Steering Pump bracket cleaned, painted and ready for install with the new pump.

10665129_10202893675518487_6066333676728878369_n.jpg

1390664_10202933428272281_2060850492646988201_n.jpg

 
After making a mess of my passenger fender while trying to weld up the antenna hole. I went to Craigslist and picked up another fender and console for a 140 bucks.( score ) I also picked up some eye candy too. A set of magnum 500. 15x7s with 245/60/15 up front and 15x8s with 255/60/15 out back.

fender 005.jpg

fender 004.jpg

wheels 009.jpg

 
Regards your wheels again, if you ever decide you don't like the 295's on the back, and you want to move down to 275's, bare in mind that you can't put 275 tires on a 10 inch rim. The specs say 7.5 to 9.5 inches.

275 tires are very suitable to 8 inch rims. Keep that in mind.

Thanks E,

Greg.:)
I've always run 275's on 10" rims, never had a prob. ::thumb::

mfynxSC.jpg


I've always run 275's on 10" rims, never had a prob. ::thumb::

Hi Brett,

Ok, i stand corrected there in a way. I said you can't put 275's on a 10 inch rim. Strictly speaking you can, as you have just shown, but the tyre boys don't recommend it really.Technically, it's no big deal i guess.When i was going for my 275's and then 295's, that was the advice given to me by the companies i was dealing with at the time. (Antique Tyres, Melbourne, and Good Year Tyres, Brisbane)

In your pic there, are those rims 10 inch?

If so, what was your backset on them? They look well tuck'd in from the fender lips.

http://www.antiquetyres.com.au/1527560-0

http://www.antiquetyres.com.au/1529550

http://www.antiquetyres.com.au/node/624

Greg.:)

 
Last edited by a moderator:
I stopped by Hubcap Heaven today - completely unplanned - and lucked out! Four 14x7" trim rings, and two 14x7"-style, deep center caps!

25gutzr.jpg


Enough to make one side completely original again. The other has the proper trim rings, but the cheap aftermarket hubcaps:

2dankwg.jpg


Classic Gone in 60 Seconds Halicki shot:

33z5nwh.jpg


9av82b.jpg


This is what I was left with (I had one Sport Wheel Cover on the car, but have the other 3 in the shed), but I realized at that moment that the two remaining 14x7" trim rings weren't quite identical at the valve stem, but are otherwise identical. Somewhere I read these might be '69 or early 1970 rings, but I need to dig up that thread again:

35k7wjc.jpg


30u2x48.jpg


Anyone in need of a complete 14x6" Sport Wheel Cover set?

2gwxo2w.jpg


-Kurt

 
Last edited by a moderator:
Drove my stand for the first time at night with the new headlights and LEDs in the dash. I must say that I am very happy with the results and am nearly blinded by the green lights when using the turn signals... Ha!

 
Drove my stand for the first time at night with the new headlights and LEDs in the dash. I must say that I am very happy with the results and am nearly blinded by the green lights when using the turn signals... Ha!
Sorry Res,

What leds did you end up settling on. Great that you've had a good result.

Greg.:)

 
I've always run 275's on 10" rims, never had a prob. ::thumb::

Hi Brett,

Ok, i stand corrected there in a way. I said you can't put 275's on a 10 inch rim. Strictly speaking you can, as you have just shown, but the tyre boys don't recommend it really.Technically, it's no big deal i guess.When i was going for my 275's and then 295's, that was the advice given to me by the companies i was dealing with at the time. (Antique Tyres, Melbourne, and Good Year Tyres, Brisbane)

In your pic there, are those rims 10 inch?

If so, what was your backset on them? They look well tuck'd in from the fender lips.

http://www.antiquetyres.com.au/1527560-0

http://www.antiquetyres.com.au/1529550

http://www.antiquetyres.com.au/node/624

Greg.:)
Hi Greg, sorry I didn't mean to sound like I was trying to contradict you, just showing that it can be done, in fact it's news to me that it's not recommended! Funny that I have a tyre that's smaller than recommended - that's a first for my because in my younger years it was the other way around, trying to jam the widest possible tyre onto standard 6" rims :)

The rim in my picture is ten inch, which were on the car when I bought it, along with 275/60-15 radial TA's. I've never measured the wheel offset but mental note to myself to do it next time I have a wheel off. I did once measure the track width though and it was a bit less than an inch above factory standard from recollection.

The TA's were a very square edged tyre so I would frequently hear scrubbing on the inner guard, so that's how far inset the rims are, but the tyres that I replaced the TA's with and also the current ones have a more rounded edge so I rarely get scrubbing anymore. I certainly wouldn't be able to squeeze 295's on these rims without tubbing the car or moving the wheel offset out by an inch each side....

Sounds pretty good Brett,

Yeah, i started out with Avenger 275/60's on an 8 inch rim with 4.5 backset, and got wheel arch lip rubbing probs. I then moved up to Avenger 295/50's on a 10 inch rim with a 5 inch backset, and still get the occasional lip rub. The only thing that's saved my arse is going to five leaf springs to strictly minimise the rubbing. I've done no mods to the tubs. Avengers have rounded shoulders too which as you say helps to minimise rubbing. I can't be sure, but i reckon if i had a 5.5 inch baskset on the tens, that would be the sweet spot for no inner and outer rub issues.

Cheers mate,

Greg.:)

 
Finally took on my interior. Not done yet but I am close. Still have to hook down the dash properly and recover the rear seat. Once done that will be it for the inside. So to list all that is now done. I recovered both front seats, restored a decent center console, added center console to car, put sound mat in the whole front of the car and put in new carpet. It was about a 6-8 hour activity and for a guy that had two neck disks fused 3 months ago it was not as much fun as it could be. Laying over leaning on head under the dash does not work like it used to. I did not have time to get rid of the green stripes in the interior but I will some day. I also included a picture of my car at work because this is meant to be my daily driver.

inside mat installed.jpg

interior almost done.jpg

at work.jpg

 
Last edited by a moderator:
Hey Ralph,

That interior is coming along very nicely indeed. You must be proud of the effort you're putting into the car and seeing it coming up so well. Keep up the good work sir!

Sorry to hear about your neck situation. From what you say, you've put in a valiant effort, doing all that work at once. Take care when you're on the job, so you won't further injure yourself mate.

Lookin' good Ralph!

Greg.:)

 
Last edited by a moderator:
Today we changed out the 40 plus year old valve stem seals on the cylinder heads, they were a total mess of broken plastic pieces. No more annoying smoke on start up, oh yeah.

 
Austin, mine is a daily driver so I have no choice. I like to ride my motorcycle the 15 miles to work when I want to and not when I have to. This car is now road worthy and it will get 150-200 miles a week until death do we part.

I hurt my neck playing soccer. I am 48 and playing with 20 year olds. Gets a little physical at times and I got taken out while doing a header and that was all she wrote.

 
Last edited by a moderator:
Back
Top