Fabrice's 429CJ 71 project

7173Mustangs.com

Help Support 7173Mustangs.com:

This site may earn a commission from merchant affiliate links, including eBay, Amazon, and others.
@Randy

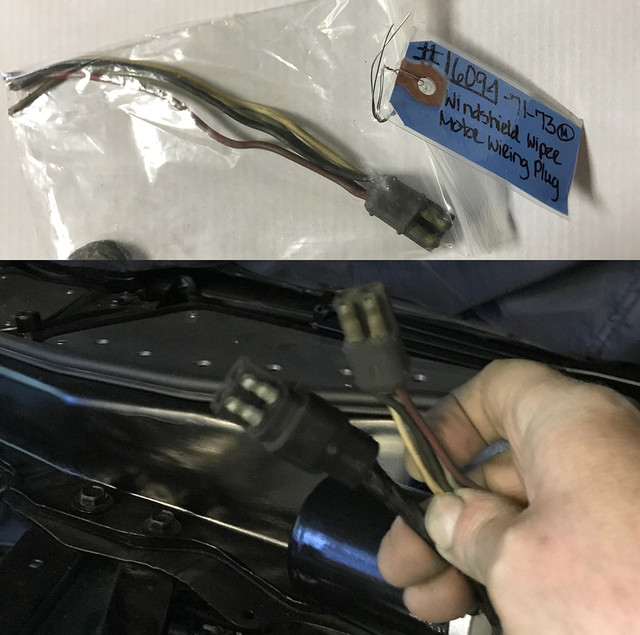
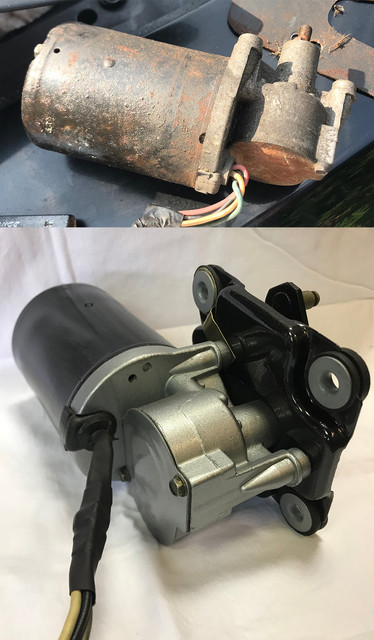
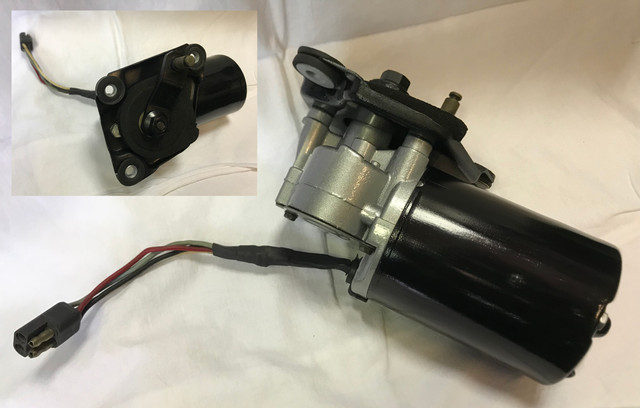
[Might be available as 4 pin trailer connectors, but I can cobble up a mating pair for you. ...]

Excellent, I'll PM you once I'll know more on the extend of the damage on the other side of the firewall.

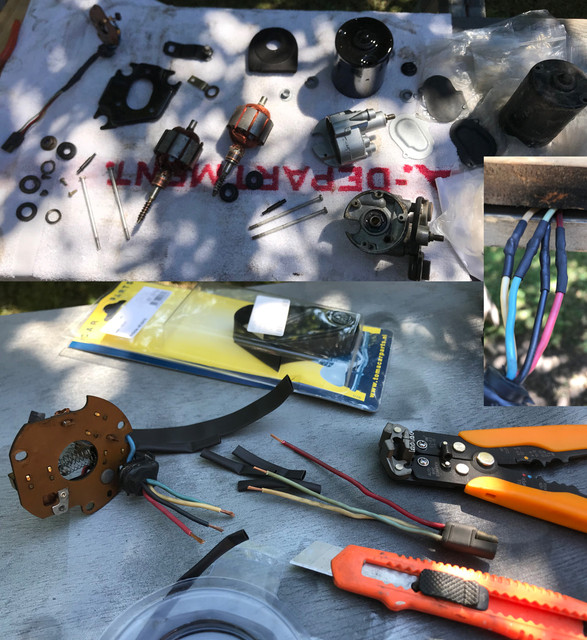
[if you find a used wiper motor, it should come with a good connector on it.]

I'm gonna search for car/parts of similar years and see if I can locate some over here.

@David

[i did not read every line of the post]

You don't like my english??? :)

[i do not have the stud you need Sorry.]

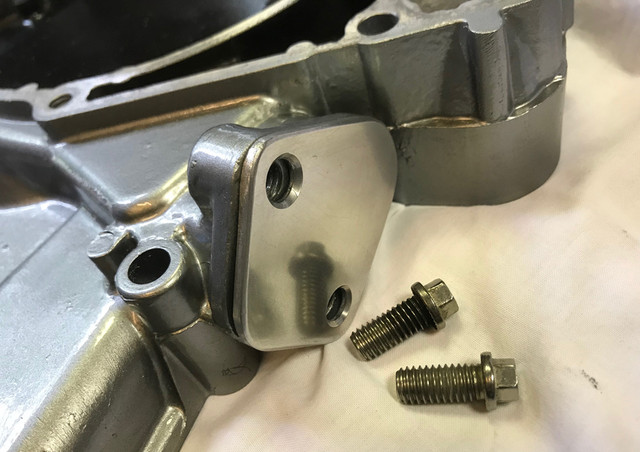
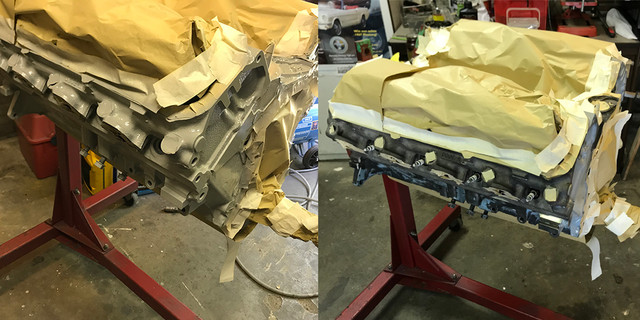
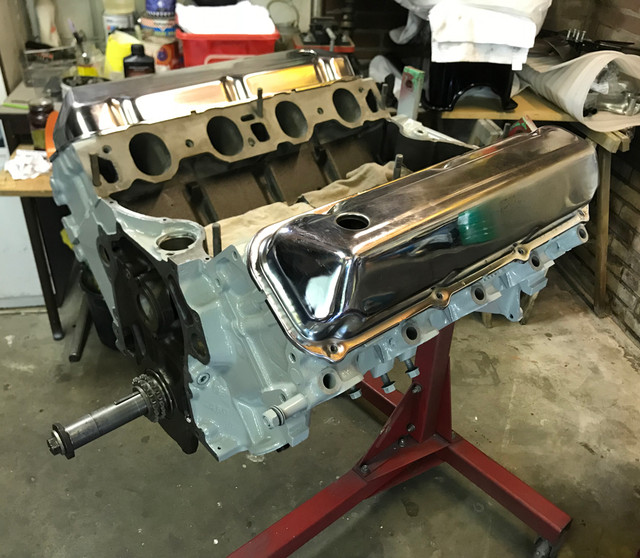
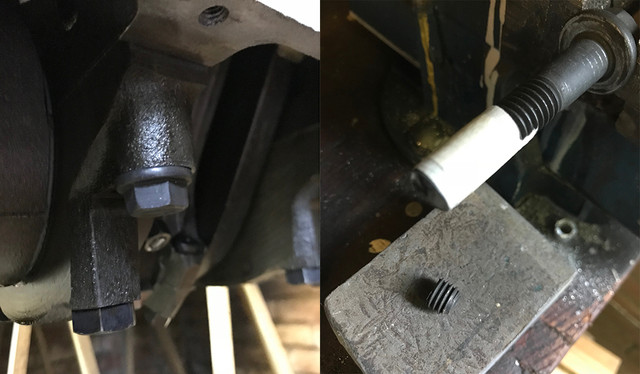
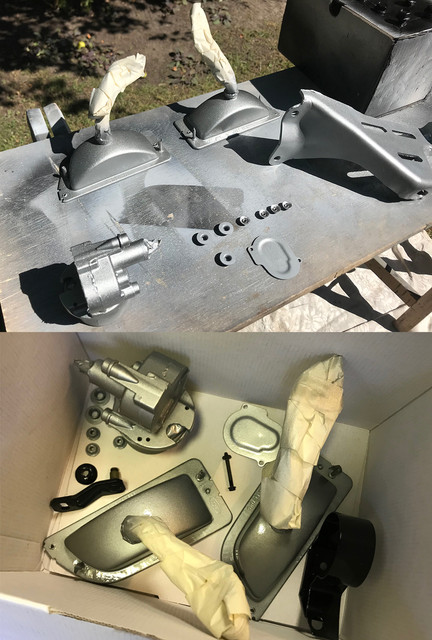
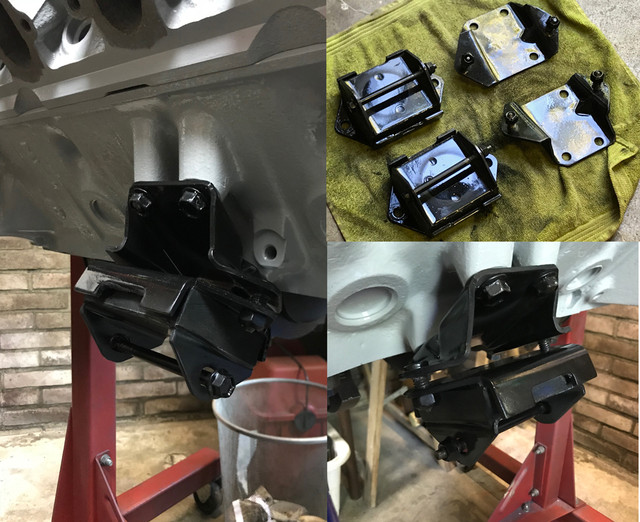
No problem, Steve managed to locate the missing nut and 3 others specific lock nuts for the engine mount to block. On my side, found back important & missing hardware that were stored with non engine related parts and others were still on the block. As It was protected under a thick air tight layers of plastic, I did not know they were there. Cross my fingers, but looks like I may have all the necessary for the engine now.

Still after that power window bezel tho.

@Steve

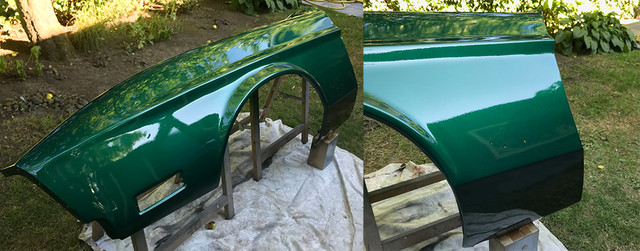
[Dark Ivy Green Metallic]

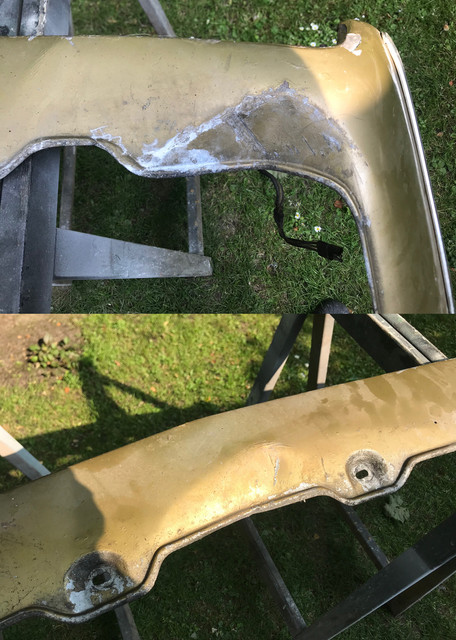
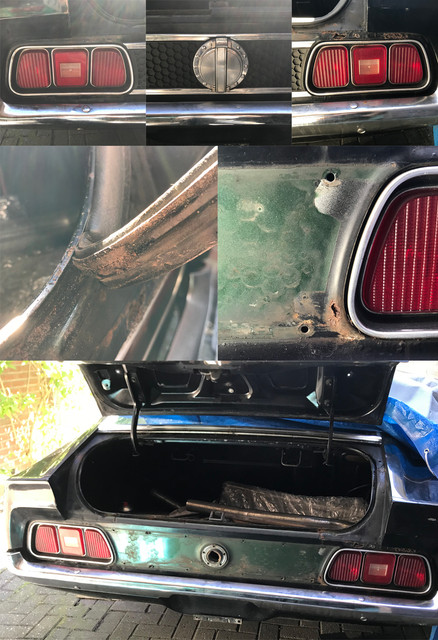
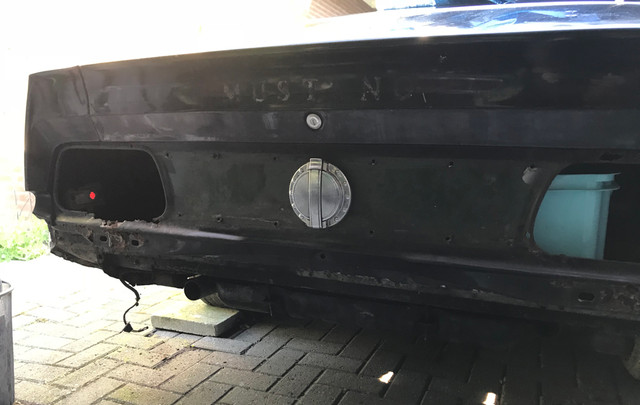
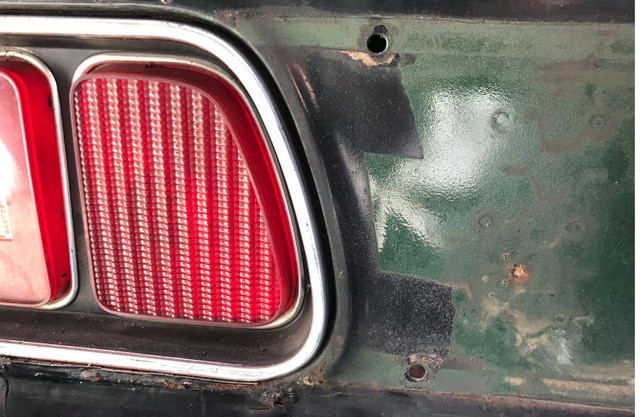
That's correct, the car has been repainted once in black with a mix of gold stripes, and lower body in grey. After removing parts, I was able to see the green.

From what I saw, the black paint job was not done to the bone, so I expect to find back the original layer of green at many places.

Build sheet : The original carpet is still inside, so may be i'll find it at some point. I also got a pile of papers of all kinds with the car that I still need to sort and go thru, may be it's there. So far, the car seams to have nice options for a 71. Its a deluxe interior, power disc brakes, rear defrost, radio+speakers, has power windows front and quarters, has the convenience group, map light is there. got the 3 gauges. Console is there but missing the ashtray and the clock. Its having the fold down rear seat, and only missing one of the trunk door handles. It has the thin trim mid body and it looks like the car was AC too, as the console as the airco panel and the glove box is not deep. Tho, i'm not 100% sure yet if these were installed out of necessity or if it was indeed an AC car.

I'll go thru the interior once I have freed enough space to store it while busy on the body. From a quick inspection, floor looks solid on exception of driver front seat cup where water has entered the car and never left.

 
Fresh and rain, so plan to paint the engine with car outside garage was a no go.

The front fender of the 73 needed one last bit of protection on the inside, so started by doing that.

My bucket of "to be finished" parts starting to fill up, time to clear a few from the todo.


Inspected the alternator, and while my rebuild kit isn't there yet, decided to open it today so I could prep the parts and paint these with the others waiting...


The casing bolts/studs were bit soft, so carefully pick a screwdriver that fitted just right, ticked them bit and got play in all of them. One head got bit damaged in the process, and regretted I did not order another more expensive kit where these were in. Nobody but me will ever noticed its having a small dent, but yeah, it's there now :)


Once open, its clear we're talking about a 45 years old piece of equipment. dirt and corrosion not being best electric friends, I knew it will not just be about painting the casing...

After cleaning the casing, I was wondering if it was good idea to open it. Now I know it was the right thing to do.


While clearing parts from the casing and looking at the way the brushes are inplace, I started wonder how I would place them back. Till i saw a hole was closed. Ment for a paperclip or similar to lock the brushes before reassemble the shaft. Once I saw it on the outside, drilled the glue and freed the hole.


First all parts went for a degrease/cleaning session. By the look of it, i'm pretty sure there were some loss in generated power. Lots of debris, brush dust and poor connections. For the rest, this original Autolite unit seams to be robust and after a good massage it should be good for another 45 years!


The stator, was corroded and dirty. It looks like it was dipped into some clear coat, but rust started on the most exposed parts. Wheel brushed them very carefully and protected most coil wires while busy. Later on, as sun and temperature were back, they received a semi gloss black treatment.


The rotor was really corroded and because wires are soldered to some elements, I could not use mechanical wheel, so gave it a massage by hand. Reused the soon to be replaced bearing to be able to rotate while brushing. Took a while but eventually got it back to state near to its original glory. Carefully masked the exposed to the stator parts and a matt black will now ensure they are protected.


Later in the day, together with other parts, the previously cleaned up and primed casing received a layer of paint. I took care to mask the ground pole on casing and locations like where the bearing or shaft will return.


Late in the afternoon, all parts were under a layer of clear coat.

Pretty pleased with the results, pity I will need to wait for that kit to arrive before I can put it back together in 2 or 3 weeks.

For tomorrow the weatherman said, I should be able to clear coat these on the other side and get to paint that block, and even may be spray my 73 fender too!

 
@NOT A T5,

thx!

The weather guy was wrong! This sunday turned out as a miserable day. rain rain and rain.

Bye bye paint plans...

The kind of days I'm really missing a big place to work properly...

Plan B it is!

As I can't do much without either set the car or go myself work outside. I went back to this poor wiper motor...


Started by testing this 1972 motor, and while it was working. there were noises I didn't like... lots of them.

As I simply hate paint on misery, just like for my 73 one, I had to open it to first verify its internals and help where possible.

I'll know soon the reason of the noises...


Plan B: checkmate!

I have to find a new motor. I could glue, fix and spend hours on it, but its not worth it and I would still have this electrical connector prob later on. So gonna go hunt for a replacement...

Plan C


As I won't use a carburator again, the EFI using a fuel pump at the rear of the car, I needed make a block-off plate for the mechanical pump on the chain cover.

So did that... Even found back some unused shiny exhaust bolts with same thread and matching the depth that will do just fine.

and then the rain got the spirit out of me...

To be continued.

 
Last edited by a moderator:
Doing some great work there including lots of pictures as well

Can understand the frustrations working outside with the weather as my vehicle is outside all the time

Pity about the wiper motor, I have two and cleaned/inspected both however one doesn't work so probably bad wire/connection but internals looked fine

If you don't find one let me know and you can have the spare one for cost of postage

 
Fabrice, that is a wiper motor for a 68-74 Econoline van. No wonder your cowl looked so bad where the wiper motor mounted and the wire harness was so butchered. Guess like we had discussed before, with no Mustang parts stores on every corner, repairs are made with what ever you can find!  Just sorta strange that of all things...a Ford van motor!? What do you feel are the chances of finding a 71-73 wiper motor in your area? If not the offer by OzCoupe72 sounds promising. The wire harness that plugs into the wiper motor is part of the 14290 wire harness. I may have one but will not be able to check until I get to SC for vacation and check my "Stash"!

Will PM you to give you an  update on our hardware project.     :)

 
@Don C

Sometimes I wonder if they promised sun just so people watch them and be happy.

@OzCoupe72

[Doing some great work there including lots of pictures as well]

Thank you. I like texts balanced with illustrations. Its bit more work to publish than using raw images, but I hope it can help someone at some point to do similar.

About your offer --> PM in your box!

@Secluff

[that is a wiper motor for a 68-74 Econoline van.]

I've added the pict with serial just for you! I knew you wouldn't resist to find out the origin of that baby! :)

Well, know that this 68-74 econoline wiper is the exact duplicate of the mustang one. I've compared it with the 73 and all is the same.

The internals were also similar to the 73 as far as I can remember.

It should have done the job ok. The mounting bracket I've found is also a perfect match.

[No wonder your cowl looked so bad where the wiper motor mounted and the wire harness was so butchered.]

My theory on this, is that the wiper motor failed at some point and was tossed together with its mounting bracket.

Then a replacement motor was found but the "econoline" bracket was no match for the mach 1.

The original bracket gone, the guy did that metal plate to fix the problem . If you noticed on the cowl vent pict from past posts. It was drilled once, and after a try

it was probably necessary to move it further left to properly operate, so another 3 holes were drilled... giving a grand total of 9 holes.

The electrics were butchered later on by the same dude who scrambled the engine & c6 parts.

 
Fabrice i have thoroughly enjoyed following your progress. Just wish i was a bit more mechanically minded and had more confidence to tackle some of the jobs you have tackled.

I think we Europeans should club together and get midlife over here to sort out everyones wiring and then do a Europen tour

 
Fabrice i have thoroughly enjoyed following your progress. Just wish i was a bit more mechanically minded and had more confidence to tackle some of the jobs you have tackled.

I think we Europeans should club together and get midlife over here to sort out everyone's wiring and then do a European tour
I can do that....so long as you're willing to pay for my travel and wine tab.
There are a number of Europeans on this site. I seriously hope we can sort this out

 
::beer:: ::beer::

Oh...you don't know how much I enjoy fine wines...

 
Its weekend again and weather is fantastic. Mustang time! :)

First finished my EFI install on my 73, a detail, but needed make a shield for the unlikely but possible event a sharp stone could do some damage...

Needed fix my wife's Mini power window that was making loads of noise.

Once done, went back to the 71...


As I'm waiting for parts for my alternator & wiper motor, I couldn't work on these, but some parts started previously were waiting for a clear coat

on the other side.


As the car body needs a serious dose of care, Most of the bolts being rusted, I've a started a while back, and sprayed

penetrating oil a few times on each and every bolts/studs I could see. Payed off, as none of the parts that I've removed this weekend resisted, all went smooth.

So I've started by removing the front valance. Fender almost free too, but having a serious lack of space, I can afford having fenders laying around, so they'll be handled in time once some of the premium space will be available.

Not very corroded, thanks to a layer of gold paint onto the original grey, but there were 2 major dents on it.


Learned from an old body guy in France, who showed me how metal remembers its original shape if you help it a bit,

I've applied force on strategic location of the dents using soft wood.


By the end of the massage, 90% of the dents were gone. And once more, this great guy was right. I will continue dolly them, but only when the metal will be clean. Right now, hammering it would damage more than fix.


Aside the major dents, some weird and bad repairs were done, so gonna have to find some deep enough dolly to hammer that back in shape, to restore that lip. Here too, I will do this once the paint will be off.


Removed the aluminium trims, both in good state, and aside this broken lens that I need to replace, I should have a nice valance in a few weekends from now.


Just like the other rusty stuffs I've already posted on, the lights are undergoing a treatment...


As I will handle the grill/supports later on when I'll do the engine bay, I've continued to remove other parts in the back. Discovering more original green in the process.

Such a pity to see so much misery...


Misery continues in the trunk. Removing the harness, bumper, rear valance...


After few hours, the once "ok" looking rear is now looking very sad. Gonna inspect in detail what I can form, and what I really need to order.

When you see 500 added for shipment for a pressed sheet of metal for a trunk floor, you start wonder how complex it would be to form the metal...

so I'm gonna pay a visit to some local metal shops to see what are my options. I know I'll need at least the tailpanel.


I know some of you seek to replicate the way how this was done, so here's a detail of the original green paint with the black to match the tail honeycomb.


As weather was ideal for paint, it was also time to go one with the block. So spend a long moment to mask it so I could spray a few layers of this 2K grey Ford.

Faster said than done, as the block got some oil to protect it and the tape did not really agree to stick on oil. So needed do lots of local extra degreasing.


By the end the day, the block was done, and even dry to the touch on most of it.

Funny on this pict the grey looks blue :)

All with all, a productive weekend.

More next time.

 
Last edited by a moderator:
Its weekend again, time for another episode on the 71

Still waiting on the alternator kit. CJP keep saying next week for 2 weeks now... so its gona take at least 3 more weeks before i can touch it.

No probl, plenty to do and this week, thanks to OZCoupe72, I've received his defect spare wiper motor.

So started by opening and comparing the original and mine ment for a Ford Econoline. Exact same to the micron! Only diff is on the rotor/body where the original has a motorcraft stamp.


exactly the same for everything. So once the connector that I found will land I will be able

to put it back together after a soldering session of the new wires...


For now, its was as usual a prep for paint. OzCoupe72 body was in better shape, while the gears were looking better on mine. Both were not very smooth, so cleaned up the old grease and added new. Now rotation its smooth as butter. painted everything inside, cleaned the magnet before dry and added another quick layer. So it should be ok for another 45 years. Body, gears, plate, all primed and some received a black layer. They will al receive the same grey as all my accessories when more are ready. then a clear coat.

The missing nuts that Steve kindly sent me this week and the engine bracket motor mounts nuts to block received also a black layer .


As I've started on the body, I also got items in need of attention, treated in parallel. These front lights spent week into a solution, but rust was so thick, it was still there. But it wasn't really hard anymore so bits of brushing revealved the metal. As I wasn't going back to them on saturday, I've let them sleep the night in teh solution and this morning they were cooked :)


The electrical wires cleaned up, they then got masked and primed.


In between stuffs, i've been playing the mythbuster and wanted know once and for all if vinegar was doing what some claim...

Above on top, I did some bolts and the wiper motor in, and that how it looked after 2 days. Not really impressive.

I totally forgot and under on the pict is what you get after a week! :)


As I was pleased with the results, tried more and here, while image is wrong on the color, these were the rusty front valance fasteners, the wipermotor rings, steering pump brackets bolts/nuts and the tension nuts of the original coil holder that I'm also handling atm. They came out even better than with the rust dissolver regarding colour. The diff is the time it needs. One works almost right away while the other needs at least a day to really do something.

short story: vinegar does really work, and if you want a more yellow/brass result, use it.


In between chemical games, some real work needed be done. The rear valance being in a fairly good state with practially no corrosion on it, most work went into fixing some dents. At this point my neighbours probably started be annoyed at the tick tick tick on the metal for hours.


Ended up with a rear valance as new at the end of the day.


Today the plan was to prime, paint parts, my 73 fender, apply paint and clear coat to the many parts waiting...

Did one side of the rear valance and then. pffffssssssssssssshhhhhhhhhhhh

My compressor thought it take the day off. A metal connection started leak air and make noise to finally prevent me to use it.

Spent a few on it and unless i change that part, no air. So Need go tomorrow buy one... grrrr the day was perfect.


Again no problem, this car needs fix to everything, so next was the front valance. After the first massage I gave them, It was time to fix the dents. While some went ok, some were really bitchy, as no hammer or anything could fit into some locations.


End of the day the neighbours probably hated me, but the valance was free of its dents, tho some tiny ones I couldn't access will require a small layer of bondo.

All with all, another productive weekend on the 71.

to be continued.

 
Last edited by a moderator:
Wow impressive progress! Ziet er goed uit!
Dank je :)

If only I could have more space, loosing 1/2 my time moving stuff around, look for things and thinking where I can store a part that is ready and loosing more time moving stuff around to find it back the moment I need it :)

 
IThanks guys!

Its weekend again! Mustang time!

This morning saw an email from CJP saying my alternator kit is finally on its way, took 3 weeks... another 1 or 2 before its here. So day started nicely!

First started with some mains bolts. While inspecting and busy set the oil pump last week, found out the gasket for the pan wasn't the right one... so another 3 weeks to wait :(

Also saw one of the crankshaft mains, was missing 2 of the external bolts (its a 4 bolts per main). No biggy as it could perfectly be ok with 2, but these two holes were simply asking to be filled! :)

The lower engine was reassembled many years ago and as it was wrapped into meters of layers of plastics for protection, I never saw it until last week. They forgot tell me 2 were missing back then. Did they forgot or haven't I gave them the two extra bolts... Ill never know.

Steve aka @Secluff to the rescue!


As expected, he managed to find the exact specs of these 2 missing bolts! So went back to machine shop this week, where the job was done, and went out with 2 bolts of the exact same grade, size and thread, except on length. I needed remove 9mm of the two spare bolts they had to have the same exact size. So started the day by doing that.

As I needed to find the torque value, I've postponed to finish these tomorrow...


My compressor broke last week, so with that small ring in hands, fixed it and sprayed first a layer of pre-primer, some new stuff (for me) recommended by my paint shop. Its supposed to treat the pores of the bare metal and give a long lasting protection. Almost transparent like a clear coat but yellow-ish. Once dry, sprayed both valances with some thick primer on top of it as they will need some small bits of bondo here and there and be sanded first.


Weather was truly fantastic, dry and warm, the ideal paint weather!

So after the valances, I've sprayed black and grey on many small parts, and finished them with a clear coat.


So much time has past since I discovered I was missing special bolts. All the once missing bolts and mounts restored and under a nice layer of paint.

Today I could finally mark my engine mounts as done! yeah! Tomorrow, I'll torque them.


I want drive that 73 soon, so no time be picky if I want to enjoy it a bit this year. I'll go to a paintshop next year. So sprayed that two tone fender that was waiting forever and tomorow I might do more so I can put back most parts on the back and go get my tech control... This way, i'll go the the paint shop on the road legally too!


Back to the wiper motor, I have now all the parts under a nice layer of paint and as I've received this connector this week (it amazes me that some spend time and energy to place such connector on E-bay, but glad they did! ). I will probably be able to reassemble this baby tomorow too. But saw when I've compared with the 73 connector that its a bit different. Smaller but should fit... Bad news is that the grommet of the wiper motor doesn't let the old wires go and in the inside there are connectors too, I'll have to solder them externally. I'll have to put my surgeon hat on to try have a very thin soldered connection on these wires..

And then my wife reminded me that some work needed be done in the garden...

To be continued...

 
Last edited by a moderator:
Another sunny day!

What's better to start it than by reassembling Frankenstein's monster in the hot sun ?!

With a plate brought back by @TonyMuscle in his luggage from the states.

A spare non functional motor, but with correct body with magnets, better screws, the foam behind and a gear gasket from Australia thanks to @OzCoupe72.

A connector from a junyard in the states and of course the "original" Ford econoline probably found in France.


Main parts were of course already painted and ready, but picked for the rest the best of the spare motor.

Picked and cleaned up the best rubbers, screws, springs... the puzzle was ready :)

Started by prepping the wires. and cut the heat sleeves, so i could have one small per wire and one for the 4 in the end. Needed protect them against each other when heat was applied.


As I've done it before on the 73, I could remember it was a massive pita to put the brushes back on this unit. So started by cutting some paperclips so I could stop the springs (left) and after that, taped the brushes so they would not go out and left enough space for the stator shaft.


Then comes the trickky part. its a simple task: put the brushes back in contact and put the body back. In practice this can become a royal pita.

This unit has a stator that needs to be screwed into the gears (endless screwing), so after it was greased on both ends and cleaned back to bare metal the gears to screw grounds. I was good to go.

If you are born with 4 hands, you can skip the next few lines. Otherwise, that's how I did it with 2.

With an hand on one the extremities of the stator, the trick is to screw in, and with the second hand having a small flat screw driver, to lift the brushes a bit, thx to the tape they glide into place with a small pressure. Repeat that 3 times, do not let your other hand do anything but hold all ! Once the 3 are on the contact area of stator, screw it more, don't let go. Its time to remove first the tape and the paperclips. Insert the small screw driver now above the contact area. You can now loose one hand and present the body.

At this time, if you do not hold the stator firmly with the screw driver or similar, it will be sucked back into the body by the strong magnets when you will present it. Poof you'll have to do all over again!

Once you can't go further, the body is now engaged enough to let go by removing the screw driver. Then while pressing and turning to screw the stator in. It will take its place back nicely (watch for the holes on the bottom for condens on the body). That's where I've lost ages (and most my patience) redoing everything a few times on the 73. This time, it was a hit on the first attempt! Then rotate and align the long bolts and you done.


And after all these troubles, I've ended up with a good as new wiper motor.


Just like most stuffs done previously, it took a while and required some efforts, but it turned out nicely in the end.

Big thx to Tony & Mick on this one!

Rest of the day was for the 73 and even enjoyed a bit doing nothing in the sun...

 
Last edited by a moderator:
Back
Top