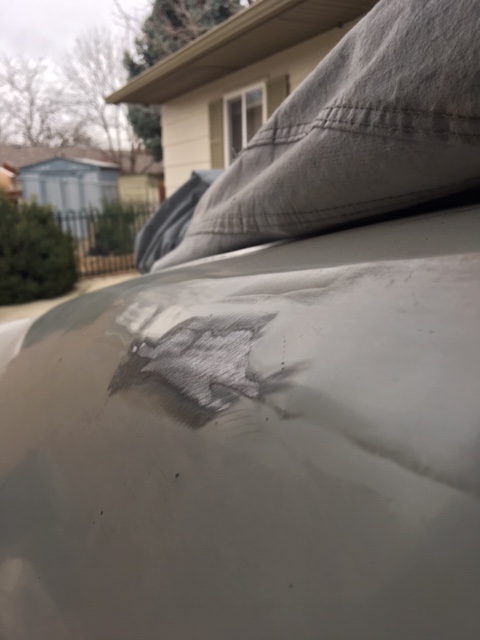
Ripples in sheet metal pillar

7173Mustangs.com

Help Support 7173Mustangs.com:

This site may earn a commission from merchant affiliate links, including eBay, Amazon, and others.

machattack

Well-known member
Joined
Apr 27, 2019
Messages
724
Reaction score
264
Location
Idaho
My Car
1971 mustang mach 1 351c 4v auto fmx
1968 mustang gt 302 4v 4 speed
Can you folks take a look and tell me what you think is going on here? 

I know its the solder joint ,both sides doing this. I replaced the whole rear of the car. Trunk pan, tail panel, trunk drops, inner wheel wells etc. The ripples were there prior to me replacing all the rear stuff. Nothing shifted, buckled or bowed in the repair process.

Some folks say the car was dropped off a tow truck. Others say the car has been jumped. I remember a thread that I think Carolina mustang said it was none of these things? but I cant remember what his answer was......cant find that thread either and Im exhausted looking for it. 
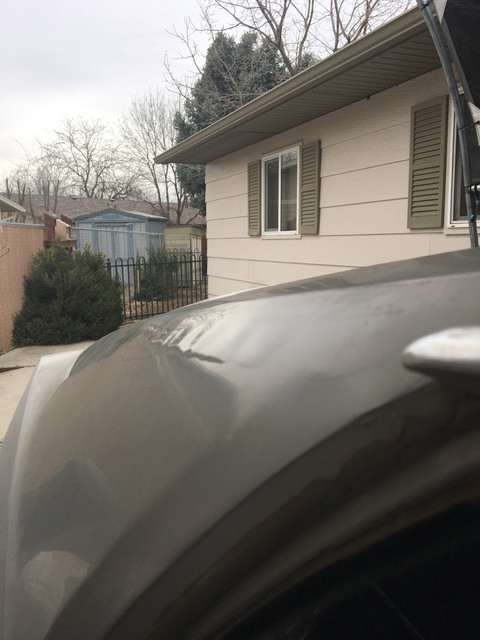
 
Hi, From the pictures it looks like a delamination issue. Maybe body filler skimmed over that area. There is one way to get to the source of the problem. Bite the bullet and dig in. Is your car already painted? If so, that sucks.

 
Hi, From the pictures it looks like a delamination issue. Maybe body filler skimmed over that area. There is one way to get to the source of the problem. Bite the bullet and dig in. Is your car already painted? If so, that sucks.
Not repainted yet. I believe this area is a solder lap joint? But I dont know for sure. I was hoping someone could answer that?

 
That's where the roof is spot welded to the quarter panel. It can start to come apart because of rust, body damage from a hard hit that twisted the car, or hard driving, like drag raced a lot where the car flexed coming off the line, or something similar. The fix is to grind it all down, weld in reinforcement behind it, or if rust, patch the section, and then body filler. I think the original seam used lead.

 
The factory used LEAD there - use caution when sanding / grinding

It is a common spot for that, clean it out

Weld the joint

You can also put a bead / layer of panel adhesive over your weld to help fill in the area

Then your body filler

The windshield pillars also have this joint

Not from jumping

If the car was dropped or jumped... the bend would have happened in a weaker area.

This area has 2 or 3 layers of metal with the inner sail panel, it is a strong structural area

Also if it bent there it would have blown the back window out
Thanks folks for the reply's!

Curiosity killed the cat so today im a cat. I took the sail panel out and found absolutely NO rust inside the pillar areas. This was my biggest fear......you probably heard me let out a gasp of air from rust relief.. I attached a picture of a small grind on the area.

I then ground the paint away to see what was on the outside? Again all I found was Primer then paint. Seems softer on the joint there so I would say thats solder. Cant check with a magnet cause more steel than solder.

Im still baffled as to why. But more concerned that when I fix it will it happen again? Wouldn't if it had stress from burnouts,twisting etc at least show cracks in the paint?

 
Last edited by a moderator:
Trying to get this pic to go. :-(

 
It is LEAD not solder, it was not even like the old lead pipe solder if that is what you are thinking.

It was pure 100 % lead.

DO NOT grind it out... propane torch and melt it out or leave it alone

EDIT just saw your picture I think you need to finish now that you have opened the can of worms exposing the seam...

See my other post for the way to do it.

The factory used lead on the body seams then, it was common practice - use caution of the lead dust - keep that away from kids, pets and yourself

Old body guys did all the repairs with lead, it was an art. My Dad used lead he could tin it and then slap the melted it on there and file it down to the right contours.

When I tried to do it ... it all ended up in globs on the floor, it wasn't pretty

I gave up before I learned the proper heat, touch and tricks  it takes. Body filler worked fine for me

 
Last edited by a moderator:
It is LEAD not solder, it was not even like the old lead pipe solder if that is what you are thinking.

It was pure 100 % lead.

DO NOT grind it out... propane torch and melt it out or leave it alone

EDIT just saw your picture I think you need to finish now that you have opened the can of worms exposing the seam...

See my other post for the way to do it.

The factory used lead on the body seams then, it was common practice - use caution of the lead dust - keep that away from kids, pets and yourself

Old body guys did all the repairs with lead, it was an art. My Dad used lead he could tin it and then slap the melted it on there and file it down to the right contours.

When I tried to do it ... it all ended up in globs on the floor, it wasn't pretty

I gave up before I learned the proper heat, touch and tricks  it takes. Body filler worked fine for me
Thanks for all the answers. You always help others and that is appreciated a bunch!

Rod and Sally

 
Back
Top