I installed that in my car and it made a world of difference. Much quieter and cooler ride. Especially if your running headers. My feet used to cook! Now there are nice and cool.installed eastwood sound deadening. Hope it is worth it!
You are using an out of date browser. It may not display this or other websites correctly.
You should upgrade or use an alternative browser.
You should upgrade or use an alternative browser.
What did you do to your car today?
- Thread starter droptop73
- Start date


Help Support 7173Mustangs.com:
This site may earn a commission from merchant affiliate
links, including eBay, Amazon, and others.
Stangace20
Well-known member
- Joined
- Aug 25, 2012
- Messages
- 271
- Reaction score
- 1
- Location
- San Diego CA
- My Car
- 1972 Mach 1 351C Gold Glow
1991 LX 5.0 Hatchback
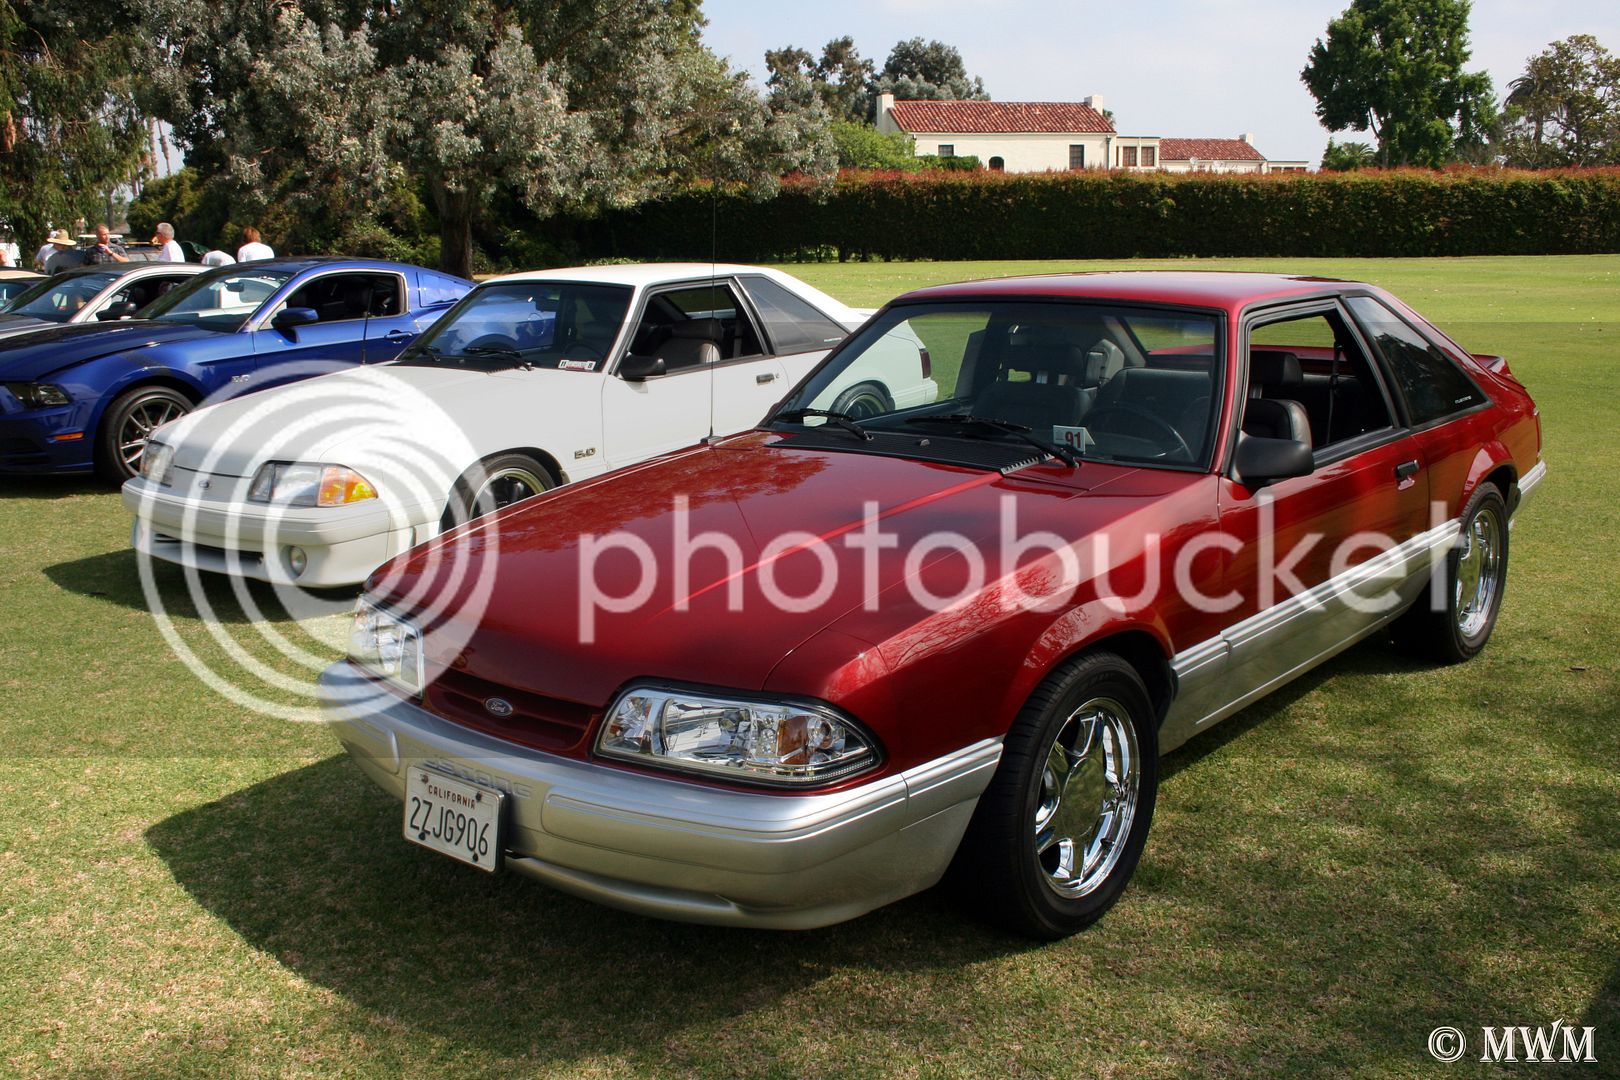
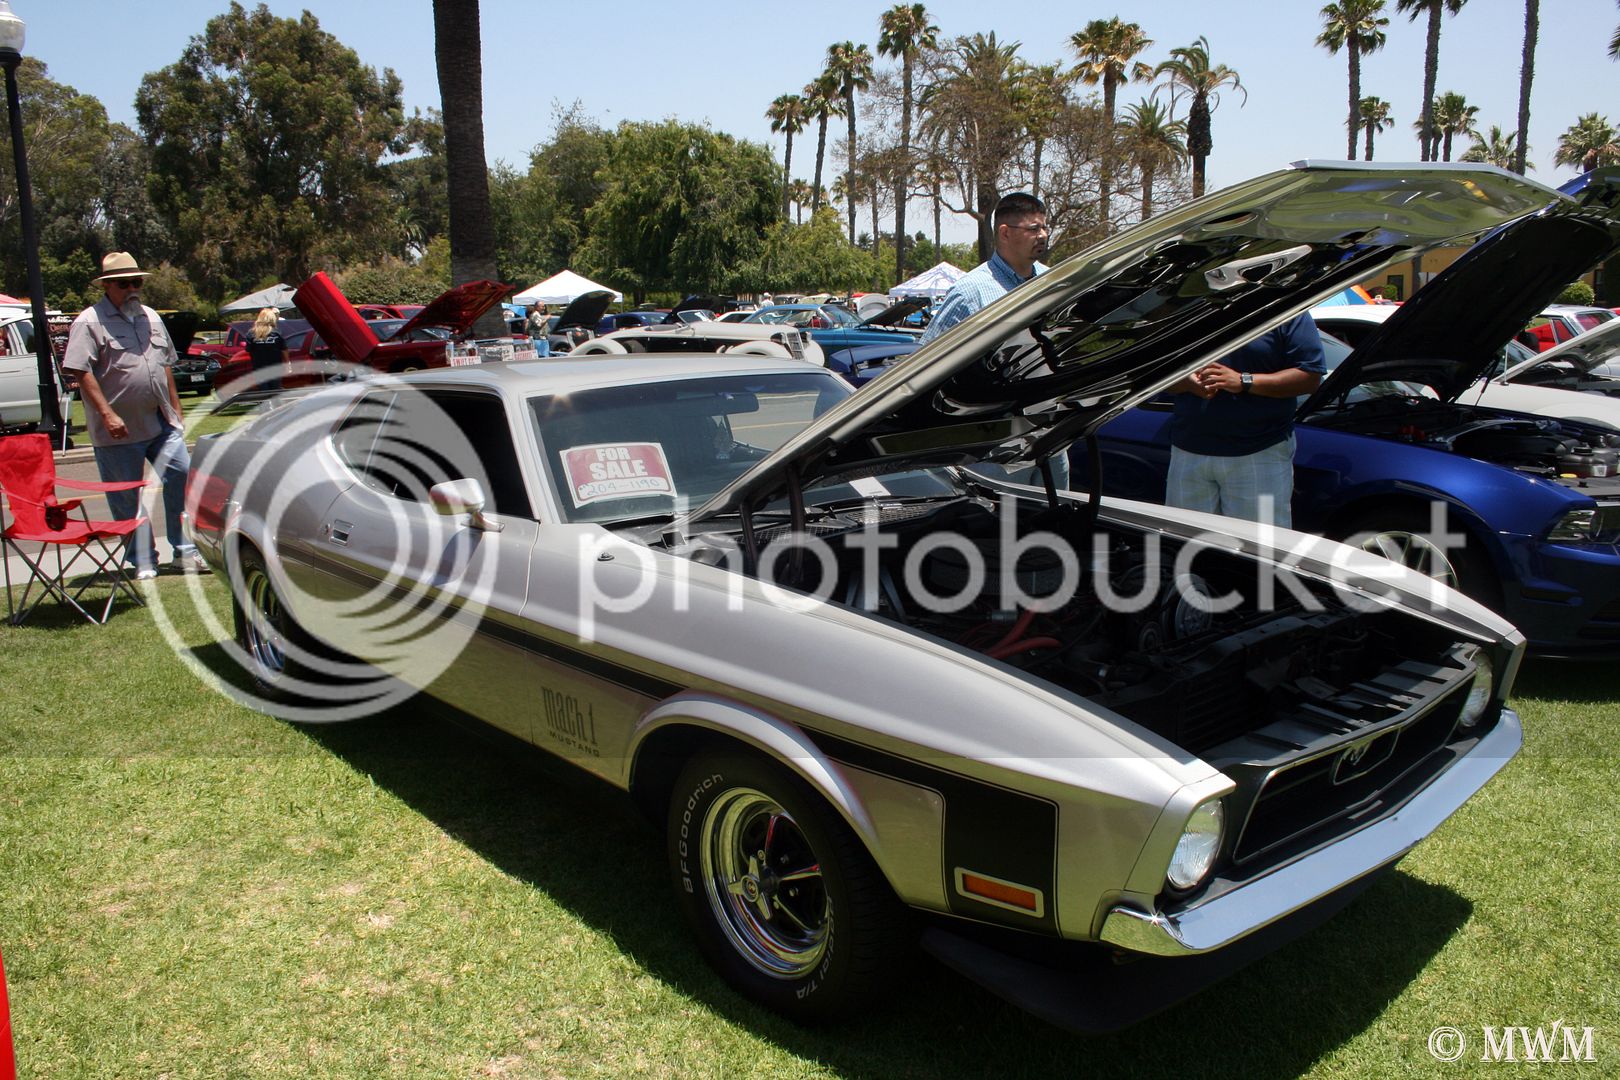
Well saturday I took my car to a car show at the MCRD (Marine Corps Recruitment Depot) here in SD. There was a lot of cars (about 300) and a fair number of mustangs. But only ONE 71 Mustang. Which definitely made me miss mine, but what was ironic was this one was also apparently for sale.
Otherwise today I called my landlord to see if they could do something about a sprinkler that's been getting my car all wet and leaving REALLY BAD hard water spots all over it (especially after I waxed it :dodgy")
Otherwise today I called my landlord to see if they could do something about a sprinkler that's been getting my car all wet and leaving REALLY BAD hard water spots all over it (especially after I waxed it :dodgy
adm22
Well-known member
- Joined
- Oct 26, 2012
- Messages
- 195
- Reaction score
- 0
- My Car
- 1972 convertible with almost half a million miles 351c- T5 transmission for 24 MPG on the Hwy! Still has a few original parts on it- not many!
also have a 1975 Bricklin with less than 20k miles.
I drove it to Autozone where I bought a blower motor for my newer Ford van that proved to be a real PITA to put in compared to how simples it looked when I discovered it needed to be done.
Before taking it to Auto Zone I took a new brake drim off and spray painted it black so it will turn rust coloured a few years later than it was designed to.
Before taking it to Auto Zone I took a new brake drim off and spray painted it black so it will turn rust coloured a few years later than it was designed to.
It's perfect. Looks great.You owe me a new keyboard. Old one is full of drool from looking at this picture!
-Kurt
- Joined
- Aug 12, 2010
- Messages
- 8,303
- Reaction score
- 681
- Location
- San Angelo, Texas
- My Car
- 1971 Mustang Mach 1
Awesome look, GravY!! ::thumb::
OK - so I ventured out to the garage today to do SOMETHING to the Mustang - my wife decided to tag along to help if she could (bless her heart - she has no idea what she's getting into... but I gotta give her props for her enthusiasm). Here's how my luck's been so far since I've had the car home from the Auto Hobby Shop: Before I packed everything up to bring it home, I found the grille center support bracket, and remembered putting it aside to make sure I didn't lose it - the grille was going to be one of the first things I did when I got it home, after all. Well... I lost it. I pretty much emptied the entire garage of Mustang parts boxes today in search of the bracket - nothing. So, I've pulled literally everything out of the Mustang and the garage that's Mustang-related... and nothing. Almost giving up after an hour of searching, I finally popped open the Eastwood box under the front of the car that was supposed to "only" contain 8 cans of SEM black spray paint, and there it was. Wife just shook her head - suppose I deserved that.
Whew - now that I have the bracket located... time to get to work. First up, mount the parking lights. This should be a snap, since I got all new stuff except for the housings themselves - I actually have 4, but 2 are in really good shape... except the driver side, which the inboard mounting peg was broken off. No biggie - I'll just drill a hole and use a suitable nut & bolt substitute - except, where's my freaken impact driver?! (I use it for EVERYTHING)
Sigh. Wife shaking head again... can't say I blame her at this point.
So, after an hour of searching for that, I finally got the hole drilled, found the suitable substitute bolt that actually fits the new fasteners I'd recently bought, and couldn't find a 5/16" deep socket for those new fasteners. Great. You know what? Screw it - the 11/32" standard worked well enough - got both of the parking lights installed.
Next was installing the headlights with my spiffy new retainer rings... and they went in like buttah! Except... that I need to mount the grille first. OK - it's only been 4 years since I pulled it all apart, and this full-scale kit didn't come with instructions... so out come the headlights. Grabbed the new fasteners and installed the center support bracket - Yay! OK - wait a minute... looking at the grille mounting tabs inside the headlight openings, and then at the headlight buckets, it appears that every one of the original mounting bolts are still firmly fastened in the buckets - minus their heads. That's right - all eight of them are snapped right the Hell off... and I cleaned up the buckets and painted right over them, not knowing any better the whole time. I hang my head in shame, disgust, and frustration... I'm guessing she pretty much thinks I'm an idiot at this point... and probably even wonders how I was able to get even this far along in just 4 years.
Did I mention I also discovered I'll need to drill some holes in the nicely painted repop fenders to mount the rubber bumper spacers so the chrome bumper looks like it belongs there? NOT looking forward to that, I can say that much.
OK - it's 6:00PM and 95... I'm hot... I'm pissed... and you know what - I'm done for today. I still gotta put all that Mustang-related stuff I drug out of the garage back into the garage before I get back inside for something cold to drink and sit in the A/C for a little bit... except that sitting Indian-style* in front of the Mustang's front end (which I'm pretty sure it was laughing at me the whole time), my legs have fallen asleep.
Damn, I miss my Auto Hobby Shop. :shy:
* Can I actually say that? I mean, I don't want to get sued like that guy that owns the Washington Redskins or anything. rofl
- Joined
- Apr 3, 2011
- Messages
- 653
- Reaction score
- 221
- Location
- United States
- My Car
- 1973 Q code Mach 1 blue glow C6 auto
1973 Q code Mach 1 blue glow, 4 speed
1973 H code Convertible ivy glow, FMX
Finally got to work correcting some of the screw ups on my C6 car that have been bothering me for a while. I am done with repair shops. From now on, I do everything myself like the old days (when I had no choice) Most of these errors were induced by repair shops that I trusted. I still can't believe that these shops f--- up so many things that are simple mechanical matters. This car has not run right since I brought it home. The list of screw ups so far includes intake manifold gaskets that were so misaligned that there was a huge vacuum leak, a distributor that is so misaligned that the vacuum can is crammed up against the radiator hose, and a collection of wire splices in the engine compartment that had so many intermittents that I had to trash the whole thing. And the topper of them all is that the vibration damper is incorrect for the engine I have. My engine guy (now retired) put a damper on for a 351W I believe - the timing scale on the damper is not even close to the timing pointer when #1 cylinder is at the top of its compression stroke. I don't know how the hell they even got the car running like crap - just trial and error I guess. Oh, one other thing, my passenger side motor mount is broken. These mounts have a total of 40 miles on them and they appear to be mounts for a 1971-72 Mustang. The 73's are completely different. Getting new parts on order. At least I got a free weekend to work on this car. I will get it repaired right - just need some time. Right now I wouldn't trust anyone else to do anything with these cars! I enjoyed working in the new garage today - that was a good thing!

- Joined
- Jun 13, 2012
- Messages
- 1,472
- Reaction score
- 3
- Location
- virginia
- My Car
- 1973 coupe
1998 mustang
1994 Nissan Sentra SE-R
Been doing some minor bodywork on the coupe getting ready to have paint n body take over.
Anyways, I removed the trim rivets I still need to fill a few holes.
Before


After


And I started cleaning up my tail lights. I almost want to just black them out. I'm painting the car white but the taillight panel will remain black. It's just something I want.
Here's a pic with one of them cleaned up a bit.

And the other one awaiting my attention.

Sent from my iPhone using Tapatalk
Anyways, I removed the trim rivets I still need to fill a few holes.
Before
After
And I started cleaning up my tail lights. I almost want to just black them out. I'm painting the car white but the taillight panel will remain black. It's just something I want.
Here's a pic with one of them cleaned up a bit.
And the other one awaiting my attention.
Sent from my iPhone using Tapatalk
- Joined
- Aug 12, 2010
- Messages
- 8,303
- Reaction score
- 681
- Location
- San Angelo, Texas
- My Car
- 1971 Mustang Mach 1
Day Two of Mustang-fest in West Texas... ends with a big fat Zero.
Went to Harbor Freight and bought some left-hand drill bits and bolt extractors, to get the snapped-off grille mounting bolts out of the headlight buckets. Attempted to drill-out the inner-upper grille mounting bolt on the passenger-side bucket - made a royal mess out of that, and gave up before I broke something, scratched paint, or drew blood. Moved to the inner-lower bolt and successfully drilled through the old bolt. Tried to run a new bolt through, and snapped off its head - apparently, I didn't get it all outta there. I'm done - just gonna order some new headlight buckets and be done with that hopefully next weekend.
Decided to move to the back and install the honeycomb taillight panel trim. I was plugging along happily making a template from the original taillight panel I cut-off the car, got most of the way done, and noticed the holes were slightly different on the new (repop) panel... so I gave up on that and decided to go with the new panel's hole locations. Taped off the pristine new paint on the taillight panel and marked the holes. Used an old sheet rock screw as a nail-set/punch, and drilled the pilot holes. Followed with a stepper bit to get the right hole diameter. Filed off the flash, and stood back to admire my work. That part actually went well.
Loaded up the honeycomb panel with the fasteners, sealer "donuts" and put the whole thing up to the car... and I can't get a single nut to grab threads, because the fasteners are flopping about inside of the trim. Struggled with it for about an hour and gave up before something gets ruined - approximately half of the sealer donuts are pretty much toast now, because they seem to want to fall apart just looking at 'em. Blah.
So... now what? I have a question in the appropriate thread that I'm hoping the answer will become another thread to add into the 'Tutorials' section.
Honest-to-God, I don't remember having this much trouble replacing the front clip on the damn car.
- Joined
- Jun 15, 2011
- Messages
- 1,989
- Reaction score
- 1
- Location
- Wisconsin
- My Car
- 73 Mach 1 Mustang (project)
93 Dodge Shadow (daily)
86 Buick Regal (2nd project)
Yeah it was good fun, I did however find more stuff to fix though. There was a bunch of bondo on the driver's side quarter panel so I'm gonna need to fix that before putting in the new tail light panel. Nice work on your stereo by the way Steve.Progress is sweet, huh J? I too haven't worked on mine in a long time. In fact, I've gotten more done this week than in probably the last 4 or 5 months combined.I haven't posted or worked on my Mustang in a while but I finally got some work done today. I (with help from a friend) took the rusty tail light panel out and we'll have the new one in hopefully tomorrow if all goes well. It's so nice to work on it again, I had such good time.
Thanks for looking.
Those fenders look good Matrix, nice job.Been doing some minor bodywork on the coupe getting ready to have paint n body take over.
And I started cleaning up my tail lights. I almost want to just black them out. I'm painting the car white but the taillight panel will remain black. It's just something I want.
- Joined
- Jul 27, 2012
- Messages
- 3,094
- Reaction score
- 445
- Location
- Brisbane - Australia
- My Car
- 1973 Mustang Convertible
H
I love your write ups - very descriptive indeed. You should know by now that when you do any work on these cars, you always underestimate what's involved relating to time, energy and effort.
What seems to be a straight forward deal, ends up being something very different. I remember i decided to fit new delux door pads to my vert. That turned into a logistic nightmare which ended up taking me around 5 days to finish. I share your pain brother!
Greg.
Hi Eric,Day Two of Mustang-fest in West Texas... ends with a big fat Zero.
Went to Harbor Freight and bought some left-hand drill bits and bolt extractors, to get the snapped-off grille mounting bolts out of the headlight buckets. Attempted to drill-out the inner-upper grille mounting bolt on the passenger-side bucket - made a royal mess out of that, and gave up before I broke something, scratched paint, or drew blood. Moved to the inner-lower bolt and successfully drilled through the old bolt. Tried to run a new bolt through, and snapped off its head - apparently, I didn't get it all outta there. I'm done - just gonna order some new headlight buckets and be done with that hopefully next weekend.
Decided to move to the back and install the honeycomb taillight panel trim. I was plugging along happily making a template from the original taillight panel I cut-off the car, got most of the way done, and noticed the holes were slightly different on the new (repop) panel... so I gave up on that and decided to go with the new panel's hole locations. Taped off the pristine new paint on the taillight panel and marked the holes. Used an old sheet rock screw as a nail-set/punch, and drilled the pilot holes. Followed with a stepper bit to get the right hole diameter. Filed off the flash, and stood back to admire my work. That part actually went well.
Loaded up the honeycomb panel with the fasteners, sealer "donuts" and put the whole thing up to the car... and I can't get a single nut to grab threads, because the fasteners are flopping about inside of the trim. Struggled with it for about an hour and gave up before something gets ruined - approximately half of the sealer donuts are pretty much toast now, because they seem to want to fall apart just looking at 'em. Blah.
So... now what? I have a question in the appropriate thread that I'm hoping the answer will become another thread to add into the 'Tutorials' section.
Honest-to-God, I don't remember having this much trouble replacing the front clip on the damn car.
I love your write ups - very descriptive indeed. You should know by now that when you do any work on these cars, you always underestimate what's involved relating to time, energy and effort.
What seems to be a straight forward deal, ends up being something very different. I remember i decided to fit new delux door pads to my vert. That turned into a logistic nightmare which ended up taking me around 5 days to finish. I share your pain brother!
Greg.
Last edited by a moderator:
mach1chick
Well-known member
- Joined
- Jul 4, 2013
- Messages
- 77
- Reaction score
- 1
- Location
- Beaver Falls,Pa
- My Car
- 1971 Mach 1 429 AT power windows, Ac, rear defrost.......PURPLE!
Adjusted driver's door. Adjusted driver's glass.
Pulled a hole shot on request and got the Sheriff after me. Oops!
Pulled a hole shot on request and got the Sheriff after me. Oops!
- Joined
- Aug 12, 2010
- Messages
- 8,303
- Reaction score
- 681
- Location
- San Angelo, Texas
- My Car
- 1971 Mustang Mach 1
Thanks Greg! Appreciate the solidarity. ::thumb::Hi Eric,
I love your write ups - very descriptive indeed. You should know by now that when you do any work on these cars, you always underestimate what's involved relating to time, energy and effort.
What seems to be a straight forward deal, ends up being something very different. I remember i decided to fit new delux door pads to my vert. That turned into a logistic nightmare which ended up taking me around 5 days to finish. I share your pain brother!
Greg.
OK, so with Dan's approval and encouragement, I went to the hardware store (Westlake Hardware, our "ACE Hardware" store) and found a couple of different solutions to install the honeycomb tail light panel trim (just in case one didn't work). The fasteners are 8x32, in case anybody ever needs to know - I scored a dozen 8x32 nuts, 8x32 wing nuts, and 4mmx10 flat washers.
Got home, loaded up the brite trim pieces with the panel studs and sealer rings, put the bottom one on the panel and carefully fitted it onto the car. The 8x32 flat nuts grabbed the threads nicely and I was able to loosely fit the bottom piece without hassle. Carefully loaded the upper brite trim piece onto the plastic panel and lined up the studs - again, with the flat nuts grabbing threads. With a little bit of adjustment, the panel's on - and I had enough threads to screw on the acorn nuts over the tops of the flat nuts... can't even see 'em now. SCORE!!
My wife also cleaned the ever-livin' sheet out of the tail lights as the sun moved into position and chased the shade away from my improvised workbench of the Ram's tailgate. I bought some used tail lights from Kurt (cudak888) several weeks ago, and they were in better shape than mine. I did notice the original from driver side was better than one of his old ones, so I used it and the better of the two Kurt sent me - pulled 'em apart so she could clean 'em inside and out. As she was cleaning them, I installed the rear marker lights. Then I pulled the quarter extensions, put the seals back in, and reinstalled them into the proper positions. After she got them as clean as she could (with Simple Green, a cleaning brush, and a plastic scraper - she did a GREAT job, BTW), I put them back together and installed with new seals.
Here it is!

Still gotta align the trunk lid so I can apply the new Mach 1 decals and install the trunk seal, but it's a far cry from Day One:

- Joined
- Jul 21, 2012
- Messages
- 3,240
- Reaction score
- 16
- Location
- South Florida
- My Car
- '71 Mustang Mach 1 M-code "Soylent Green"
'69 Plymouth Valiant 100
'68 Plymouth Satellite
Ahh, now that's the type of motivation I am in need of, Eric!
I couldn't tell you which taillight is which...
-Kurt
I couldn't tell you which taillight is which...
-Kurt
- Joined
- Aug 12, 2010
- Messages
- 8,303
- Reaction score
- 681
- Location
- San Angelo, Texas
- My Car
- 1971 Mustang Mach 1
Come to think of it... neither can I. roflAhh, now that's the type of motivation I am in need of, Eric!
I couldn't tell you which taillight is which...
-Kurt
Thanks again for the new 'lights! ::thumb::
- Joined
- Jul 21, 2012
- Messages
- 3,240
- Reaction score
- 16
- Location
- South Florida
- My Car
- '71 Mustang Mach 1 M-code "Soylent Green"
'69 Plymouth Valiant 100
'68 Plymouth Satellite
That makes it even better. Eases the mind from envisioning the whole car as each and every individual part.Come to think of it... neither can I. rofl
Thanks again for the new 'lights! ::thumb::
Don't you mean thanks for the "light?"
-Kurt
I have been refinishing plastic parts and getting ready to paint some underhood bits - horns, vapor canister and mount, and engine mounts.
- Joined
- Jun 13, 2012
- Messages
- 1,472
- Reaction score
- 3
- Location
- virginia
- My Car
- 1973 coupe
1998 mustang
1994 Nissan Sentra SE-R
I notice some lights have black inside and some don't. Is that something exclusive to 73's (full chrome?)
Installed my cleaned up light, my dremel needed a break haha.

Sent from my iPhone using Tapatalk
Installed my cleaned up light, my dremel needed a break haha.
Sent from my iPhone using Tapatalk
- Joined
- Jul 21, 2012
- Messages
- 3,240
- Reaction score
- 16
- Location
- South Florida
- My Car
- '71 Mustang Mach 1 M-code "Soylent Green"
'69 Plymouth Valiant 100
'68 Plymouth Satellite
Yep, Ford cheapened out in '73 and deleted the blackout.I notice some lights have black inside and some don't. Is that something exclusive to 73's (full chrome?)
Installed my cleaned up light, my dremel needed a break haha.
-Kurt
Last edited by a moderator:
- Joined
- Aug 12, 2010
- Messages
- 8,303
- Reaction score
- 681
- Location
- San Angelo, Texas
- My Car
- 1971 Mustang Mach 1
Still gonna clean up the others and put them aside for later... after I get the rest of the stuff done, that is.
You Did WHAT On Your Day Off! Can U Feel Me?
So there I was... she walked in with a quart of 30w and she says hey bby .... ugg then I woke up.
It's my day off and the day b4 payday I'll b ordering some parts for the girl tomorrow but what to do today?
I took the car to the mustang club meeting last nite and she was looking pretty good I thought but one thing
that bothers me and ppl go right up to is that area between the hood and the windshield!
The dreaded COWL AREA! So the wiper arms look like S and the windshield support brackets are rusty and who knows whats
under the cowl vents YIKES!
I figure hey it's a CA car and just needs a spruce up sandpaper and paint is cheap.
Wiper arms off
Cowl brackets off
Cowl Vents off
Vacuum out inner cowl area and looks ok in there but probably leaks but no prob as I never take the girl out in the rain or hose it off!
Now the FUN PART! wire brush sand, prime and paint the parts and after all it's the little things right? So there goes my day off and I have
sore fingers and new looking parts and somehow I feel satisfied although it did take a couple cold beers in the end to finish it up.
I started thinking of you boys back east and I have to feel for you as I think my rusty project cannot compare to yours for sure. Yea I
have a rusty car but not rusted through just cosmetically.
I think the bottom line is restoring these old cars is a therapy to be enjoyed and is not recommended for a young man newly married as I can attest.
My 2nd wife is very understanding and loves the car and is happy I have a hobby compared to the 69 I had in the 80s that made my 1st wife jealous.
Xmas List:
Garage
Rack
Media Blaster
Parts washer
Mig Machine
Paint Booth
Yea not gonna happen but I got a happy life and happy Wife GB Her and I gotta say she loves going for a put!
Cheers Guys
Similar threads
- Replies
- 583
- Views
- 59K
- Replies
- 45
- Views
- 8K