Timing frustrations

7173Mustangs.com

Help Support 7173Mustangs.com:

This site may earn a commission from merchant affiliate links, including eBay, Amazon, and others.
So today I removed all the old short rocker studs. Ran a thread chaser through all the holes. Put the ARP grease on the new studs and installed. Put the push rods back in and installed the rockers. Pulled the spark plugs so I could turn the engine over by hand. Not a whole lot of room due to the fan. I could not turn the crank 90* at a time like you would if this was on a engine stand. I could maybe get 1/4 turn. So did about 20 1/4 turns adjusting each time while I was setting zero lash. Took forever, and I don't care for the results. I think I went too far when using the method of spinning the push rod that everyone else seems to like. I should have just tried to wiggle them up and down. Anyway, again, due to the number of times I went around them, I think I went too far. By the time I added 1/2 turn to set pre load I could tell my geometry was now out of whack. And sure enough it is. (See Photo). So I'm going to break them all free and start over again tomorrow. You can see I'm off now. Also, after my half turn, It was very difficult to turn the engine over by hand again. I sure wish this motor were out and on a stand.
Btw. It is not that hard to remove the fan while the engine is in the car. Once you do that you can remove the shroud. Just did that. And i tried turning the engine by hand a few weeks ago with the fan and shroud on so i know how painful it is.

Sent from my SAMSUNG-SM-G930A using Tapatalk

 
I'll remove the fan tomorrow and give it another go. I'll just do cyl #1 though. if #1 comes out good, I'll do the other 7. If I get the same result I'll have to go from my 8.50 push rods to 8.45.

With the fan and shroud out of the way, it should be cake and take half the time.

 
Last edited by a moderator:
Big red mach 1,

For sure get that fan and fan shroud out of your way.

You can put a few short bolts back in the pulley to water pump to keep it in place.

I like to start at the rear of either bank and move towards the front while watching the lifters move and adjust1  valve at a time.

I am always turning the engine over with a big long ratchet to keep the lifters from bleeding down. (I always start out with all rockers completely loose.

if you get to within 1/2 a wrench flat for zero lash,I usually call that good, usually go parallel or perpendicular to the engine block.

With fresh lifters, I will pull the distributor to pump up the lifters

how much preload depends on the lifter specification (which you probably don't have) 3 wrench flats probably will suffice.

Sorry about the wrench flats thing,( Harley guys will understand) there must be at least 1/2 dozen different thread pitches on aftermarket pushrods.

Boilermaster

 
Dumb question but did you remove the spark plugs and loosen the belts? I have a newly built engine from top to bottom and I have no problems with turning the crank. I just used a 1/2 drive socket wrench, nothing fancy. One thing I did learn was to turn the crank on the drivers side of the engine from above. I am also on the thin side, skinny I guess you could say, so I can get in tight spots. But I had no problems with setting the lash the exact same way you are with my fan and shroud in place. I even have a/c.

And Don C is right, the geometry is not looking good there. I would be checking for the correct push rod length. I would also pull a couple of lifters out and see what the bottoms look like. Just make sure to put them back in the same bore. You can also inspect the cam lobes of the lifters you remove.

 
Last edited by a moderator:
I totally don't follow the "wrench flats" thing. LOL

Yes, spark plugs pulled. Belts still on. Fan will come off tomorrow, and I'll give it another go.

I'm sure the lifters are all bled down at this point.

 
Last edited by a moderator:
I'll remove the fan tomorrow and give it another go. I'll just do cyl #1 though. if #1 comes out good, I'll do the other 7. If I get the same result I'll have to go from my 8.50 push rods to 8.45.

With the fan and shroud out of the way, it should be cake and take half the time.
Big red mach 1

,

you do not need to go to shorter pushrods !!

you are perhaps already too short.

at zero lash, you can be near the inboard 1/3 of the valve, but your contact pattern should move towards the center of the valve stem until you get to about 1/2 of the lobe lift, then it should start moving back to where it started from.

I have been fooled by pictures and camera angles before, but your contact pattern looks to be too far to the intake valley side to me, which means you need LONGER pushrods.

Boilermaster

I

 
Going back to your method of determining zero lash - I have always fared better wiggling the pushrod up-and-down vs spinning. In my view, it's more effective way to find zero lash. Spinning is just too subjective for me. I agree that you should get better results that way.

 
Super simple way of checking valvetrain geometry.

https://www.lunatipower.com/how-to-verify-valvetrain-geometry

Polylocks have been around since the 60's, if not earlier. If you're going to replace the studs and poly locks, I do recommend ARP for both, as they have a nicely machined contact face for the set screw and don't loosen easily.

 
Geoff,

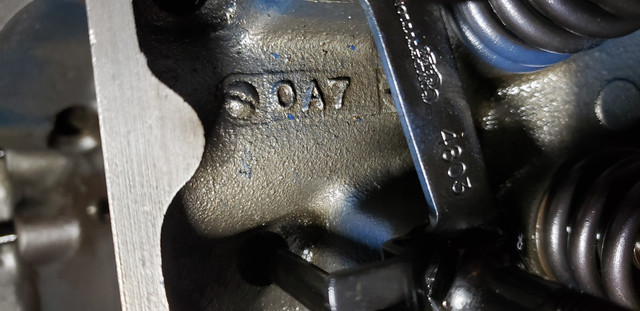
I have 70 heads. I already knew this, but here are the numbers on mine. Ford logo came out blurry, but you can read the rest.

At least you confirmed what you thought you had for heads. Just out of curiosity, what's the date code on the other head?

EDIT: removed pictures.

 
Last edited by a moderator:
Super simple way of checking valvetrain geometry.

https://www.lunatipower.com/how-to-verify-valvetrain-geometry

Polylocks have been around since the 60's, if not earlier. If you're going to replace the studs and poly locks, I do recommend ARP for both, as they have a nicely machined contact face for the set screw and don't loosen easily.
Hemikiller,

it don't get any easier than that.

Still trying to wrap my head around why big red would need longer than stock pushrods.

The D0AE-N cylinder head did not come with screw in studs, perhaps they were cut too shallow or too deep ?

then there is head shaving and gasket thickness and longer than stock valves and sunken valve seats and modified installed height .

My experience usually led me to believe aluminum roller rockers, mostly would require a slightly shorter pushrod.

But HEY, follow the simple explaination. unfortunately my small brain works differently than that.

Boilermaster

 
Use an adjustable rod first and determine the right lenght. Also, keep the oil pressure up to reduce the risk of bleed down. I did it while pressurizing the system with the drill.

Sent from my SAMSUNG-SM-G930A using Tapatalk

 
Thank you all.

I'm definitely going to back everything off. With fan removed, I will get nice 90* turns on the crank. Which means I will touch those rockers 8 times, not 20. Not that every one needed tweaked every time.

I'm also going to wiggle up and down. I also do not like the spin method.

I'll keep the oil pressure up with the drill also. Mine all bled down yesterday.

I had seen that Lunati video before. I used that method yesterday, didn't care for what I saw, but kept going. Figured to finish and verify the results. Not a surprise that I'm off.

I'll grab the other date code from the other head.

Going to order a fan clutch and some studs for that also.

Will report back. Thanks again!

 
Geoff,

I have 70 heads. I already knew this, but here are the numbers on mine. Ford logo came out blurry, but you can read the rest.
At least you confirmed what you thought you had for heads. Just out of curiosity, what's the date code on the other head?
Geoff, 

Both heads have the 4 in the corner. No dot next to either 4. 

Pass 0A7 Jan 7, 1970

Driver 0A12 Jan 12, 1970

 
Last edited by a moderator:
Geoff,

I have 70 heads. I already knew this, but here are the numbers on mine. Ford logo came out blurry, but you can read the rest.

At least you confirmed what you thought you had for heads. Just out of curiosity, what's the date code on the other head?
Geoff, 

Both heads have the 4 in the corner. No dot next to either 4. 

Pass 0A7 Jan 7, 1970

Driver 0A12 Jan 12, 1970
Wow, only 5 days difference. For heads that were "exchanged" they had to have come off the same engine. It would be too much a coincidence otherwise. If I have it correct it was 71 CC heads that had the 4* (dot), 70 CC was just the 4. Of course, there is another possibility and that is that this IS a complete 1970 engine . You could look at the block codes just above the starter that you would have to remove first I'm afraid, or find the partial VIN on the back of the block as described earlier.

I just love this stuff!

When I first got my car in 08, I really found all the code stuff very interesting and informative. I really enjoyed that part of the hobby, as I'm sure you will too.

 
Last edited by a moderator:
Your D0AE-N heads are 4-valve closed chamber heads. Casting number information is available here

https://www.7173mustangs.com/thread-casting-numbers-and-engine-codes?pid=203996#pid203996

I'm always suspicious of the height of push rod and valve contact points of aftermarket rockers. Most are not specific to Ford engines. Plus, you don't know what cam and push rods were installed before you got it. I agree that spinning the push rods is difficult, even though it is the recommended method. I spin and wiggle them at the same time.

 
Wow, only 5 days difference. For heads that were "exchanged" they had to have come off the same engine. It would be too much a coincidence otherwise. If I have it correct it was 71 CC heads that had the 4* (dot), 70 CC was just the 4. Of course, there is another possibility and that is that this IS a complete 1970 engine . You could look at the block codes just above the starter that you would have to remove first I'm afraid, or find the partial VIN on the back of the block as described earlier.

I just love this stuff!

When I first got my car in 08, I really found all the code stuff very interesting and informative. I really enjoyed that part of the hobby, as I'm sure you will too.
You cannot go by the dot. I have two sets of heads that have the dot and are closed chamber. The dot came into play in the 71 model year.

I'll keep the oil pressure up with the drill also. Mine all bled down yesterday.
You don't need to do that if you replace a lifter with a solid as Lunati recommends. I have a couple I keep in bottle of oil for this purpose.

 
Back
Top