Pitman and Idler arm replaced today. Too bad I can't get in for a wheel alignment till next week.
You are using an out of date browser. It may not display this or other websites correctly.
You should upgrade or use an alternative browser.
You should upgrade or use an alternative browser.
What did you do to your car today?
- Thread starter droptop73
- Start date


Help Support 7173Mustangs.com:
This site may earn a commission from merchant affiliate
links, including eBay, Amazon, and others.
P
Pastel Blue
Guest
A good day for some cross border shopping..., well, in this case; to pick up my latest order.
Included were all the major AC system components except for the compressor which I will look at separately to see if mine is worth rebuilding. I intend to stick with the factory compressor as part of my return to the factory original look. Needless to say, a few bucks for this batch of "stuff"... Many additional small pieces that I had not yet ordered as well. I also decided to purchase the Eastwood sound/heat proof material for my interior.
While in Buffalo, I drove down to Classic Tube in Lancaster and picked up some nice pre-bent transmission lines and a new vacuum modulator line. Mine were toast...
My restoration has been on hold since the end of July, as I needed a new evaporator, heater core and a blending arm for my heat/AC box in order to complete the rebuild of the box and get it installed on the interior firewall so I could move on to the rest of the dash install...
I also decided to change out my original upper controls arms that I rebuilt and install a set of Scott Drake repo's. The main reason was the original ball joint rivets... At the time, I was in a rush so that my shop could get the car back on its own wheels so I installed new ball joints with nuts and bolts and as time went by, I just could not live with set up in the long run. Once exchanged, I will then install the correct rivets in the new ball joints on my original control arms and store the set for the time being...
.jpg")
Included were all the major AC system components except for the compressor which I will look at separately to see if mine is worth rebuilding. I intend to stick with the factory compressor as part of my return to the factory original look. Needless to say, a few bucks for this batch of "stuff"... Many additional small pieces that I had not yet ordered as well. I also decided to purchase the Eastwood sound/heat proof material for my interior.
While in Buffalo, I drove down to Classic Tube in Lancaster and picked up some nice pre-bent transmission lines and a new vacuum modulator line. Mine were toast...
My restoration has been on hold since the end of July, as I needed a new evaporator, heater core and a blending arm for my heat/AC box in order to complete the rebuild of the box and get it installed on the interior firewall so I could move on to the rest of the dash install...
I also decided to change out my original upper controls arms that I rebuilt and install a set of Scott Drake repo's. The main reason was the original ball joint rivets... At the time, I was in a rush so that my shop could get the car back on its own wheels so I installed new ball joints with nuts and bolts and as time went by, I just could not live with set up in the long run. Once exchanged, I will then install the correct rivets in the new ball joints on my original control arms and store the set for the time being...
Last edited:
CFrance729
Well-known member
- Joined
- Jul 31, 2016
- Messages
- 52
- Reaction score
- 0
- Location
- Carolina
- My Car
- 1973 Mustang Coupe, 302
1985 Buick Riviera
Hopefully finishing up the replacement of pretty much everything on all four drums except the adjuster and backing plate.
This is my first major project on the car and my first time really messing with brakes, so I also just wanted to see if everything looks good to yall.
So far I have the front done, and should be done with the rear today if the rain stays away.
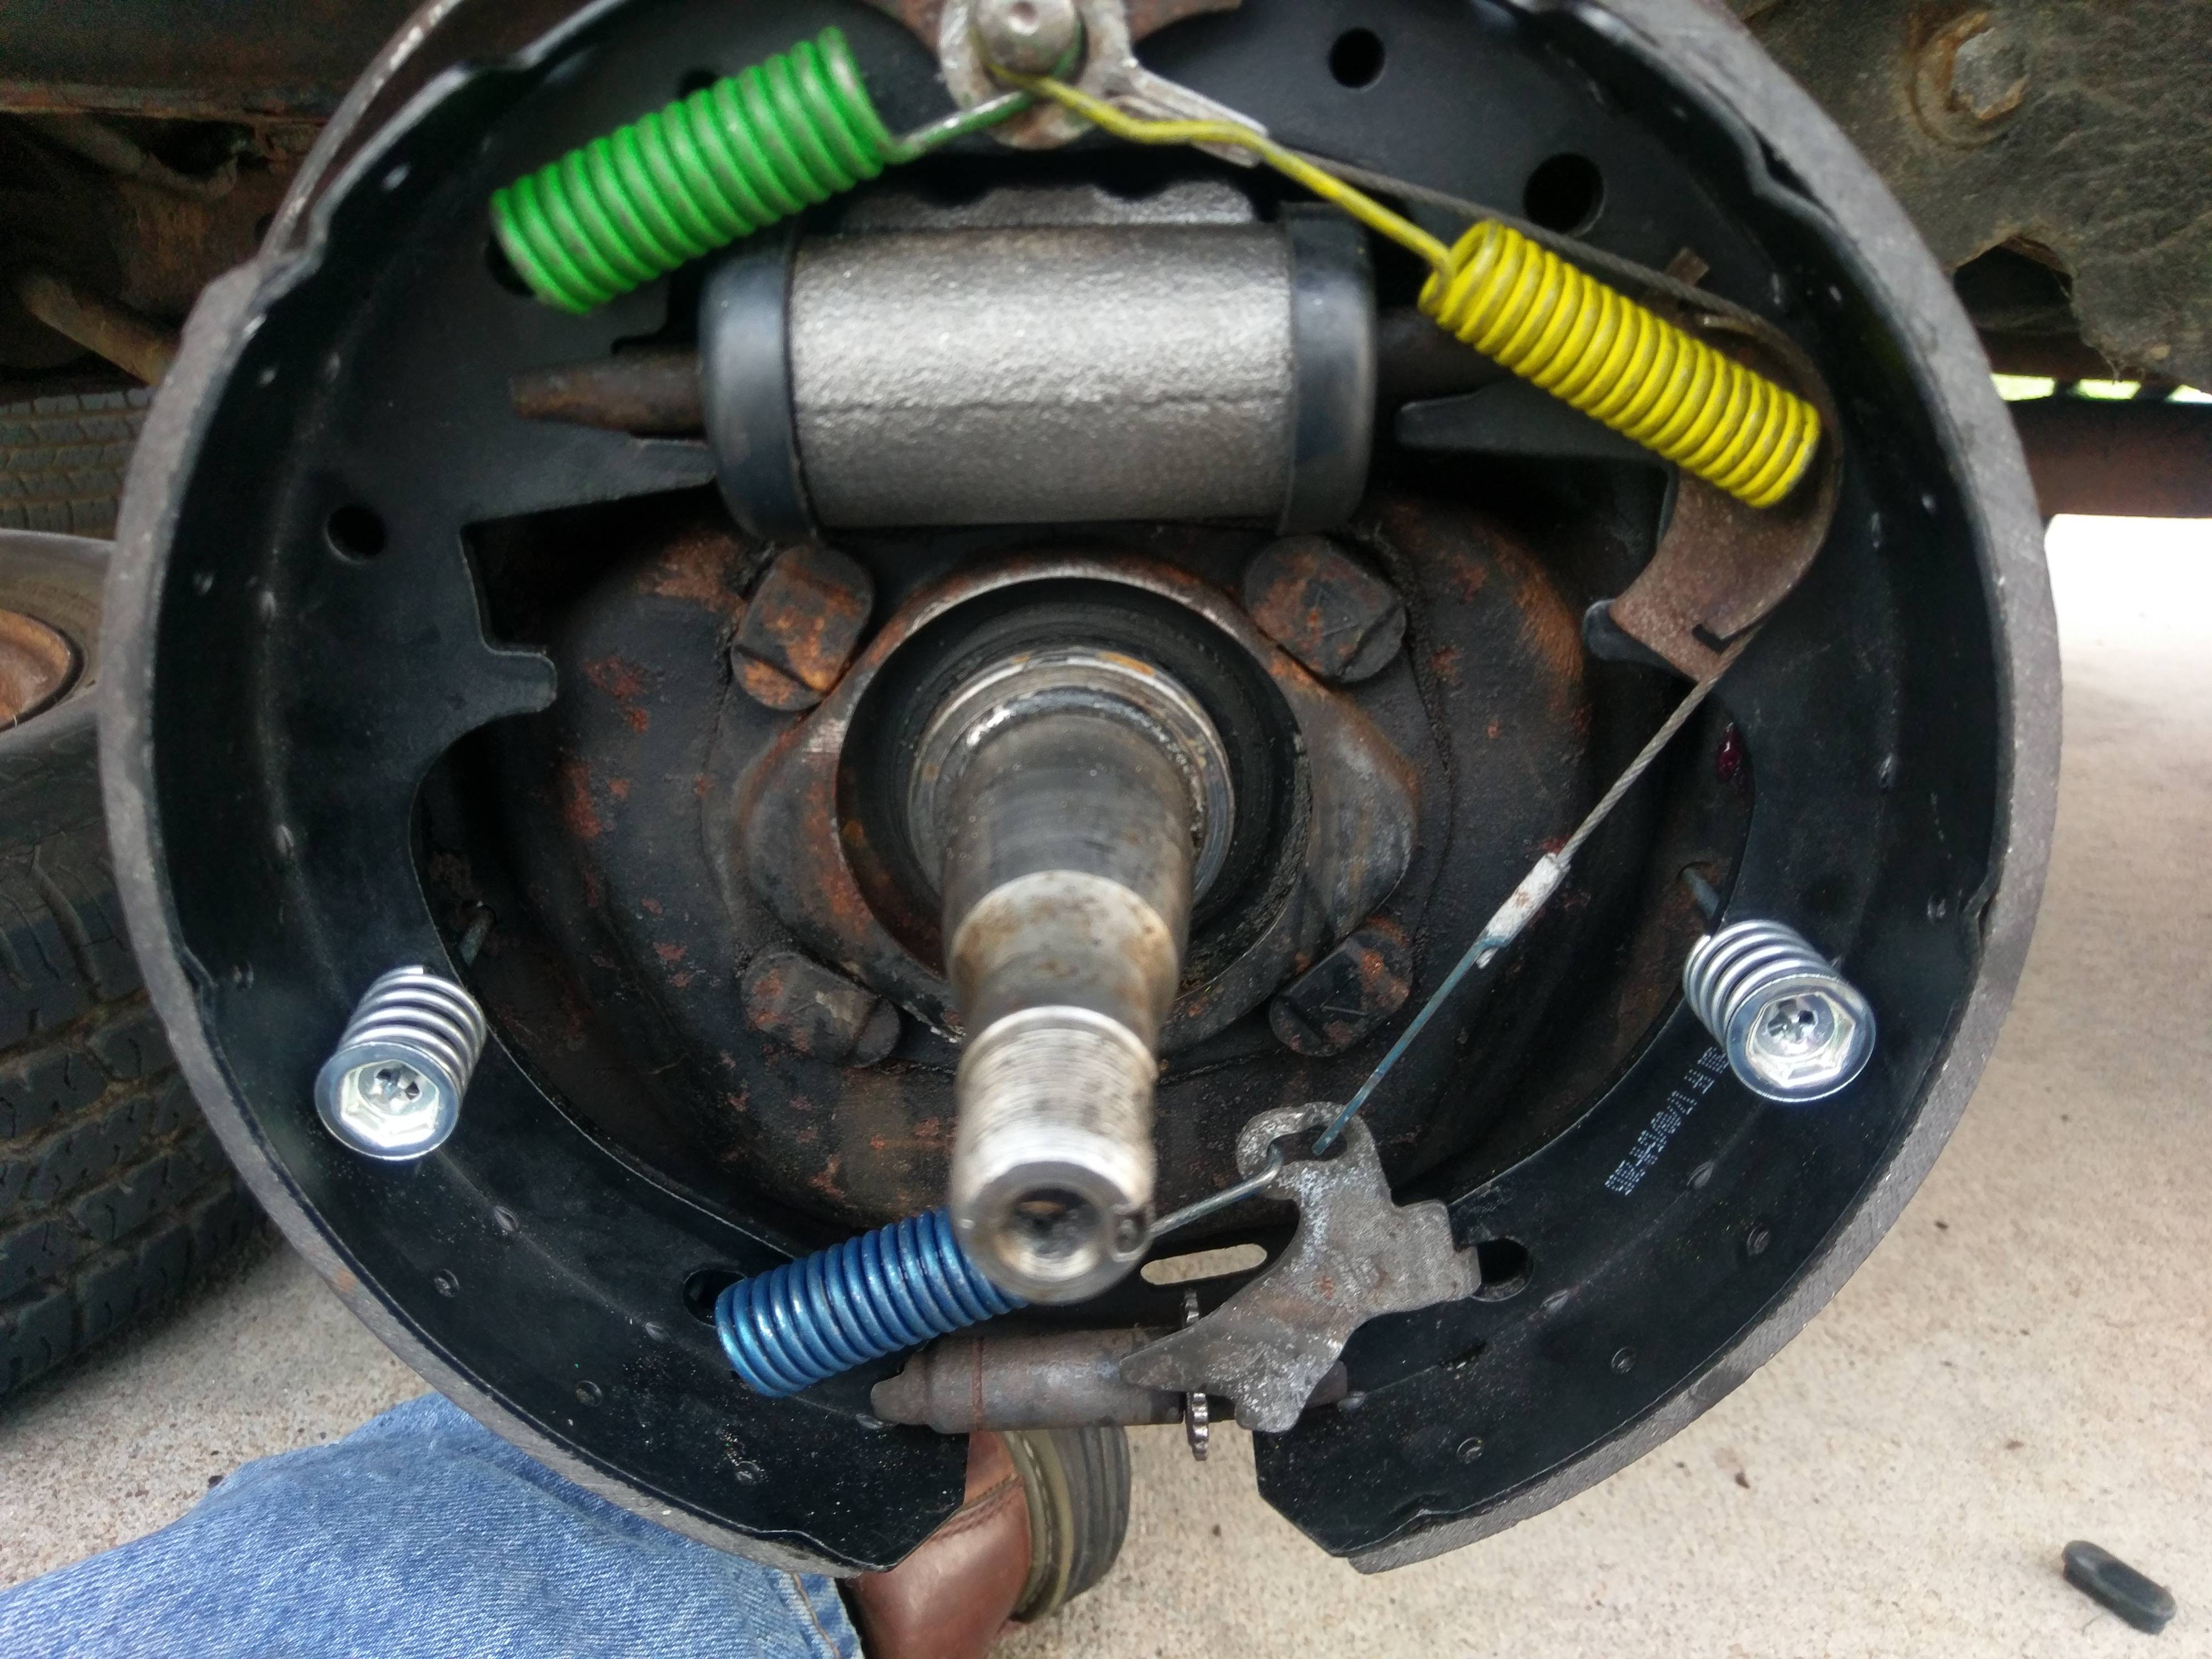
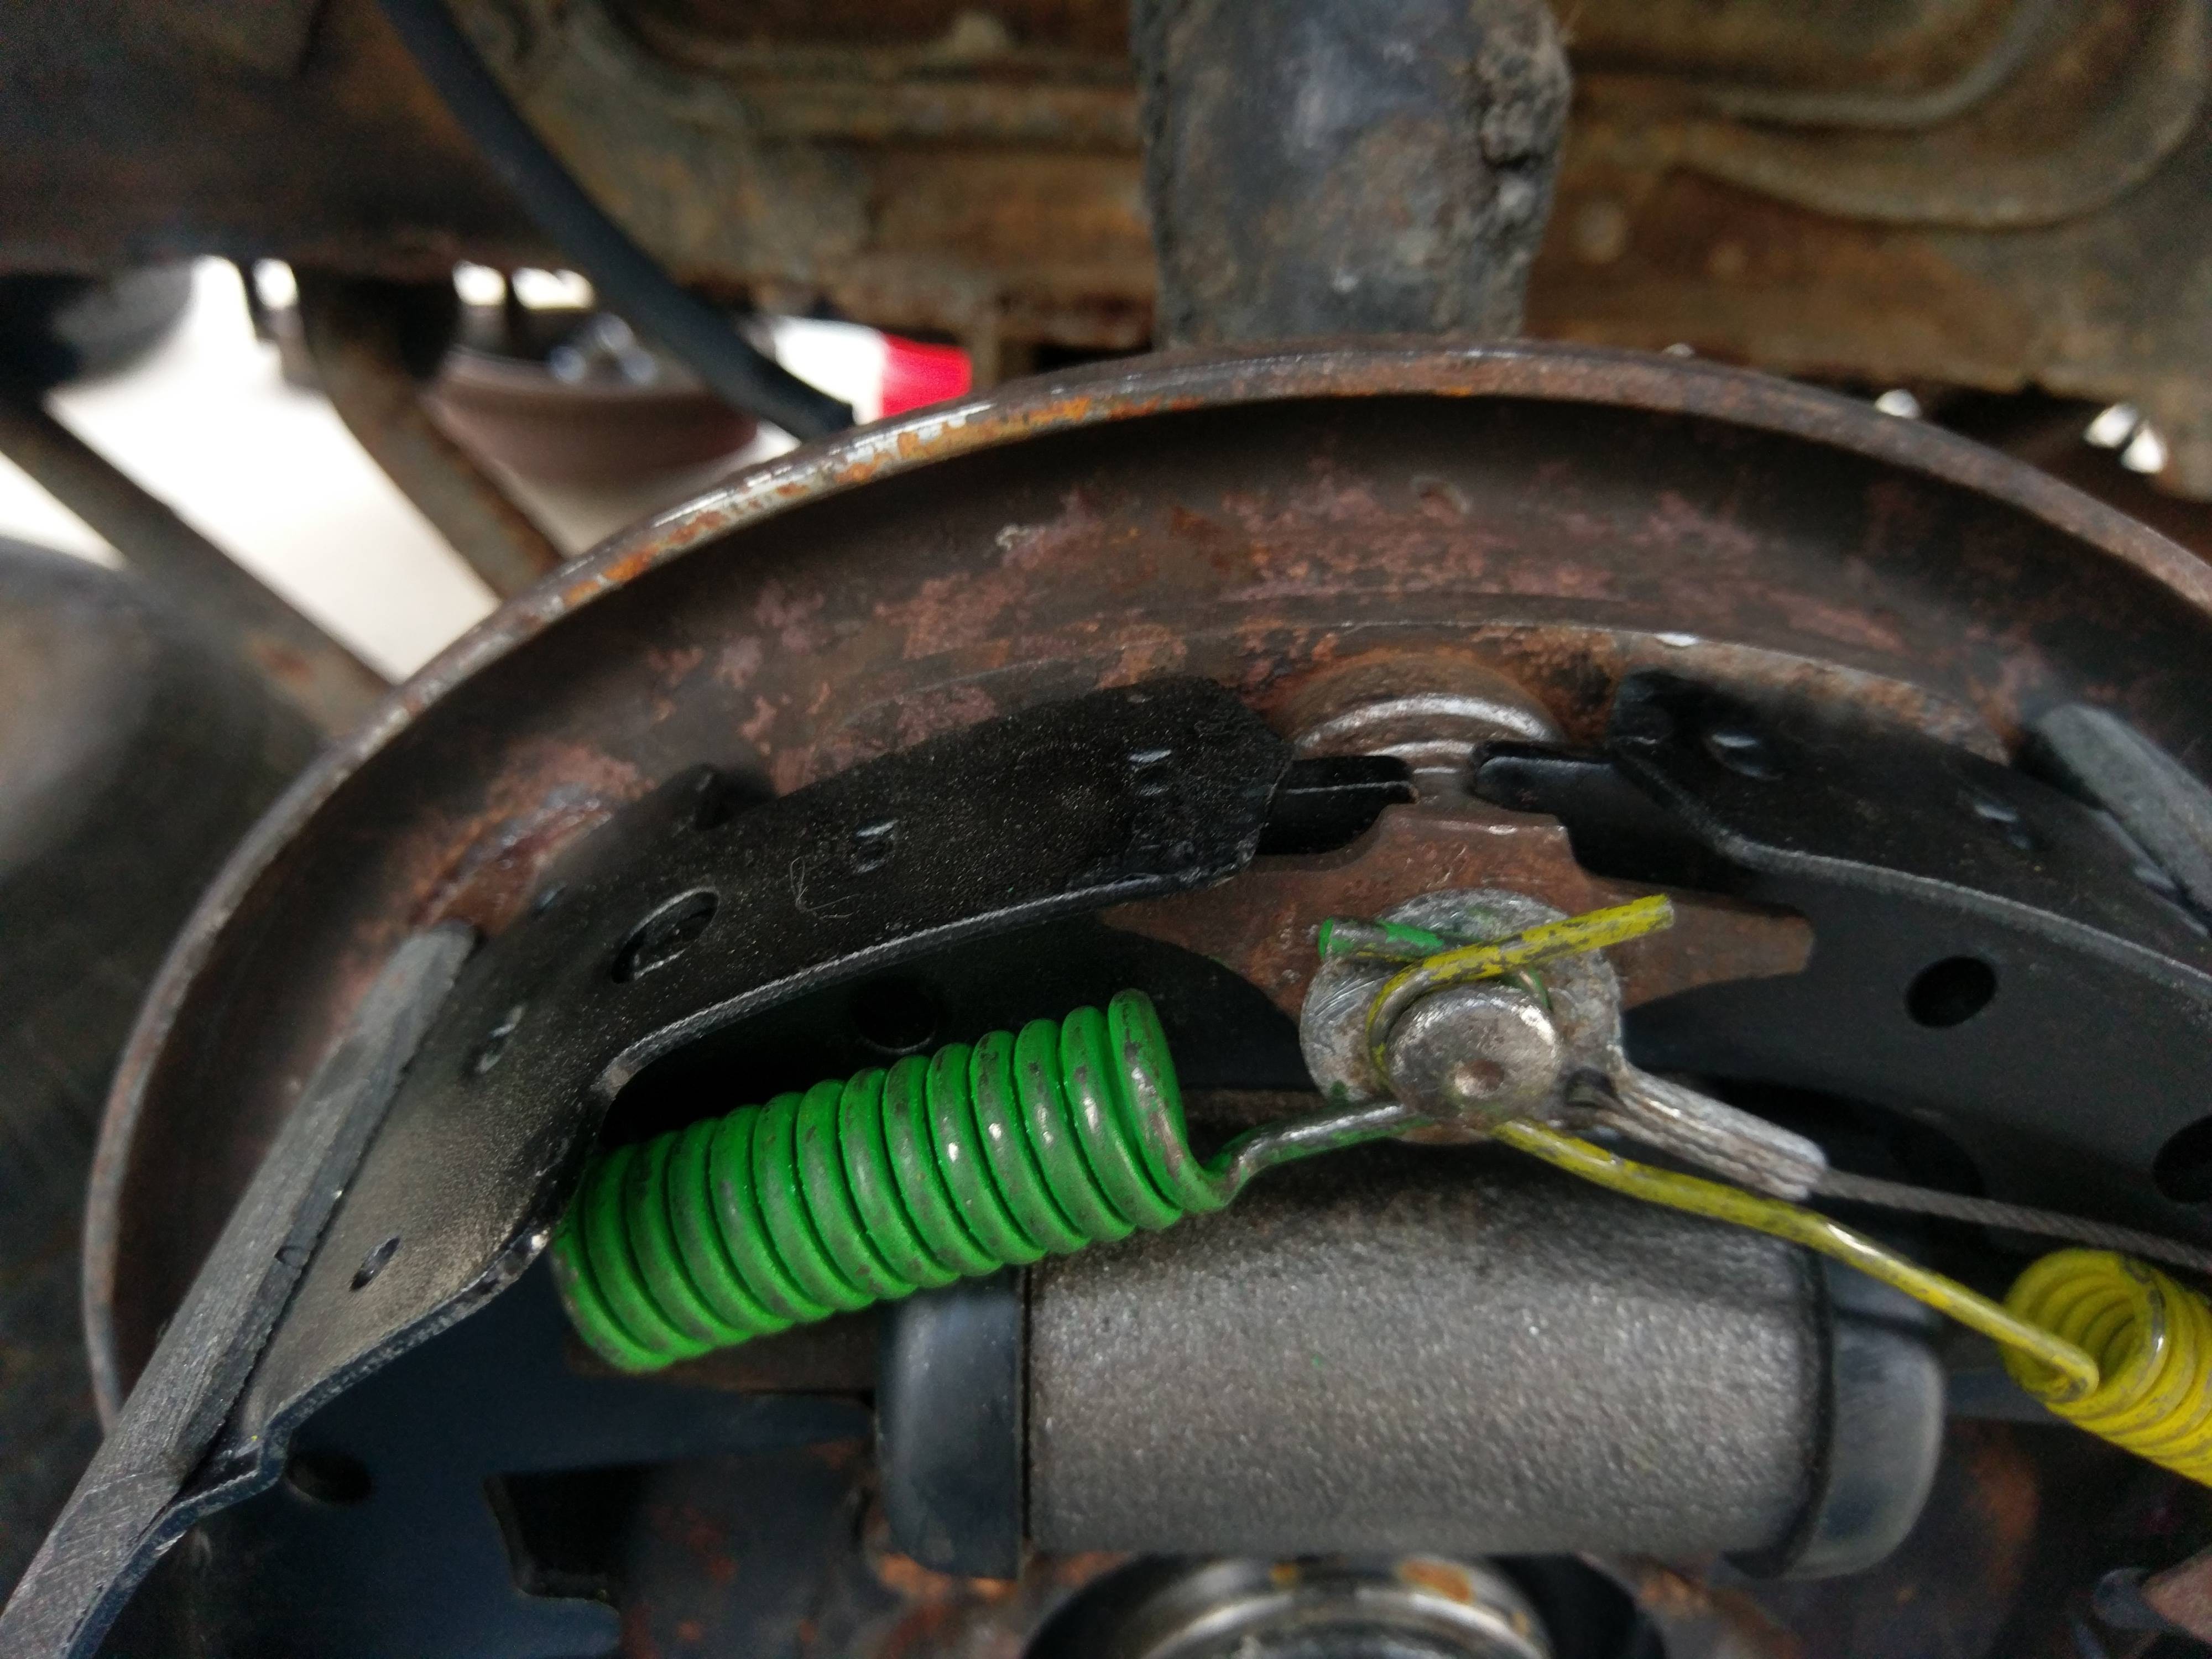
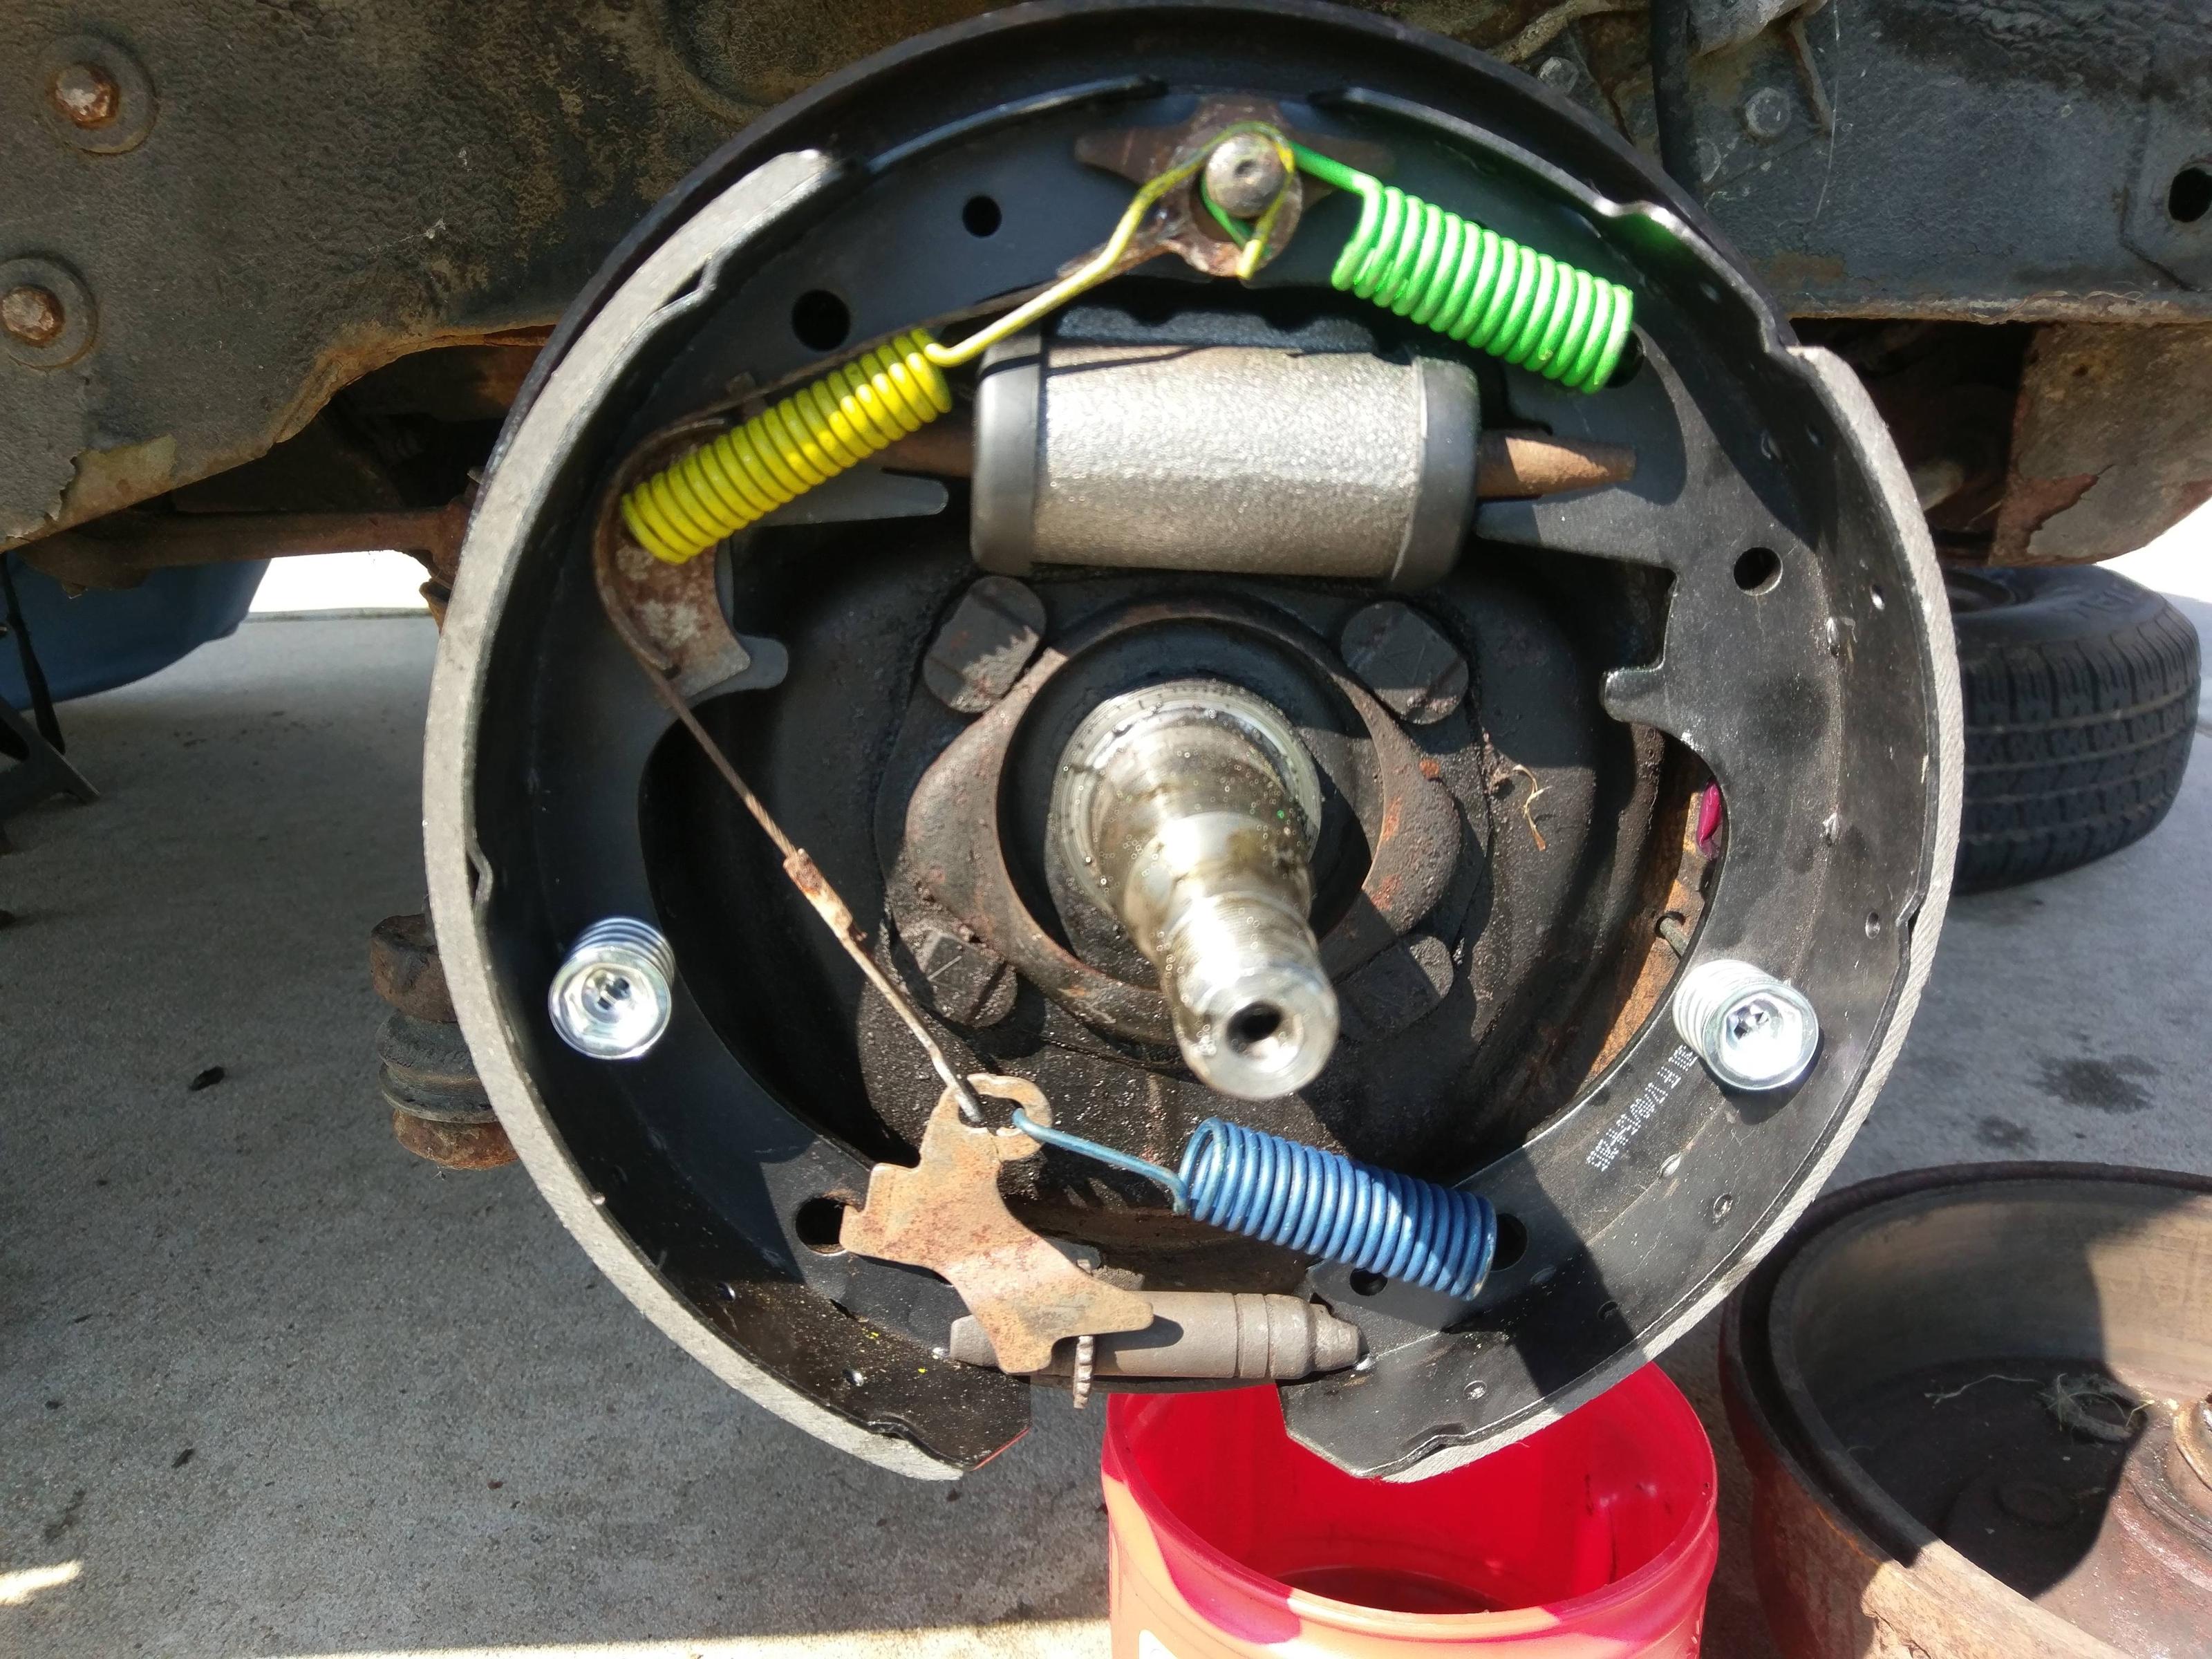
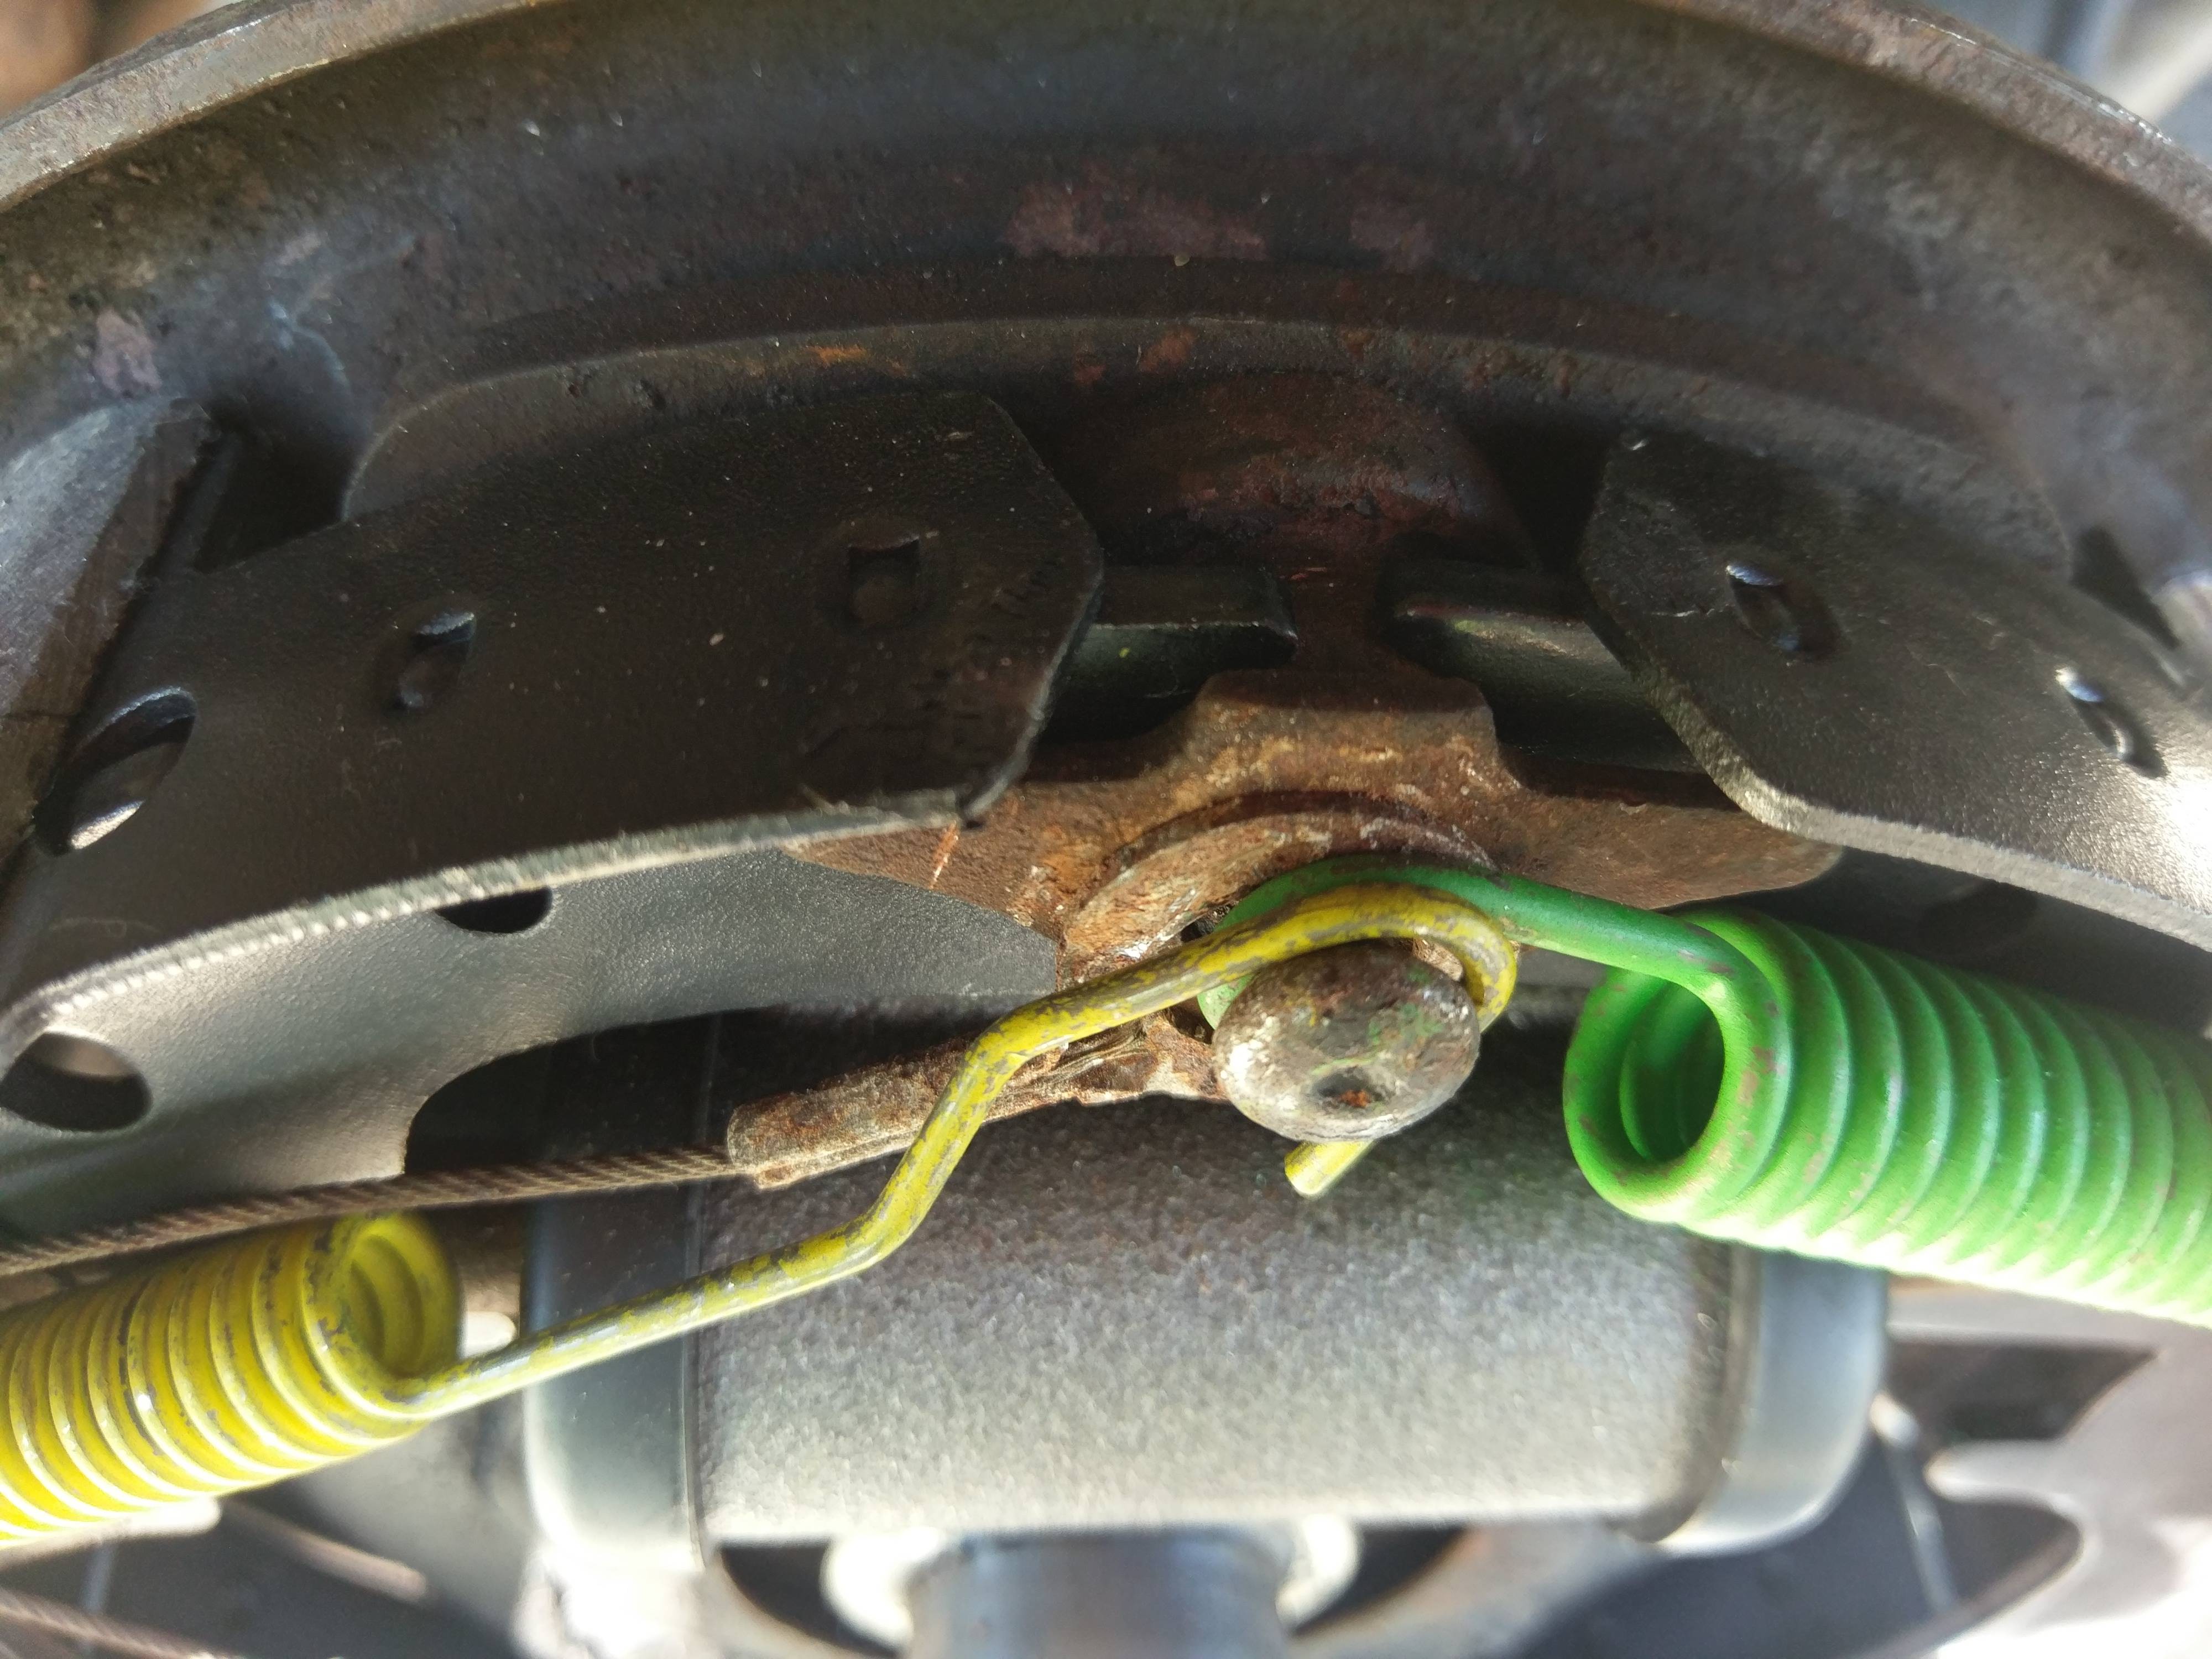
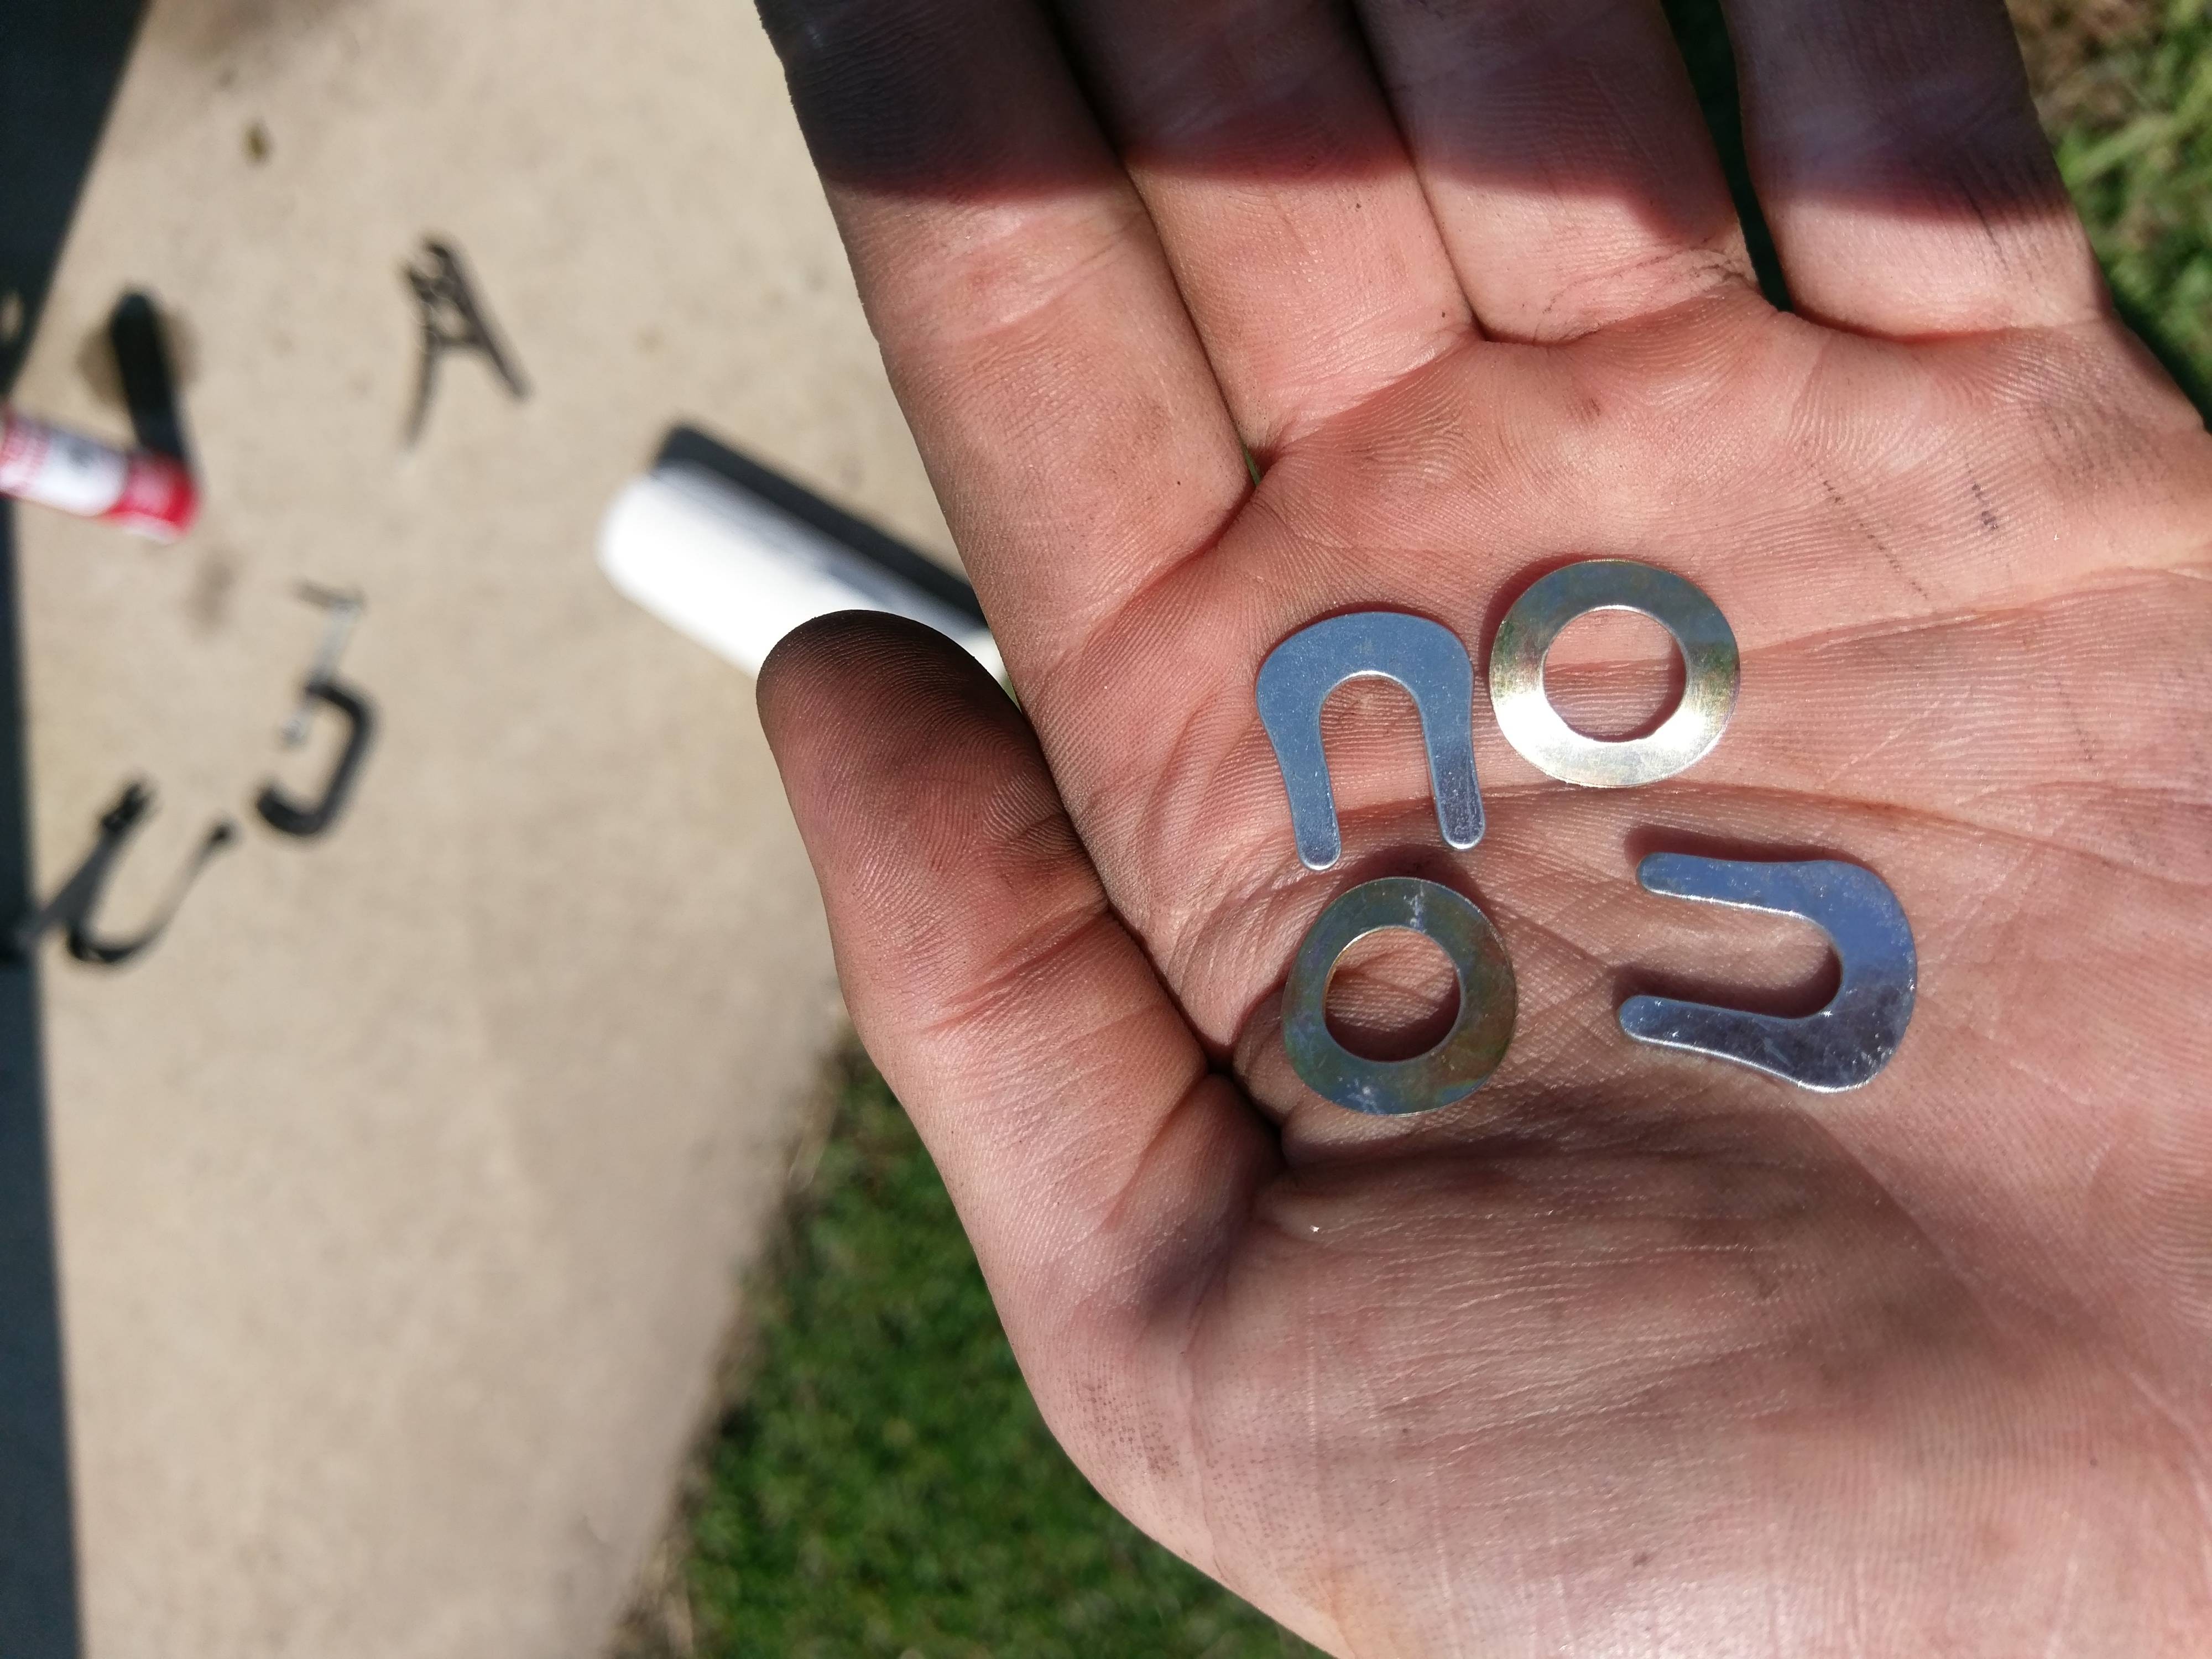
Also wondering what these are, they came in the brake hardware kit. Didn't pull anything like that off the front, so I'm guessing its for the rear? I will find out later I guess.
This is my first major project on the car and my first time really messing with brakes, so I also just wanted to see if everything looks good to yall.
So far I have the front done, and should be done with the rear today if the rain stays away.
Also wondering what these are, they came in the brake hardware kit. Didn't pull anything like that off the front, so I'm guessing its for the rear? I will find out later I guess.
They are for the parking brakeHopefully finishing up the replacement of pretty much everything on all four drums except the adjuster and backing plate.
This is my first major project on the car and my first time really messing with brakes, so I also just wanted to see if everything looks good to yall.
So far I have the front done, and should be done with the rear today if the rain stays away.
Also wondering what these are, they came in the brake hardware kit. Didn't pull anything like that off the front, so I'm guessing its for the rear? I will find out later I guess.
Eeew, front drum brakes...?
Fitted a new boot lock(The car came without a boot lock and used to use a screwdriver as a key)
Rubbed the front license plate bracket down, applied rattle can primer and then matt black and fitted new period correct(For the U.K) black metal license plate with pressed silver letters
Rubbed the front license plate bracket down, applied rattle can primer and then matt black and fitted new period correct(For the U.K) black metal license plate with pressed silver letters
- Joined
- Jul 6, 2015
- Messages
- 4,367
- Reaction score
- 217
- Location
- Iowa
- My Car
- 1973 Mustang Grande 351C 2v
Pulled the axels and third member. Going to drop it off next week at Quick Performance in Ames for a rebuild with a traclok and 3.70 gears. Should be a big difference from the worn out 2.75 open. Fluid was pretty black and burnt smelling and there was a ton of play (25+ degrees). Damn that was heavier than I thought pulling it laying on my back.

- Joined
- Jul 6, 2015
- Messages
- 4,367
- Reaction score
- 217
- Location
- Iowa
- My Car
- 1973 Mustang Grande 351C 2v
Is there a good way to determine if the axels seals and bearing are good or need replaced? They were not leaking and not making any noise prior to removal. Just done want to put back together and have to take back apart.
Hard to do other than the weight? I would like to swap gears and would rather remove the third member myself to save a couple hundred bucks.
- Joined
- Jan 7, 2015
- Messages
- 8,032
- Reaction score
- 526
- Location
- Western North Carolina
- My Car
- Multiple Mustangs!
They are cheap so if you don't know the age or condition replace them. Be sure to get some that knows how to press the new one's on if they do not press by the inner race can damage new bearing. They also need the correct clamp to go around the old bearing to prevent the thing from exploding. If you try to press off just using the outer race to support they can shatter and fly like a grenade.Is there a good way to determine if the axels seals and bearing are good or need replaced? They were not leaking and not making any noise prior to removal. Just done want to put back together and have to take back apart.
I have cut them off with torch just getting close to axle then toss in cold water and they will break and then fall off. The steel ring that goes on after the bearing is same way. If not experienced with torch don't do it. A good parts house should have a press.
A long piece of pipe that fits over the axle and hits only the inner race can be used in a jam to push the bearing and ring on.
- Joined
- Aug 14, 2014
- Messages
- 4,350
- Reaction score
- 1,394
- Location
- Madison, WI
- My Car
- 1971 Mach 1 w/408C stroker
To deal with the weight help yourself with a garage jack. Place it under the 3rd member and just use your hands to keep it centered in the jack. Once the member is on the jack let it drop.
I did it this way on my own and was not that hard. To install I followed the same idea but had to use my leg to pump the jack lever while keeping the member on the jack with my two hands.
Yes... it is very heavy and I imagine hard to do without a jack.
Just in case, I placed a couple wood blocks around the jack in case the 3rd member drops. I am glad I did because it dropped while it was going up. The blocks cushioned the drop.
Agree with the comment to replace the seals and bearings if you dont know age. They are cheap and then you know all is new.
1971 M-code Mach 1
Last edited by a moderator:
- Joined
- Jan 7, 2015
- Messages
- 8,032
- Reaction score
- 526
- Location
- Western North Carolina
- My Car
- Multiple Mustangs!
There is no problem with drum brakes just fade if used over and over under hard stops and do not shed water like a disc does so not good wet.They are for the parking brakeHopefully finishing up the replacement of pretty much everything on all four drums except the adjuster and backing plate.
This is my first major project on the car and my first time really messing with brakes, so I also just wanted to see if everything looks good to yall.
So far I have the front done, and should be done with the rear today if the rain stays away.
Also wondering what these are, they came in the brake hardware kit. Didn't pull anything like that off the front, so I'm guessing its for the rear? I will find out later I guess.
One thing that is overlooked on drum brakes by most is to have the linings ground to fit the drum diameter. A shop with brake lathe might still have one of the grinders to re arch the linings. You already have them on the car but if you had put them inside the drum you would see that they probably are not the same diameter as the drum unless both are new. Here is link to simplified diagram of what you get without the correct arch. https://www.bing.com/images/search?q=arc+grinding+brake+shoes&view=detailv2&id=B16EAEB3910824A4A613648BA8F412E12964F3BE&selectedindex=42&ccid=HJ5NaJ9f&simid=608027118106905906&thid=OIP.M1c9e4d689f5fa1850390fb115f171ed6o0&mode=overlay&first=1
You end up with just an inch or so of the lining actually hitting the drum surface and poor braking. If you have the correct arch you get full contact all around the brake drum and more surface contact than disc brakes can give. They will wear in some but takes a lot of time. If you drums have been turned they for sure should have re cut the arch on the linings. I have a AMMCO brake lathe but still looking for a use grinder for the shoes. It does take away some of the life of the lining but you will have much better brakes.
After you rough adjust the linings out until they barely touch the drum the go to a safe place and go in reverse and hit the brakes hard. As the linings rock in the backing plate it makes the self adjuster work and correctly adjust the brakes. Do this several times and they should be good to go. Again in a parking lot with room get up to say 35 mph and slam on the brakes going forward and if you have any brake locking up before other you might need to back off the adjuster some. You can have great brakes with drums that will stop straight and give good service. You will actually get better gas mileage with drum brakes since the disc brakes drag the pads all the time. There is no spring returns on a disc brake but the drum linings have the heavy springs that pull them off the drum surface so no drag. When qualifying in NASCAR they insert springs to hold the disc brake pads off the rotors to give just a little more speed.
One test I like to do before taking any old car out is sitting in the driveway press on the brakes with both feet applying all the pressure you can. If there is a weak place in a metal or rubber line in the brakes it will blow then instead of when you are coming up behind someone in a panic stop. The rubber hoses should be changed front and back if they are original. They break down inside and sometimes restrict the flow of fluid or could rupture. Since 1966 Ford has had the double reservoir in the master cylinder so if you blow one of the seals you will still have some brakes. With just the one like in 65 when it blows the pedal hits the floor and you better be reaching for the emergency brake.
Glad you are doing some of you own work I am sure you can do better than some of the garages I hear about.
CFrance729
Well-known member
- Joined
- Jul 31, 2016
- Messages
- 52
- Reaction score
- 0
- Location
- Carolina
- My Car
- 1973 Mustang Coupe, 302
1985 Buick Riviera
Yep, front drums.
It should do fine for now, it is only $400, give or take, to replace almost everything on all 4 corners, compared to upwards of $1k just for the front conversion. I plan to put discs on the front eventually, but its not priority.
Also, thanks for that information OMS and CMM.
The drums and shoes are both new, so I should be fine. I will keep it in mind though for when inevitably do more brake work on another car, probably my 85 Riv.
- Joined
- Jul 6, 2015
- Messages
- 4,367
- Reaction score
- 217
- Location
- Iowa
- My Car
- 1973 Mustang Grande 351C 2v
It is very easy. Remove the rear wheels. 4 bolts on each axel flange and pull the axels put. Remove the ten nuts around the third member break loose slowly to drain off the fluid. It is heavy but a jack is not necessary. It wasn't that bad to pull out and rotate to get around the mufflers and down while laying on my back.Hard to do other than the weight? I would like to swap gears and would rather remove the third member myself to save a couple hundred bucks.
Last edited by a moderator:
Sweet, Thanks.It is very easy. Remove the rear wheels. 4 bolts on each axel flange and pull the axels put. Remove the ten nuts around the third member break loose slowly to drain off the fluid. It is heavy but a jack is not necessary. It wasn't that bad to pull out and rotate to get around the mufflers and down while laying on my back.Hard to do other than the weight? I would like to swap gears and would rather remove the third member myself to save a couple hundred bucks.
Last edited by a moderator:
Put some illegal US license plates on my UK car. My car is eligible for black and white plates but the UK font is different, however most cops are in the 20s/30s and won't have a clue about old cars with B/W plates. So worth taking the risk!


- Joined
- Sep 2, 2012
- Messages
- 1,622
- Reaction score
- 222
- Location
- Blue Springs, MO
- My Car
- 1971 Mach 1, Grabber Blue w/Argent stripes. Original 2V 351C Auto, Tilt, rear defog, Black Comfortweave Interior. Under restoration. Original colors, 4V 351C, 4-Speed, Spoilers, Magnums, Ram Air. All Ford parts.
Tried to establish a selling price to end my pain!!!
Seriously I cleaned brake lamp contacts and replaced bulbs, disconnected the PMGR starter to avoid problems. Installed the power window relay on the Shock tower per the factory assembly manual, then controlled my temper as I found that the NEW brake proportioning valve from Scott Drake is leaking!!!!!
WTF!!!! I had my original leak, so I rebuilt with a kit only to have it leak, so I replace it with a brand new Scott Drake unit to avoid my assembly errors and the SOB Leaks on me. Right out that bottom bolt. Any suggestions??
kcmash
midlife
Shorts checker
- Joined
- Jan 24, 2012
- Messages
- 4,483
- Reaction score
- 1,253
- Location
- Tucson, AZ
- My Car
- No Mustangs at the moment.
Drink three stiff glasses of bourbon and call me in the morning.roflTried to establish a selling price to end my pain!!!
Seriously I cleaned brake lamp contacts and replaced bulbs, disconnected the PMGR starter to avoid problems. Installed the power window relay on the Shock tower per the factory assembly manual, then controlled my temper as I found that the NEW brake proportioning valve from Scott Drake is leaking!!!!!
WTF!!!! I had my original leak, so I rebuilt with a kit only to have it leak, so I replace it with a brand new Scott Drake unit to avoid my assembly errors and the SOB Leaks on me. Right out that bottom bolt. Any suggestions??
kcmash
- Joined
- Sep 2, 2012
- Messages
- 1,622
- Reaction score
- 222
- Location
- Blue Springs, MO
- My Car
- 1971 Mach 1, Grabber Blue w/Argent stripes. Original 2V 351C Auto, Tilt, rear defog, Black Comfortweave Interior. Under restoration. Original colors, 4V 351C, 4-Speed, Spoilers, Magnums, Ram Air. All Ford parts.
CRAP, I'm already on glass 6 and the alarm goes off at 5am sharp!Drink three stiff glasses of bourbon and call me in the morning.roflTried to establish a selling price to end my pain!!!
Seriously I cleaned brake lamp contacts and replaced bulbs, disconnected the PMGR starter to avoid problems. Installed the power window relay on the Shock tower per the factory assembly manual, then controlled my temper as I found that the NEW brake proportioning valve from Scott Drake is leaking!!!!!
WTF!!!! I had my original leak, so I rebuilt with a kit only to have it leak, so I replace it with a brand new Scott Drake unit to avoid my assembly errors and the SOB Leaks on me. Right out that bottom bolt. Any suggestions??
kcmash
midlife
Shorts checker
- Joined
- Jan 24, 2012
- Messages
- 4,483
- Reaction score
- 1,253
- Location
- Tucson, AZ
- My Car
- No Mustangs at the moment.
I meant drink three or even more until you're unable to place a call.
Similar threads
- Replies
- 591
- Views
- 61K
- Replies
- 45
- Views
- 9K